Photoshop Elements Scene Cleaner
Since I am new to Photoshop Elements, I was surprised by the accolades Elements is receiving for their PhotoMerge capabilities, especially Scene Cleaner. It is something that cannot be done nearly as easily in Photoshop CS5 but has been in Elements since version 7. (For Photoshop CS5 people, Mike Hale’s Stack Mode Panel at Russell Brown’s website does have a panel that can be added to do this very thing.)
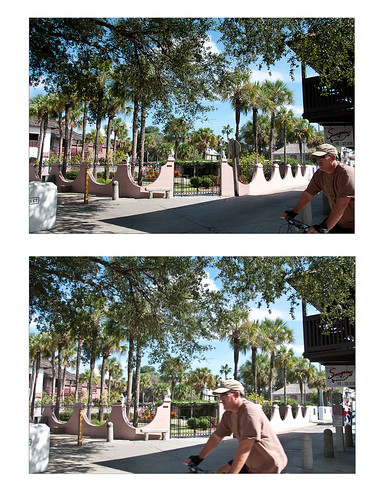
The image above is of a street corner in St. Augustine, Florida. Both the Scene Cleaner and the Saturated Slide Show effect were applied to this image. Here is how this was done:

1. For Scene Cleaner there must be at least two shots of the same image with the moving objects in different positions. In this case, it was the guy on the bicycle that road into my view while I was photographing. If lots of tourists are in your image, you will need several shots which you probably will have anyway if you shoot in bursts like most people do, especially if using a DSLR camera. If not, remember to do this when taking a picture of a famous place with lots of people around – this technique will save your picture!
2. Open Photoshop Elements and adjust all images at once in Adobe Camera Raw, trying to get their exposures as close as possible. (See my Tidbits Blog “Adobe Camera Raw – Not So Obvious in Photoshop Elements 10” on how to do this.) Click Open Image button and open all images up into Photoshop Elements. Do the adjustments this way so you do not have a bunch of layers to merge down before doing the next step.
3. Make sure the Project Bin at bottom is open (double click on the words Project Bin to toggle between open and closed) so all three images show up in it.
4. Go to Edit tab on right and select Guided, then PhotoMerge section, and finally Scene Cleaner. The program is now aligning the images. One of the images will appear in the left image box called the Source.
5. Need to look at all your images and decide which one is exposed the best for the final image. In the bin click and drag this image into the right Final image location. In the case above, the bottom image was used as the Final image and top image was the Source image. If more images had been available, different images can be changed out as the source image by just clicking on each one in the bottom bin.
6. Select a Source image that has an area cleared of any object or tourist that is ruining the other image. Select the pencil tool and set the brush size to about 35 pixels. This is key to getting this to work – Paint roughly in the Source image in the area where you think the interfering object is in the Final image – the object magically disappears in the other Final image. It may not be a perfect removal, but it does a pretty good job! A second image can be selected as a Source and marked up to remove other problem areas in the Final if needed. If you get lost, follow the Guide notes – they even have some advanced tips. The Show Regions box can be checked to see how each image is affecting the final result. Click Done to apply.
7. Use Crop Tool to cut away any mismatched white areas around Final image.
8. The image above still showed a bit of a hand. Therefore a Clone Layer was added and the hand blended out.
9. For the concrete shadow color issue (can see the different colors between the two images used above), the Lasso Tool was used to select the bad colored cement and it was placed on its own layer (with selection active, click CTRL+J). A Hue/Saturation Adjustment Layer was opened and the Colorize box was checked (these settings were set: Hue 210, Saturation 14, and Lightness -28) to match the cements.
10. The final step involved going to Edit -> Guided -> Saturated Slide Show Effect. It was applied 6 times to get the over-saturated look I liked.
This sounds like it was hard to do, but in reality it was really simple. The biggest issue is getting two or more shots that have different enough views to be able to remove the moving objects. Everyone says the Scene Cleaner is really a great addition and personally I wish they had it in Photoshop CS5. It has been fun learning a new technique in Elements. Give it a try!…..Digital Lady Syd


Leave a Reply
You must be logged in to post a comment.