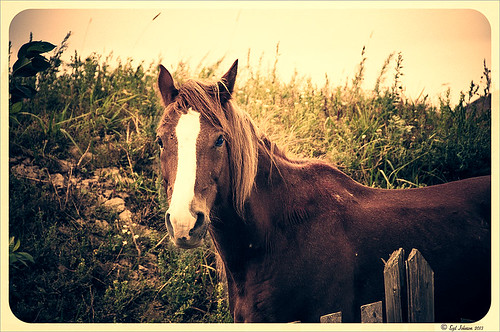
Meeting a Belarusian Horse!

This beautiful horse was in a field outside an old wooden windmill in Belarus. I had forgotten I had taken his pix. Since I did a blog called Can You Get a Painting Look With a Photoshop Action? Jack Davis Can!, this image was processed in Lightroom using his Wow! Antique 03 preset, which included the framing. Check out my other blog for downloading info of his Lightroom presets. The image was taken into Photoshop and the Burn and Dodge Tools were used directly on a duplicate copy of the background. I would never have tried this if I had not watched a short video on Lynda.com called Black and White with Lightroom and Photoshop by Bryan Hughes O’Neill, Adobe Photoshop Senior Product Manager who really knows what all the sliders do in these programs. It was very interesting and I learned to use these tools. The main thing to remember is to keep Protect Tones checked. With the Dodge Tool set to Shadows at 50% Exposure, the horses eyes were painted over to make them pop. Burning Tool was used to separate his face from the field using Midtones and Highlights selected. A New Layer was created for the Sharpen Tool – therefore be sure to check Sample All Layers and Protect Detail in Options Bar. The Strength was set to 12% and the effect was built up slowly where sharpening needed to be added. It does not introduce a lot of artifacts this way. A Curves Adjustment Layer was added on top and dragged down in image to get a little more contrast. That was all that was done to get this lovely effect. What a beautiful creature!…..Digital Lady Syd
Digital Lady Syd Related Blogs:
Using Old Wallpaper for a Vintage Look
My Favorite Adobe Lightroom 5 Features
Elements & CS5 Friday: Adding a Texture for a Totally New Look to an Image
Friday blogs are going to be for Adobe Photoshop Elements along with some techniques crossing over with Adobe Photoshop CS5. I realize there is a huge group of digital fanatics out there using the quite capable little sister to CS5. So let’s start.
 |
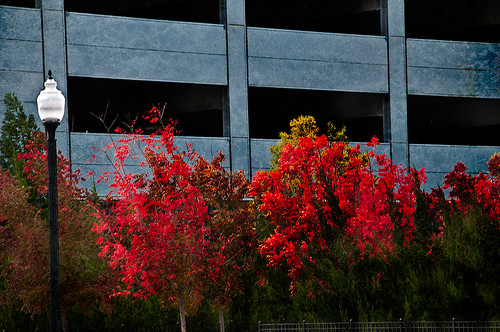
Unfortunately these beautiful trees are in a very run-down part of the city and located in front of a parking garage. I guess my point is that just because something is not in a gorgeous settng, it can make a really nice image with just a little effort. Hover over the image to see what the original image looked like.
To achieve this nice effect, all that was done is to add an interesting texture image as a layer on top of your basic picture. In this case, a really grungy looking texture creates this wonderful effect on the building and in the tree colors. This free texture is from Shadowhouse Creations and is called You’d Be Surprised – download it here. This is one of the best texture sites I have found on the internet – beautiful textures all for free!
Here are the steps required to create this look:
1. Open your image in Photoshop Elements (or CS5).
2. Clean up any areas that need to be touched up using the Clone Stamp Tool or Content Aware Healing Brush.
3. Go to File -> Open and navigate to the downloaded texture, in this case You’d Be Surprised, to open in Elements (or CS5) as a separate image.
4. Select image (CTRL + A), copy (CTRL + C) and then go to the original image and paste (CTRL +V) into the file which now puts the new image on top of your image. Close the texture image without saving.
5. Since the texture is probably too small to cover your image, we will use a Free Transform (CTRL+T) to expand the image – just drag the corners out to completely cover the original layer underneath.
6. Change the texture layer to Overlay Blend Mode at the top of the Layers Panel (click on down arrow to the right of Normal).
7. (Optional Step) If certain areas would look better without the texture, highlight this layer and click the Add a Mask icon (2nd icon over from left at bottom of the Layers Panel). This adds a white layer mask – click on it in the Layers Panel and paint with a black soft brush set to 50% opacity. Paint into areas you do not want the texture affecting.
For this image, the lamppost and light were painted out in black along with a little bit of the red leaves in the trees to increase the color range in the leaves, and some of the dark green bushes to add some lighter highlights for interest.
8. (Optional Step) To sharpen parts of the image to make certain areas stand out, click on the Create a New Layer icon (1st icon at the bottom of the Layers Panel and 6th icon from left for CS5). Select the Sharpen Tool (it is nested with the Blur Tool and Smudge Tool – 3rd icon from the bottom on the Tool Bar or 11 from bottom for CS5) and leave the top options set to the default settings except check Sample All Layers. On this new layer, with a soft edged brush paint over the objects you want to sharpen – since the brush is set to a default Strength of 50%, go over the object a few times to build up a really sharp effect. Watch out for artifacts if too much is applied. The nice thing is, since this sharpening is on its own layer, it can be deleted and started over or the opacity can be reduced if too much is added.
In the image above, just the lamppost and light and a few of the top red and yellow leaves were sharpened.
You are done! And this texture creates a very beautiful look. Look at some of the other images Shadowhouse Creations used with this texture at the download site link above.
Well I hope you enjoyed this blog – I did. I love working with textures and this workflow can be used over and over again to achieve some beautiful results using any texture. Have Fun Creating!…..Digital Lady Syd


