Infinity Light Fun!
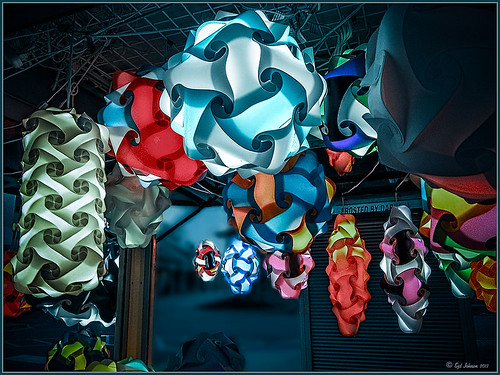
The beautiful colored “Infinity Lights” were on display at the local St. Augustine Outlet Mall in Florida. You can actually check them out at Facebook@Happy Pappys Glowing Balls. They are quite striking at night!
This was really easy to process – actually took the image with my little point and shoot camera. Just did regular adjustments in Lightroom before going into Photoshop. First Topaz (see sidebar for website link) Detail 3 was used – applied Overall Detail Medium II with a Lt. Blue Sky Tone filter selected. (Did you know that Detail now has filters for each section? If you click on the upper right corner of each section, there is a drop-down with all kinds of presets for all the sections. For example, the Tone section has presets for Lt. Blue Sky, Lt. Contrast, Lt. Foliage, Dk. Bl. Sky, Dk. Foliage, Brighter I and II, Darker I and II, Med Contrast, High Contrast, and Skin Brightening I and II. This was added to their recent 3.1 upgrade – definitely download this if you have the plug-in and did not do this.) A New Layer was created and a stop sign removed in the background. A composite of the image was created (CTRL+ALT+SHIFT+E) was placed on top and a Gaussian Blur filter set to a Radius of 22 applied. A black layer mask was added and the background area was painted in white to keep the blur in those areas. The last step involved adding OnOne’s (see sidebar for website link) Perfect Effects 4 PhotoTone Cooler preset was applied, which added a little bit of a bluish tone to the total image. This preset was part of free download from OnOne if you own Perfect Effects 4 – they are from their original PhotoTunes program from many years ago. The last step involved adding my free SJ Thin Double Edged Frame with colors from image. I wish I had a good place to put a few of these really interesting lights. They are so pretty!…..Digital Lady Syd
More Border Fun!
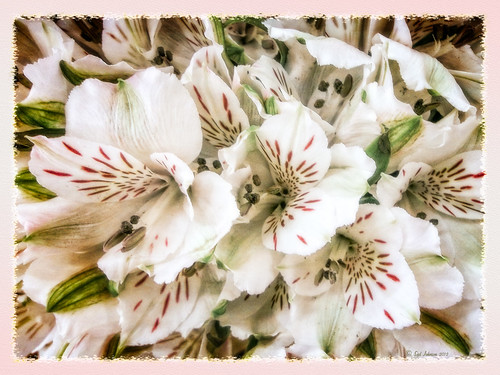 Creating the Border: Completed this border using a tutorial I learned from PhotoshopLayers.com called Photographic Edges in Photoshop. It is basically a very simple process and uses the Photoshop Sprayed Strokes Brush Stroke Filter to create the border. I changed the settings and maxed out the Stroke Length to 20, the Spray Radius to 25, and Stroke Direction to Horizontal to get a more pronounced edge. Then the frame was saved down as png file. This was done using my the little known Script called Save Layers to File. (See my blog How To Make Frames or Borders on how to do this.) To use this new border easily on other pictures, just drag it into your document. Use a Solid Color Adjustment Layer to change the color of the frame. In this case, I changed it to a light pink, then used a Layer Style to add a soft gradient, a white texture, and Outer Glow. Using a Layer Style on borders can create a very subtle but nice effect.
Creating the Image: These Alestroemeria flowers were actually captured at the local grocery store with my little point-and-shoot Kodak camera. Not much processing was required. I followed the Lightroom processing steps from my blog How to Use Adobe Camera Raw (ACR) or Lightroom 4 Quickly. In Photoshop I applied OnOne Perfect Effects (see sidebar for website link) stacking Tonal Contrast, Rice Paper Light Texture, and Hollywood Glow at 50% opacity. A Curves Adjustment Layer was added to add back just a little overall contrast. A composite was created on top (CTRL+ALT+SHIFT+E) and duplicated. The top layer was set to Multiply Blend Mode and on a layer mask using a large soft black brush at 100% opacity, one dot was placed on where I wanted people to look first. Next the border .png was placed on top with a Solid Color Adjustment Layer set to light pink. Finally a Layer Style was added to the border using a light pink to pink Gradient Overlay (Blend Mode Normal, Opacity 48%, Linear Style, Angle 81 degrees, and Scale of 150%), Pattern Overlay (Blend Mode Normal, Opacity 66%, Pattern set to Normal Blend Mode, Opacity 66%, Pattern from Photoshop’s Watercolor Patterns – bockingford_rough at Scale 55%), and an Outer Glow set to its default settings.
Try creating this border – it really easy and fun to make!…..Digital Lady Syd
A Little OnOne Perfect Effects Vintage Look
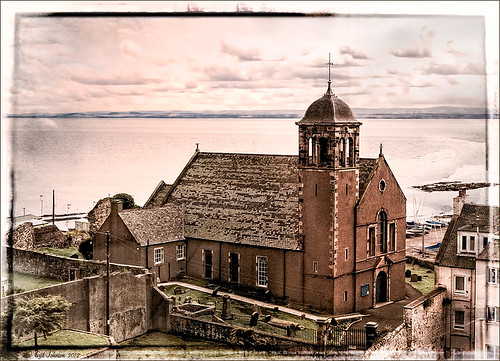
This beautiful Scottish Church was taken from a train going from Edinburgh to St. Andrews. This is a wonderful way to capture some of the countryside. I am surprised how sharp this image was since the train was moving – my settings using a 18-200mm Nikon lens were F/13, 1/200 sec, ISO 400 using a 45 mm lens. For post-processing, the first thing done was to create three Virtual Copies in Lightroom and set them at different exposure settings – one to about -2, one using the original, and one set to +1. This is a way to get an HDR look using a single image. The first two where then taken individually into Topaz DeNoise 5 (see sidebar for website link) and adjusted for noise issues. The +1 just used a little adjustment in Lightroom since the over-exposed image did not have a lot of noise. All three images were then selected in Lightroom and right-clicked to get menu – Open In -> Merge to HDR in Photoshop. That is how the bottom layer was created. Next by applying OnOne Perfect Effects (see sidebar for website link), the image took on a great look. This plug-in can do interesting things to images – usually when I just can’t put my finger on what I need for a photo, Perfect Effects has a solution. This image uses these filters presets stacked: Black and White->Warm Gray with colors swapped in Effects Options, Detail->Texture Booster, and Borders->Russell with Scale set to 4 in Effect Options. Back in Photoshop Nik’s Viveza 2 was applied to add a little soft color in the sky, sharpen the cupola, and add a little brightness to the front of the church. Then Topaz DeNoise 5 was applied one more time to get rid of some noise created by the plug-in application – this time it was targeted to the sky and water using an Overall Strength setting of .11, and for the lighter areas, Adjust Highlights set to .28. Recover Detail was set to .30 and Reduced Blur to .13. This sounds like it was a lot of effort, but it really was very quick to apply. The hardest part was adjusting the noise in the three virtual copies in Lightroom. …..Digital Lady Syd
Digital Lady Syd Related Blogs:
Can a Pseudo HDR Image be as Good as the Real Thing? (Part One)
Can a Pseudo HDR Image be as Good as the Real Thing? (Part Two)
OnOne’s Perfect Effect Landscape Tips
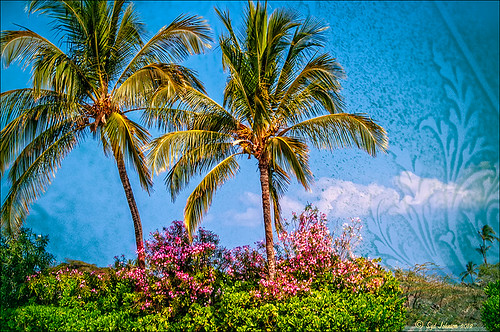
This week I used one of OnOne’s quick video tips for their Perfect Photo Suite 6 (see sidebar for website link) called “Bring Out the Most Detail Out of Your Landscape” (need to go to the 12/21/11 video to find) where they give you some great settings for a starting point to adjusting your landscape images in Perfect Effect and Focal Point. These beautiful trees were growing on the Big Island in Hawaii. Only Perfect Effects was applied to this image and the Red color range in the Color Enhancer effect to bring out the pink in the flowers. I got a little over the top with the frame, but I liked the effect so I used it – it is PhotoFrame Taufer Texture 07 in darkish green at 61% opacity. If you have Perfect Photo Suite 6, or just Perfect Effects, check out this video and the numerous others that are listed. I have been learning lots by going through them – much better than reading the manuals. Thanks OnOne!…..Digital Lady Syd
Digital Lady Syd Related Blogs:
Another OnOne Perfect Effects Pix-Got To Love It!
Digital Lady Syd’s Review of OnOne Perfect Effects
Pseudo HDR in OnOne Perfect Effects
First Try – OnOne’s Perfect Effects 3!
I love OnOne’s PhotoFrames (see sideboard to access OnOne’s site) – not sure anyone can beat this plug-in for its versatility and choices for adding borders onto an image. I use this plug-in probably 90% of the time. It surprised me how handy it is and how much I use it.
That said, I have not been as big a fan of PhotoTools 2.6 – still a very versatile plug-in but it was a lot harder for me to use than PhotoFrames. Therefore I did not use it near as much as many of the other plug-ins I have covered here in my Tidbits Blog and in my Fun Photoshop Blog. I have been waiting anxiously for the newer version of PhotoTools to be release and it is finally here in the form of a new name – Perfect Effects 3 – and interface. The whole suite of plug-ins (which these are two of the plug-ins in the Suite) has been re-engineered into an interface that can be opened from one place in the new OnOne Perfect Photo Suite 6.0.
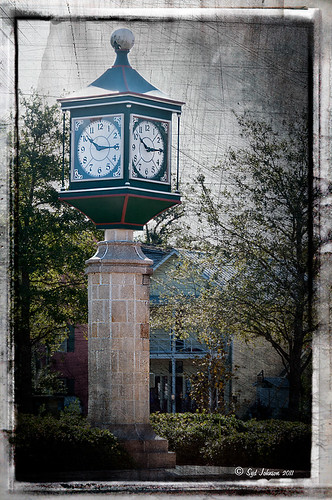
The above image is of a beautiful clock in the historic district of St. Augustine. Not much was done with the sliders – I was just trying out the interface and getting around. This image has three effects stacked in this order: Texturizer section – Itchy preset; Vignette section – Grunge Vignette Dark; and Borders – Russell preset. Before applying the first preset, the clock was masked with the Masking Brush (Show Mask set to Overlay and Painting Mode to Paint Out) so the texture would not cover it.
It is nice to see some interesting borders included with this plug-in. The interface is improved but I still am learning how to get around it completely yet. I have just done a longer review at my Fun Photoshop Blog “Digital Lady Syd’s Review of OnOne Perfect Effects.” Download a trial version yourself – there is a 30-day fully functional trial period. Have fun experimenting…..Digital Lady Syd
Related Digital Lady Syd’s Blogs:
Same Image-Different Plug-in
Adding a Texture for Flair!
Dual Tone Plug-in Comparison

