Seasons Greetings from Me and My Cat Sophie!
Sophie and I are wishing you a wonderful Holiday Time. She is my fairly new member of my household – she found us in September at the Flagler Humane Society, who rescued her from some terrible accident where she lost her tail. Still healing from the wound, but she is a real trouper and doing well. And I have to give major cu-does to the Shelter employees – the staff is a fabulous group of people that work very hard to help orphaned pets. If you are looking for a pet, go check out your local Society. You will not regret it – I know we don’t!
And about Sophie – she is roughly 3 years old and I think she is part Chartreux since she has the beautiful amber eyes and gray tones on her fur. She talks to me all day – not loud meowing, just sort of gurgles. I always feel bad when I am not sure what she is trying to say. We have a lot of fun. I am trying to teach her to walk on the treadmill with me, but so far she is reluctant! Merry Christmas!!!!!…..Digital Lady Syd
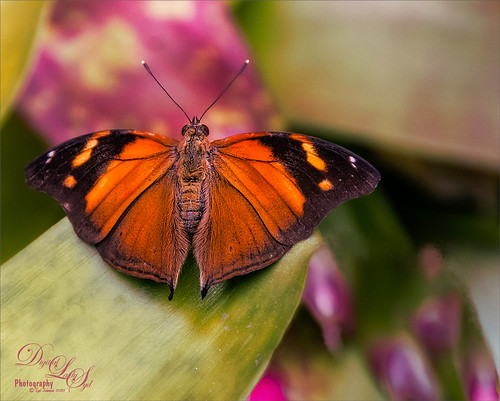
The Beautiful Autumn Leaf Butterfly
Just another one of the beautiful butterflies at the Florida Museum Butterfly Rainforest in Gainesville, Florida. This is a really fun place to visit if you are in the area and it open now. Just did my basic post work – a little Luminar 4 and Viveza, some painting, a Blake Rudis sharpening action, and a Blake Rudis Dodge and Burn action. I really enjoy post processing these butterflies……Digital Lady Syd
Practice Makes Perfect
This image is from ISO Republic and is one of my favorites for practicing new Photoshop techniques. This time I decided use Topaz (see sidebar for website link) Studio 2 using some of the best filters from this program. I created a Studio Look a while back called “SJ BW to Painted Color Look” (for settings see my How to Convert Black and White Images to Colorful Paintings with Topaz Studio 2 blog) which was applied. On top the Color Theme filter was added and setting it to the Lighten blend mode and changing the third swatch to color #1c1c1e with Lightness set to 0.12. Color Theme filter is a great way to adjust one of the colors in the image without changing everything and one of the best filters in the Studio program. I also used Luminar 4 to add in the Sunray effect and a Color Lookup called Seattle. The font is called Garlic with both a regular and outline version stacked on top. Sure was fun to play in one of my favorite Photoshop plugins!…..Digital Lady Syd
My Favorite Lemur
This guy is my favorite Lemur – a Coquerel’s Sifaka Lemur – at the Jacksonville Zoo. Definitely a very friendly male who is always glad to say “Hi” when you come by his exhibit. Luminar 4 (see sidebar for website link) was used on the image and of course Viveza. I love working on the beautiful animal images from this Zoo…..Digital Lady Syd
Enjoying a Covered Patio

Had some fun with the beautiful lighting of this covered patio at The Garlic Restaurant in New Smyrna, Florida. Lots of nice tables outside to enjoy a refreshment before the evening arrives. This image was a bit hard to post-process due to the lighting issues. Luminar 4 was used to get the rich colors (I find this Photoshop plugin is great for this – see sidebar for website link) and Viveza was able to draw the focus to the correct areas. A few Adjustment Layers to lighten and darken some parts of the image and that was about it. Wish I lived closer to this place – a great place to have dinner!…..Digital Lady Syd
Standing Guard at the Hospital
This image was taken a while back of the Spanish Military Hospital Museum in St. Augustine, Florida. What I was trying to do was get an interesting texture on the building. This was done using one of my very favorite Photoshop plugins, Luminar 4 (see sidebar for website link). By following one of their fun videos on YouTube called Create an Antique Faded Look by Darlene Hildebrandt, the effect was created. The Essentials Color filter, Creative Matte Look filter, and the Professional Split Toning (Amount 50 and Shadows Hue 56 and Sat 60) were applied to get the antique effect. Then Lucis Pro 6.09 (which appears to be no long available unfortunately) was used to get really cool color wash look. Just a lot of fun. ….. Digital Lady Syd
New Guinea Singing Dog – Singing?

This was one of the cutest animals I have ever seen in a zoo – this one at the Palm Beach Zoo – seemed totally happy. He also had a buddy running around outside his doghouse. Just used a lot of different filters here – Topaz DeNoise AI (this filter is getting really good!), Luminar 4 (this program is becoming my go-to plugin for cleaning up an image – it is incredible) (see sidebar for website link), and an Exposure Adjustment Layer for the eyes. And then several individual layers were used to just clean up some of the edges of his face, muzzle and ears using an erodible brush by Aaron Blaise. That was it!…..Digital Lady Syd
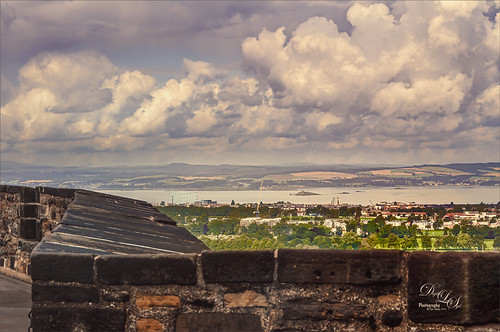
What a Beautiful View!

This is an image taken a while back at Edinburgh Castle in Scotland – missing not having any gorgeous landscape images to take like this one. Hard to believe these clouds were so dramatic! Not much done on this photo – just some LR basic processing, then in PS, Topaz (see sidebar for the website link) Denoise AI was used. Next a little Luminar (see sidebar for website link) and finished off with Viveza. All my favorite plugins!…..Digital Lady Syd
The Beautiful Queen Emma Entertains a Visitor
Yes, since I am stuck at home, I decided to practice some of my macro photography by starting with one of my favorite subjects, a Queen Emma plant in my front yard. This beauty had a beetle of which I have no idea what kind it is, tromping around, but it did not seem to be hurting the blossom. There is also a photo-bombing ant – oh, my! I will keep an eye on the Queen from now on. Not much was done with this image other than using a profile in Lightroom called Artistic 02 at an Amount of 76 and a little sharpening on the beetle with the Adjustment Brush. In PS the file was duplicated and Luminar 4 was opened to sharpen up the beetle a little more – just used the AI Enhance Tool at 50%, and Structure on and Detail Enhance Tools on just the beetle, using a mask to do this. Used Viveza 2 to really adjust the color and lighting in the final image. That was it. What an intriguing visitor…..Digital Lady Syd
A Happy Giant Otter
I love it when I go to a zoo and the animals seem happy. The Giant Otter exhibit at the Jacksonville Zoo is one area where the all the otters seems so happy and were totally enjoying themselves. A great place to relax and just watch them while at this Zoo. It is very hard to photograph these fast moving animals, but if you are persistent, a good image can be achieved. Not a lot was done on this image but there was a lot of reflective glare from the water spectral highlights. That is why I decided to use Topaz (see sidebar for website link) Studio 2’s Impression – applied a preset created by Jai Johnson (a fabulous wildlife photographer and texture creator) called Just Paint Hummingbird Scene. (Check out her Artistry Beyond the Camera Episode 1 video for settings – she uses Topaz photoFXlab software, but the Topaz Impression settings are the same.) I made a few changes to the strokes in the Impression filter. Back in Photoshop opened up Luminar Flex – like it to sharpen when Topaz Sharpen AI does not work. Their Detail, Clarity, Structure and Microstructure filters are terrific for this. (These are the same filters as Luminar 4 – see sidebar for website link.) A little line clean up and a free Rain Overlay (from Book Cover Mockup Rain Overlay by Design Cuts) was added at Screen blend mode at 56% layer opacity. A Levels Adjustment Layer was used to add contrast. That was it. What a cute little fellow!…..Digital Lady Syd
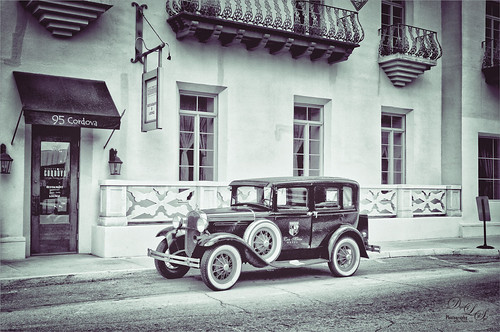
The Old 1929 Ford Model A Car

Just posting a quick blog of an antique car that is usually parked outside the Cordova Hotel (now the Casa Monica Hotel) cc 1888 in St. Augustine, Florida. Lots of fun adding an old feel to the image. After watching Unmesh Dinda’s video called 4 Luminar EXCLUSIVE Effects Photoshop Can’t Create!, I decided to use my similar image and try out the technique. From Lightroom Luminar 4 (see sidebar for website link) was opened and his steps were followed. The LUT used is from the Street Look set called 60’s B&W preset. In Photoshop used On1 (see sidebar for website link) as a plugin to add Cross Processing filter using Yellow Strong and Vintage filter using Earth – all filters were set to Opacity 59%. Now the image had a more yellow/green look so in PS a Color Adjustment Layer was added to get more of a dark purple and cyan feel. A Levels Adjustment Layer was used to adjust the overall brightness of the image. Last step was to add a subtle vignette. I love doing vintage look images. …..Digital Lady Syd
The Dome at Flagler College

I have tried to post process this image before without a lot of success. That was until I ran across an older video by the Photoshop Guru Unmesh Dinda where he used Luminar 2018 on a very similar image. I could not believe how great the details came out so I thought I would share the technique. The video is called 4 Luminar EXCLUSIVE Effects Photoshop Can’t Create and the effect used here is called Image Radiance. The image was taken in St. Augustine at the main entrance to Flagler College, aka the old Hotel Ponce de Leon built in 1890 by Henry Flagler. The dome stands 3 stories high and is still quite spectacular. The effect can be done easily with Luminar (see sidebar for website link) Flex but is much harder with Luminar 4. Here are the filters and settings used for the above – you can see the issue with Luminar 4 not having all the filters/sliders: Dramatic: Amount 39, Contrast 95, Local Contrast 69, Brightness -88, and Sat -42; Highlights/Shadows: Highlights -80 and Shadows 63 (for Lum 4-look in Light filter for sliders); Sharpening: Amount 89, Radius 50, Masking 35, and Dehalo 50 (for Lum 4-look in Details Enhancer – all but the Dehalo sliders are found in Advanced Settings); Image Radiance Amount 14, Smoothness 100, Brightness 29, Shadows 79, Warmth 19, and Sat -70 (for Lum 4 there is a Glow setting but no Shadow or Saturation slider) ; Microstructure: Amount 90 and Softness 50 (for Lum 4 there is not Microstructure filter-possibly AI Structure would work); and added Details Enhancer: Small 41, Medium 35, and Large 21. I also used Topaz (see sidebar for website link) Sharpen AI at the start using the Stabilize mode, Remove Blur 0.90 and Suppress Noise 0.30 – the best sharpening filter around.
Hope this post helped you a little, especially if you are working with the new Luminar 4 – Luminar 3 did have all the filters and sliders still. Have a great day!…..Digital Lady Syd


