Five Image Template Creates Beautiful Collection!

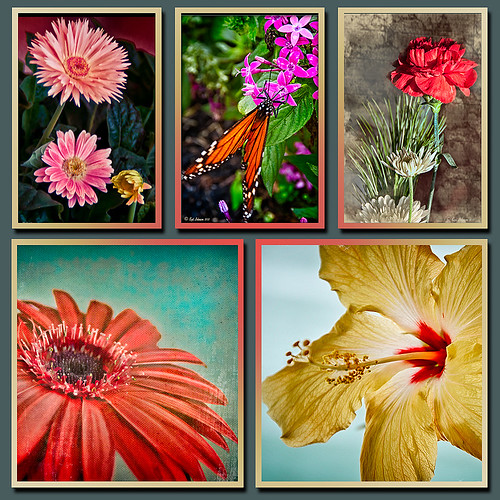
I have not been following all my favorite websites like I should. There is one I had not visited in quite a long time so I checked in. The CoffeeShop Blog was offering this wonderful Web Storyboard 6 for 5 pictures as a free download so I thought I would give it a try. I was really pleased with the final result. Her template is very easy to use – just clip (highlight image and go to Layer -> Create Clipping Mask) the each image you bring into the Photoshop file she provides to the location you want. Use Free Transform to adjust the size to fit. The background color was changed by clicking on the Background Color layer thumbnail and choosing whatever color you want. On the Frames layer, a Gradient Overlay Layer Style was added and reversed using Muted Gradient Muted 5 from Graphix1 set with a Radial Style, angle set to 90 degrees, and Scale set to 149% to get the pretty reddish gold colors on the frames.
Both The CoffeeShop Blog and Graphix1 websites offer some of the best free resources for the Photoshop fanatic like me. Take a minute to check out their websites – both have great blogs too (just click on their Home buttons).
It is really fun to put a collection of your images together! Give it a try!….Digital Lady Syd
Digital Lady Syd’s Free Christmas Card Template

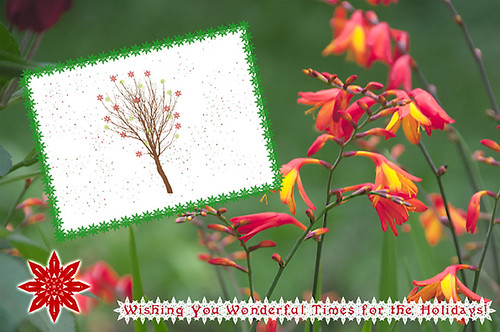
I have been wanting to create a versatile card template that could easily be used with your own images and background. Here is what I have come up with for a basic template for any kind of card. (Download at bottom.) It is set to 8 1/2 inches X 5 1/2 inches, one of the standard sizes for cards (and fits an 8 1/2 inch X 11 inch sheet). On the above image, the kids picture is one of mine that I scanned – it turned out pretty nice considering how old it is. The beautiful bokeh-like background is from ibJennyjenny Magical textures set 3, texture 3 with a Hue/Saturation Adjustment layer added to make color more greenish. I love the Christmas Toy Train font (look at the text file to learn how to use it if you download it) – it replaced the Fantaisie Artistique font in the template.
The file below is exactly how the card should look when using the downloaded template (with my images added). The one above has the “Place Your Photo Above” layer and the “Frame Snowflake 6…” layers turned 90 degrees. This is where the flexibility is – almost all elements can be swapped out and changed and you still have the basic template to follow.

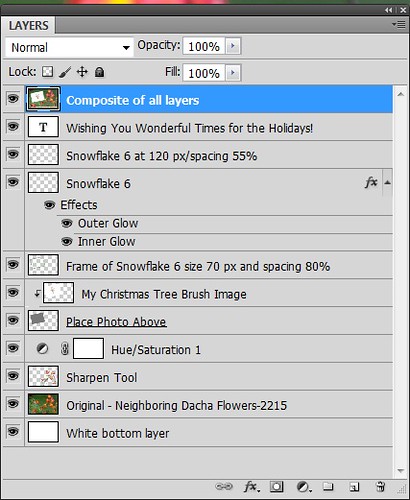
To help you understand how to use the layers, below is a copy of the Layers Panel for the downloaded Basic Template and on the right is the Layers Panel for the image above to show you how it was created.


The type font can be easily changed by highlighting the type layer and double-clicking on the T icon to activate the editing mode for the layer. (The template and the above photo both use my favorite free font Fantaisie Artistique – when you open the template, if you do not have this font on your computer, one from your hard drive will be substituted or download this one, right click on the file and load to your computer.) Layer styles can be added to all the layers, like the Snowflake 6 brush (from Design by Firg’s Snowflake Shape Pack) layer with the White Inner Glow and Outer Glow. Firg’s Snowflake Shape Pack is not free but now are for sale. To try a different option download Obsidian Dawn’s free Snowflakes Photoshop Custom Shapes. All the snowflakes used in this image are the same brush. Need to give credit to the people who create these wonderful free resources on the internet: the tree image was created using a Winter Tree brush by Mels Brushes, Gorjuss Snowflake brushes for tree branches, and Snow Drops brush by FROSTBO for the pretty colored small snowflakes.
……

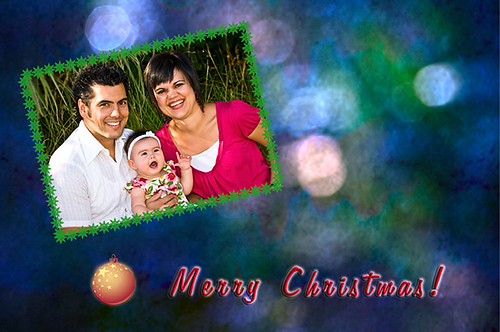
This image uses exactly the same template with a generic free family image (downloaded from stock.xchng). The Bitstream font is Freehand 575 BT. The same background is used from ibJennyjenny Magical textures set 3, texture 3, as used as above. The ornament is from Photoshop Free Brushes Christmas Balls set – painted a yellow ball on a layer, painted it in, then changed colors and painted it in a reddish color on top to make the design show through.
****DOWNLOAD LINK TO MY BASIC HOLIDAY CARD TEMPLATE****
To create the inside page, just turn off the photo image layers, make your text larger and create a little saying. Friday I will do a short example for my Photoshop Elements friends as this template works fine for this program also also. Have fun using the template and Happy Holidays!…..Digital Lady Syd
Digital Lady Syd’s Related Blogs:
Digital Lady Syd’s Free Christmas Card Template Using Photoshop Elements
Free Christmas Card Templates-Part 2
Free Christmas Card Vectors and Brushes
Some Holiday Cheer
Some Free Christmas Overlays to Spice Up Your Christmas Cards


