Happy New Years!

Happy New Years to everyone. I posted this image earlier today and thought I would give you the info on how to create it. The flowers are two of my red gerberas from my back porch that decided to burst forward on the New Years weekend. They are a little crazy looking as I keep moving them into the house when it gets cold and outside again when it warms up! Anyway, here are the steps in a nutshell! After initial processing and cropping in Lightroom, Topaz (see sidebar for website link) Detail 3’s Medium Detail II preset was applied. Next Isabelle Lafrance free Christmas Lights overlay was applied for the bokeh effect. I just used a soft black brush on a layer mask to bring the red gerberas back into the image. Next I applied my free SJ Snow 2 Slight Blur Overlay and added a Pattern Overlay. In another document I opened up my free Smudge Texture and changed the colors to reds, greens and yellows – saved it down as a new pattern (Edit -> Define as a Pattern). Then on the Snow Overlay layer, I created a layer style using the Pattern Overlay and selected my new pattern set to 33% scale – this gives the colored confetti look. I duplicated the layer and Free Transformed it (CTRL+T) – selected Flip Vertical so the colored snow on this layer lines up differently. The bottle is from Mel’s Happy New Years Brushes with a Bevel & Emboss layer style applied along with the fizz. The font is Orial with a Stroke, Inner Glow and Outer Glow layer style added. The last step was a Curves Adjustment Layer to add some contrast. Lots of fun to play with all these effects! Hope everyone has a chance to play in Photoshop and try out some of these fun techniques!…..Digital Lady Syd
01/01/2013 | Categories: Just Being Creative | Tags: Colored Confetti, Create Confetti in Photoshop, Detail, Free Overlays, overlay, Pattern Layer Style, Snow Overlay, Topaz Detail 3 | Leave A Comment »
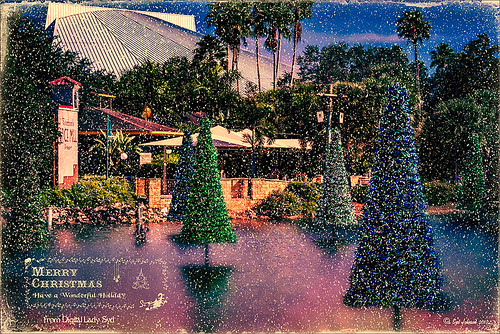
Christmas at SeaWorld Orlando

These “floating” trees were in the pond area at SeaWorld Orlando in October and they looked really strange. I decided to spruce them up a bit and give them that holiday feel – these must have been the first decorations they put up. I have said it before and I will say it again – whenever I cannot figure out something interesting to do with an image, OnOne’s (see website link on sidebar) Perfect Effects usually has the answer. In this case two effects were stacked: Nicely Toasted preset from the Vintage group – set to Hard Light at 74% opacity and Warm Vintage also from the Vintage Group with a few changes to Brightness (-45), Contrast (-40), and Darken Blend Mode with Strength 58. A Composite Channel Curve was set (In157/Out 138). My free Snow1 Overlay was added along with my free Merry Christmas PNG Overlay using an Outer Glow layer style set to a bluish color (Blend Mode Normal, Opacity 39%, Spread 8%, and Size 215 px) – use this trick to to make your text and overlays stand out if on a busy background. Added text layer for my name, and added French Kiss Glorious Grunge Edging Only with the grunge erased from the middle. All of these overlays used a Solid Color Adjustment Layer set to a soft cream color sampled from the roof of the building. (Layer -> New Fill Color -> Solid Color and check Use Previous Layer to Create Clipping Mask for each overlay). The text layer used the same color. A Curves Adjustment Layer was added and the mask filled with black – with a 30% opacity white soft brush, the areas I wanted affected were painted back in the mask. That was it. Hope you can use a few of these tricks to make some nice cards…..Digital Lady Syd
Digital Lady Syd Related Blogs:
Where to Find Those Cool Free Christmas Card Templates?
Free Christmas Card Vectors and Brushes
Beautiful Christmas Flowers
Some Free Christmas Overlays to Spice Up Your Christmas Cards
12/18/2012 | Categories: Photoshop Filters | Tags: Free Overlays, French Kiss Textures, OnOne Perfect Effects, overlays, Perfect Effects, plug-in, plug-ins, plugin, SeaWorld, SeaWorld Orlando | Leave A Comment »


