Digital Lady Syd’s Free Christmas Card Template Using Photoshop Elements

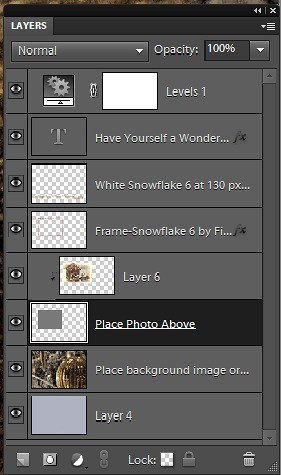
This template was processed completely in Photoshop Elements. Same steps as with the regular Photoshop program. Open up your other image(s), CTRL+A to select the whole image, and CTRL+C to copy the image. (These are both images I took last Christmas.) Switch to the template file, highlight the layer(s) that indicates where the photo(s) should be placed, and press CTRL+V to place the image above that layer. Then use the Move Tool to scale, rotate, and move the image(s) to place it. The Background Image layer was changed to 73% opacity. That’s it. Below is an image of the layers as they appear in the finished image above.

Note the Text Layer has a 1 pixel Stroke layer style set to Black and Outside. The Frame Layer has an Outer Glow layer style set to Blend Mode Screen at 75% opacity and Size 16 pixels to make the frame stand out a little. To find the Layer Styles in Elements, highlight your layer to add effect to, go to Menu -> Layer -> Layer Style -> Style Settings. I painted a little beige color over the white flakes to make the lettering stand out better. The white snowflakes and frame snowflakes brushes are Design by Firgs Snowflake Brush 6. (Firg’s Snowflake Shape Pack is not free but now are for sale. To try a different option download Obsidian Dawn’s free Snowflakes Photoshop Custom Shapes.)Font is Fantaisie Artistique – if you do not have it on your computer, your computer will substitute a different font or you can download it (right click on it after downloading to add to font list) and it will appear correct.
****DOWNLOAD LINK TO MY BASIC HOLIDAY CARD TEMPLATE****
This is pretty simple and you should be able to get lots of different looks. See my blog for other examples on how to use this template. Have a good time and enjoy!…..Digital Lady Syd
Digital Lady Syd’s Related Blogs:
Digital Lady Syd’s Free Christmas Card Template
Free Christmas Card Templates-Part 2
Free Christmas Card Vectors and Brushes
Some Holiday Cheer


