Dingbats on Textures – Who Knew?

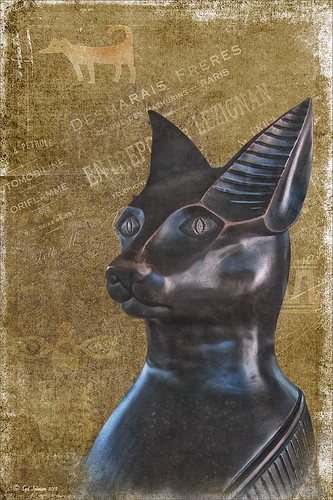
This beautiful cat statue was located outside the door to the breakfast buffet at the Hilton Waikoloa Village on the Big Island in Hawaii. After initial processing in Lightroom, the image was brought into Photoshop where French Kiss Bohemian Texture, a free download, was added behind the cat image. A black layer mask was added to the cat layer and the cat image was painted out with a white brush – it was refined by going into the Properties panel with the mask selected and clicking on the Mask Edge button to smooth out the selection. French Kiss Grunge No1 Chateau (a free download of PNG brush overlays) was placed on a layer above the texture but under the cat, and a brown Solid Color Fill Adjustment Layer was clipped to the layer (go to Layers -> New Layer -> Solid Color Fill and check Use Previous Layer to Create Clipping Group). The overlay was set to 69% opacity. Just above this layer another French Kiss overlay – Bohemian Template Overlay was applied (in set with Bohemian Texture download) with another Solid Color Fill Adjustment layer added using a soft cream color. The overlay texture was set to 48% opacity. Next above the cat image, French Kiss Artiste Impasto Texture (not free) was set to 32% to get a textured look on the cat – my own free gray Cat Painting Texture would probably work just as well. Now what was really neat is how I got the interesting animal and markings effect – they are from Tangaroa Dingbats font. By adding a layer style (double click on the layer) and selecting the Inner Glow with the default settings, and Pattern Overlay using my free Digital Lady Syd’s Smudge Texture as a pattern set to 258% scale, you get the soft orange-brown look. (To create a pattern from a texture, just open it up in Photoshop and go to Edit -> Define Pattern and it will appear at the bottom of your patterns list.) A separate text layer had to be created for each of the three objects selected and each text layer was set to approximately 30%. The Sharpen Tool was used on New Layer to sharpen the eyes just a little and that was it. I think it turned out pretty nice and it was a lot of fun to create. Try out using dingbats in your images to add a little different look to a texture…..Digital Lady Syd
01/15/2013 | Categories: Textures | Tags: dingbat fonts, dingbats, Free Textures, French Kiss Overlays, French Kiss Textures, Hilton Waikoloa Village | Leave A Comment »


