Anything Photoshop or Photography

Latest

Pretending I’m Driving My Dream Car

Image of the Instrument Panel of a 1961 Corvette

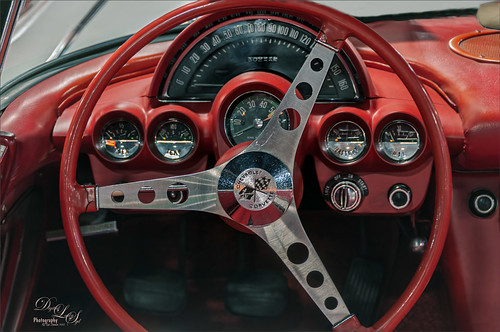
This 1961 Chevrolet Corvette was sitting in the Classic Car Museum of St. Augustine just waiting for me to take its picture. I so wanted to take this baby out for a spin! Not much post work was done on this image – just used a couple settings in Lightroom before beginning work in Photoshop. Had to do some cropping and a bit of Clone Stamp work to get it to line up correctly. Then Topaz Denoise AI (see sidebar for website link) Standard effect was applied. To further sharpen those little numbers on the dials, Viveza 2 came to the rescue with just the right amount. A Green Channel Luminosity Curves Adjustment Layer was added to further enhance the instruments. See my How to Use a Red Channel to Create a Nice Blended Image Effect blog – works pretty similar with the Green Channel if the Red Channel does not look that great. Last step was a regular Curves Adjustment Layer to set the Red color just right. That was it. What a great day to see this little beauty!…..Digital Lady Syd

Let’s Have a Little Chat

Image of a digitally painted lion

Going to make this short and sweet. Been practicing my digital painting and thought I would post this guy whose image is from a pack from ISO Republics 30 Free Images (be sure to change Image Size from 72 ppi to 300 ppi before starting so image is of a manageable size). The real trick is to find the right brushes to use – mainly the Mixers, Regular Brush and Smudge Brushes. The main Mixer Blender brush is from one I brought into Photoshop from Corel Painted and just make a bunch of iterations of regular, smudge and mixers from the tip. (See my older blog called How to Bring a Corel Painter Brush into Photoshop – it still works!) Most of the painting effect was placed on a layer above the original painting (Option Bar setting were Load the Brush After Each Stroke off, Wet 100%, Load 50%, Mix 80%, Flow 100% and Sample All Layers check on. Then used several layers to do whiskers, eyes, nose, etc. A Shadow and a Highlight layer was added to distribute the lighting correctly. Added an Autumn Colors Color Lookup Adjustment Layer at 63% and a Gradient Map set to light yellow to white, Multiply blend mode, and 47% opacity. That’s about it. Lots of fun here!…..Digital Lady Syd

Who’s Looking at You?

Composite image of a large deer in a landscape image.

Had some fun creating this rather strange composite using the landscape file Autumn 18 by Moonloop and a free deer object from Tara Lesher (this guy has shown up in several of my images). The first thing was to go into Edit -> Sky Replacement and choose a new sky (in the Photoshop Spectacular group – 005byJKost) and several of the sliders were adjusted to match the sky tones to the overall image. This layer was duplicated and a selection of the foreground with the trees was made – used the Quick Selection Tool to select the sky and inverse the selection (CTRL+SHIFT+I). Added a layer mask to the duplicated image layer and the sky is now removed with only the foreground on the layer. Placed the Deer object under this layer and moved it around so his head sticks out from behind the trees. To make him blend in better, a Multiply blend mode Shadow layer was created and clipped to the Deer using a light gray tone to paint some shadow on the left side of his face and lower body. Then a Color Balance Adjustment Layer was clipped to the Deer also and just the Shadows were adjusted. Above that a Levels Adjustment Layer was clipped to the Deer where the Output black slider was set to 28 to remove some of the dark contrast on him. Clean up was done in the mask on a few of the tree edges that did not get selected completely. Added a Color Lookup Layer Adjustment set to Choi Hung Estate LUT from SparkleStock. Used the Sharpen Tool to slightly sharpen the Deer eyes, whiskers and right ear. Then created another Multiply Shadow layer and Color Dodge Highlight layer to tweak the lighting effects just a bit. Last step was to make a very light vignette on image using a Levels Adjustment Layer (see my Using a Levels Adjustment Layer for a Vignette blog). To learn how some of these steps were done in more detail, check out Sam Peterson’s Photoshop Daily Creative Challenge Day 3 on Photoshop Manipulation YouTube video from Adobe Creative Live – he explains this whole process very well. Lots of fun here…..Digital Lady Syd

Old Ford with a Fancy Radiator Cap

Image of an old Model A Ford with a Boyce MotoMeter Radiator Cap hood ornament.

Recently went to the wonderful Classic Car Museum of St. Augustine with some of my Club buddies. There was so much to see so if you are in the area, be sure to check them out – lots of great old cars and the owners are happy to share information on all them. I forgot to get the information on this particular car, but I believe it is roughly about a 1930-ish Ford Model A Deluxe Sedan from its appearance. What is so interesting is that the hood ornament is a Boyce MotoMeter that is actually a radiator cap indicator and was designed in 1912. From the driver’s side, you can see what the car temperature is while driving. The wings are a separate part added to the cap. I wish I had looked on the other side!

Well just a few comments on the post processing here. Used Topaz Denoise AI (see sidebar for website link) and the Clear version – worked great! Then a stamped layer was created (CTRL+SHIFT+ALT+E) and the Sponge Tool (yep – that’s what I said) was used to desaturate some of the extraneous colors on this layer that appeared on the car because it was so shiny. The Options Bar was set to Mode Desaturate, Flow 100%, Airbrush on and Vibrance unchecked. It does not have a Sample All Layers box so that is why a stamped layer was needed. A little Clone Stamp was used to clean up a few areas and a Color Lookup table was set to a Joel Grimes preset called Detailed Warmth – set it to Overlay blend mode at 47% layer opacity. On another stamped layer Viveza 2 was applied to sharpen the cap detail and darken down the corners a little bit. Last step was to do a Red Channel Luminosity Curve to bring out the cap more. That was it – lots of fun!…..Digital Lady Syd

Happy Lilies

Image of Lilies growing in Ames Park in Ormond Beach, Florida

Had a great time with some of my Photo Club buddies photographing Lilies at a small park in Ormond Beach, Florida, called Ames Park. This image was taken while I was lying flat on my stomach shooting as straight out as I could. It was shot using F/8.0 using a 40 mm lens. There was a lot of shine on the flowers so that all needed to be toned down a bit in Photoshop. A lot of clean up had to be done and Viveza 2 was used to help with the overall lighting effect. The last step used was applying an Orton Effect that Mark Denney uses a lot on his image. The steps are in his 6 Things I Never Do Inside Lightroom! video. I thought it added a nice finishing touch for these flowers. …..Digital Lady Syd

The Grace of Rhododendrons

Image of some pink Rhododendrons

Found these rhododendrons growing in a local Lowes Home and Garden Store and thought I would give my Android phone a spin by capturing a RAW image. I was overall pretty pleased with it. Topaz (see sidebar for website link) Sharpen was used to sharpen it up a little in PS – the background showing the store was removed and a texture from Daily Textures called Explorations 6 was added. A Color Lookup Adjustment Layer was applied using one of my favorite presets (from Photofocus’s Landscape presets) called Africa at 87% layer opacity. Flypaper’s Adriana texture was added on top and set to Pin Light at 73% layer opacity. One of the coolest trick I learned from Karen Alsop and that is to paint over the far edges of items to soften the effect and draw attention away from that part of the image. Just use a soft round 25 pixel brush with only Smoothing on and set the Opacity to 12% and Flow to 24% – then just sample the background color and paint on the edges on a new layer. Can adjust the layer opacity as needed. The font is called Modernline by Ef Studio. Really love these flowers!…..Digital Lady Syd

Before Walmart

Historical image of a General Store provided by Shorpy.com

Just enjoyed taking this image from Shorpy.com (click to see original B&W image) and converting it into a colorized image. Loved the sign that shows all the items offered, definitely a precursor to Walmart. Also loved the silhouette sitting outside the store. Had to straighten the image using the Camera Raw Filter’s Geometry panel. The wires were removed – I wanted to leave them in, but the original image did not show the wires strong enough to see them in the colorized image. In Topaz Studio 2 my “Look” for colorizing was used (for more information see on see How to Convert Black and White Images to Colorful Paintings with Topaz Studio 2 blog – links to other blogs on this site) and made a few changes to fit this image – this is where the real fun begins. Back in Photoshop a little clean up was done and a sky with the PS’s new Sky Replacement function was added – the clouds were taken from my backyard around noon. Finished off with Topaz (see sidebar for website link) ReStyle (using the Zambezi Zest preset) to get the right color grading effect to the image. Check out Shorpy’s for lots of fun pix to colorize…..Digital Lady Syd

Valentine Mandala

Today I found this really cute element that I decided might make a nice mandala. I painted it will some colors, took it into Topaz (see sidebar for website link) Studio 2 and applied the Broken Bits Look. Then just followed the instructions that Leslie Nicole, of French Kiss textures fame, gave in her How to Create a 4 Way Mandala in Photoshop video she did for Design Cuts recently. This is a very simple process to follow. I actually flipped the design 45 degrees 4 times! Then painted in the hearts, add some heart background with a brush, some text, and two of my own textures underneath. For more examples, check out my Happy Valentines Day Fun Photoshop blog. Have a great day!…..Digital Lady Syd

Happy Lily

Image of a white lily

This white lily just appeared in my front yard last summer – I had planted this variety several years ago. I was excited to see it but the white color did not lend itself to great photo shots. I decided to give it a digital touch Here are some tips I had for this image:

  1. Had to use a special brush I made to get rid of some of the color from chromatic aberration in the white lily petals – created a clone brush set to Color blend mode at 32% opacity to paint over those areas very lightly with a small 15 pixel brush. Brush called SJ Remove Chrom Abb around color edges. Only used where there is white or light color on the subject, now on the long edge and side of the petals which were way too soft. Used a regular soft cloning brush here.
  2. Did not like the line definition of the petals so decided to use a new brush I created from Kyle’s Spatter Video – named it SJ Drawing Br-Airbrush – very small 3 pixels but very nice for this type of line drawing on flowers.
  3. To get a more interesting effect, on the line drawing I opened the Layer Style – Glow and set it to Opacity 16%, Color a dark blue or #2d354e, Spread 41% and Size 32 to get a rather interesting shadow effect around the lines and gives a bit of a painterly effect to the whole image. This definitely turned out really good.
  4. Used the Pattern Stamp Tool to created the pretty flowers on the ground – Used Jessica Johnson’s English Garden brush and pattern – in this case used one with the blues and purples in it. (Brush 11 at 200 pixel and Pattern 14) The brush had too much texture in it but when I turned it off, it did not look as good when repainted. Therefore I added a slight Gaussian Blur to the layer and set the Radius to 1.4 to remove the texture quality but still maintain the detail in the flowers.
  5. Used Grut P Limbo Lift brush in his Pencil set to add shadow and highlights and his S Tend Octo brush to add the green and white small flower look.
  6. The Bokeh Texture was from Jill Wellington from a long time ago and was set to Color Burn blend mode. Added a layer mask and painted out the flower.

That is basically what was done. It is fun to try new things!…..Digital Lady Syd

Celebrating Winter

Digital painting of a snowy sky scene

Just practicing painting. This is one that I created following a set of videos called Painting with Photoshop from Corel Painter Master, Melissa Gallo from many years ago. This series is still the best one out there to learn how to paint in Photoshop. This image used several variations of her Pencil Sketch Brush which comes with the workshop. If you really want to learn how to do this, it is totally worth the money. Created this image due to the fact that everyone is getting large amounts of snow this week. Enjoy the beauty of wintry mess!…..Digital Lady Syd