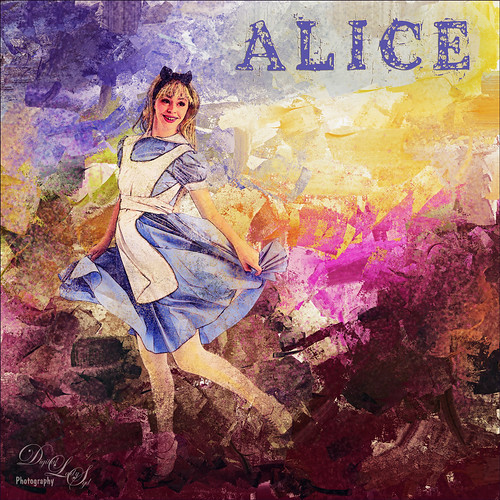
This is a composite image that I created using stock images and a texture I had created in Corel Painter. The beautiful Alice is from Faestock on DeviantArt. The first step was to create a New Document set to 8 inches X 8 inches at 300 dpi. Next the stock image of Alice was added and the girl was selected and removed from the white background. On this cut out image, an effect used by Corey Barker at Creative Live during the 2017 Photoshop Week was applied. I cannot seem to find another source for this effect but Corey has used similar effects in Photoshop User Magazine and a Kelby One blog. Anyway, the basic effect gave Alice a rather gungy look using different brushes in layer masks. The Alice layers were put in a group. Then the texture was added underneath the group. Selective Color Adjustment Layers and a Curves Adjustment Layer were used to blend this all together. Nik Viveza 2 was added to draw focus to her face. The font is the Old Printing Press Free Version. It is fun to make just a care-free image that makes you smile!…..Digital Lady Syd

Latest
The Whisker Cactus
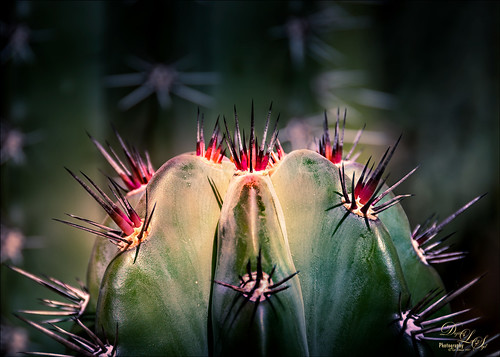
A local hotel in Phoenix, Arizona, labelled this a Whisker Cactus – the red spikes are at the top of the stalk. They had this wonderful cactus garden with several different types. Unfortunately I did not have my macro lens with me, but this image has a pretty nice macro feel to it. A lot of the post-processing was done in Lightroom using the Bad Weather 8 preset by Serge Ramelli with adjustments to the Gradient Filters and Radial Filters. In PS, Lucis Pro (no longer available) was used to just add some texture and sharpening into the cactus only. Nik Viveza 2 was used to emphasize the plant colors. Matt Kloskowski’s technique was used to create a vignette. (See my How to Create a Subtle Vignette blog.) On another layer the Sharpen Tool and Blur Tool was used selectively and a 50% gray Dodge and Burn layer was used on the focal point areas. That was it. These cactus are pretty but incredibly sharp!…..Digital Lady Syd
Enjoying a Flower
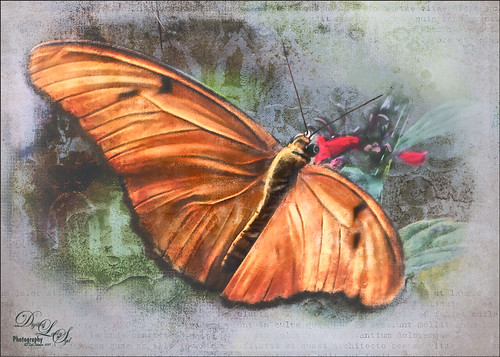
Love this Julia Longwing Butterfly – have never seen one like this around my home. The image was taken at the Palm Beach Zoo which is much further south in Florida. This male butterfly actually lives several months and loves the Passion Vine. The image was cropped way down to emphasize the butterfly. Then Lucis Pro (no longer available) was opened to sharpen up just the butterfly. On separate layers the wings were painted mainly using Gruts (see sidebar for website link) NM Pans Attic brush. 2 Lil’ Owls (see sidebar for website link) Dream freebie texture was set to Hard Light at 70% layer opacity. In a layer mask the butterfly was painted back. Kim Klassen’s 2170 with Script texture (not sure it is available anymore) was used around the butterfly. Nik Viveza 2 was applied to adjust the coloring in the image. Next Topaz (see sidebar for website link) Lens Effects’s Diffusion filter set to Moderate was applied. A black layer mask was added and just the diffusion effect was applied to the wings and flowers. A Color Lookup Adjustment Layer was added and the Crisp Winter preset was selected. It was set to Hard Light and 27% layer opacity. I decided the color palette was not quite right, so on a stamped layer Topaz Restyle was opened up. A preset was made of the image and then the colors in the palette were just slightly adjusted to get the final look. (See my How to Use a Topaz ReStyle Trick for Improving Your Image blog.) Wish these little beauties were in our local…..Digital Lady Syd
Checking Out the Buds
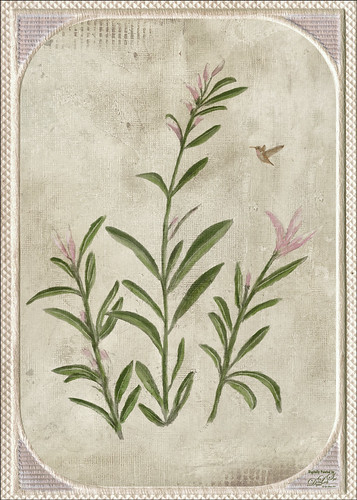
Still practicing drawing and painting. This image I just followed the same workflow from my Some Flower Power blog which created an original sketch layer and several painting layers for the flowers. Next the Hummingbird was painted on a layer using a bird brush created by just turning an old bird image into a black and white and defining as a brush preset – actually used two different colors and softened the edges a little. Kim Kassen’s Stay texture (not sure it is still available) was placed on top and really gives the vintage feel to the image. A Hue/Saturation Adjustment Layer was clipped to it (ALT+click between layers) to desaturate the texture color a little. The border is from On1 Hundred Borders set. The three final steps were performed that I almost always use at the end of my workflow: a Red Channel Luminosity Adjustment Layer, Nik Viveza 2, and a Black and White Adjustment Layer. I am starting to enjoy creating the flower paintings……Digital Lady Syd
The Neighborhood Puppy
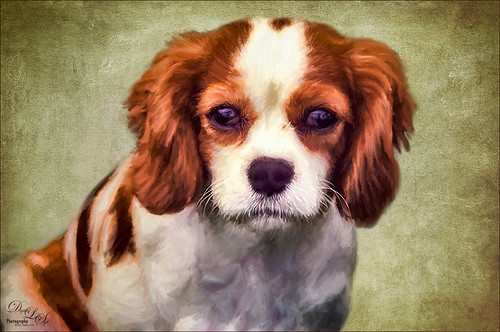
This is one of the cutest puppies I think I have ever seen. Her name is Kaila and I get to play with her every now and then when she is on one of her neighborhood walks. This time she let me take a few images of her, so I thought I would take advantage of this photo and try out a recent Topaz blog called Cartoon Your Critter – Make Your Pet a Work of Art by Taylor Seaton. I did not follow the steps exactly since my image is not really a cartoon effect, but I liked the final results. So how did I get to this point? Well I used Topaz (see sidebar for website link) ReMask, but I also tried Photoshop’s Mask and Select, which gave a great result too, just to see which is is better. (I think the results depend totally on the image IMHO, so if you do not like the results of one, try the other.) I did not like the results Topaz Simplify gave to this image, so Lucis Pro 6.0.9 (unfortunately no longer available) was applied on a duplicate layer of just the selected dog. Again the layer was duplicated and following the Topaz blog, the image was taken into Topaz Impression 2 where the Cartoon Your Critter preset was downloaded from the Community. No changes were made to it. Next Artiste Old Master texture from French Kiss (see sidebar for website link) was placed underneath the dog layer. Topaz has several nice textures in their blog that can be downloaded if a nice one is needed. Then created a stamped layer (CTRL+ALT+SHIFT+E) on top so it can be taken back into Topaz Impression 2. On separate layers above lots of painting with PS was done to add my own painting flair. On another stamped layer Nik Viveza 2 was applied and just a little bit of vignetting was added along with a little work on the nose and mouth. I really like the results. And as always, it was a lot of fun to do!…..Digital Lady Syd
Bird of Paradise
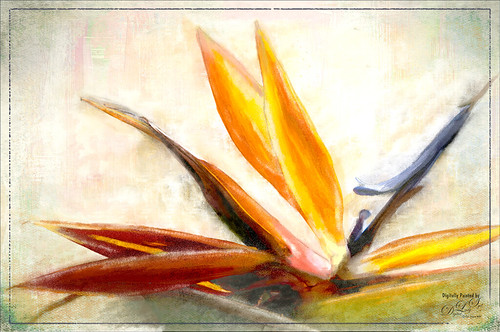
I currently have a couple Bird of Paradise blooms on my plant so had to get a few images. This one was extracted in Photoshop and then painted in Corel Painter before bringing back into Photoshop and finishing up the detailing of the flower and adding texture. One of my Pastel textures created in Painter was placed under the flower. Then several layers were placed above using several of my SJ-3 Pastel brush variations (see my How to Create My Favorite Brush blog) and Grut I Qwillo brush (or see sidebar for link to all his brushes) to create the outline. 2 Lil’ Owls (see sidebar for website link) Color Bokeh Grunge Set-3 was added and the flower painted out on a layer mask. On a stamped layer (CTRL+ALT+SHIFT+E) Nik Viveza 2 was used to emphasize the focal point. Did not like the painted strokes completely, so added a few more layers and used Grut NM Tick Tumble to smooth out color in several places. A Sebastian Michaels edge was added. It is fun to paint these beautiful blooms!…..Digital Lady Syd
Hospital Militar
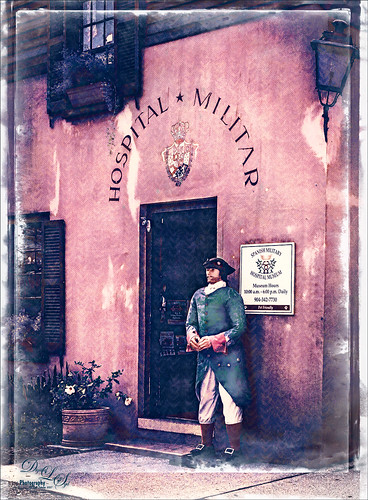
Just had some fun adding an interesting effect to this front door image of the Spanish Military Hospital Museum in St. Augustine, Florida. In PS a free action by Chris Spooner called Engraved Effect Medium was used on the whole image. If you use this action be careful-it makes your image huge. What you need to do is look in the group and decide which layers you want to apply and remove the others to control the final size of the image. I really like the engraved look and the action contains three different levels to experiment using. Then the image was taken into Topaz (see sidebar for website link) Impression 2 and applied the Abstract I preset with changes to fine tune to this image. Next a stamped layer was created (CTRL+ALT+SHIFT+E) was placed on top. Lucis Pro 6.0.9 (no longer available was applied and just the Smooth Detail slider was used. One of my PNG textures was added to the image and set to Overlay blend mode and then set to a bright blue color by clipping a Color Fill Adjustment Layer. The Foggy Night Color Lookup was added and set to 34% layer opacity. Next 2 Lil’ Owls (see sidebar for website link) Starry Night 6 was applied and set to Saturation blend mode at 46% layer opacity. The last step was to use one of Sebastian Michaels edges. It like the sort of vintage feel in the image…..Digital Lady Syd
The Golden Dragon
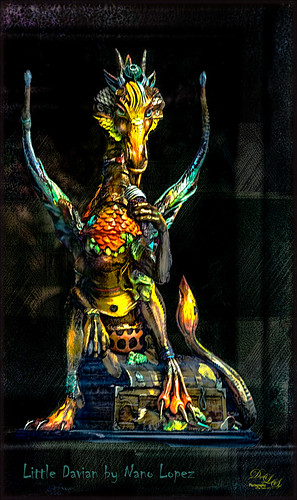
I had never seen a Nano Lopez sculpture until my recent visit to St. Augustine where the James Coleman Gallery had it displayed- this piece is called Little Davian. I shot this beauty through the front window in bright daylight so it took a lot of cleaning up to get rid of the reflections . I thought that the dragon was singing into a microphone but he is actually eating a “Dragon Berry” ice cream cone! Need to check out all Nano’s work – it is amazing! I will give you a quick run down of what was done to the image, but many steps were involved to get an effect I liked. First the dragon was run through Lucis Pro (no longer available) to get the edges defined better – it does not really sharpen but gives a similar look. Then PS Select and Mask command was used to extract the dragon from the background. To get the interesting cyan texture on the right side, a grunge type object created in Corel Painter was placed behind the extracted dragon, set to Soft Light and 52% layer opacity. A Hue/Sat Adjustment Layer was clipped to the layer and set to a Cyan color. A Darken/Lighten 50% gray layer was added. Nik Viveza 2 was used to adjust the color and tone throughout the image – this helped fix the glass reflection problem. Topaz (see sidebar for website link) Clarity was used on just the dragon. A Spotlight Layer set to Overlay blend mode was used on the dragon head. 4 Light Leaks were used on the edges – top and bottom set to a little dark red color, right side cyan and left side a warmish orange. 2 Lil’ Owls (see sidebar for website link) Color Bokeh Grunge Set – overlay 6 was set to Divide blend mode at 40% layer opacity to darken the edge of image. The font is called Chiller. Last step involved adding Topaz Detail 3 – just gave the overall image some sharpening and emphasized the background texture. Obviously my image does not do justice to the actual beautiful piece created by the artist, but it was a joy to work on the image!…..Digital Lady Syd
Light Dawning in the Forest
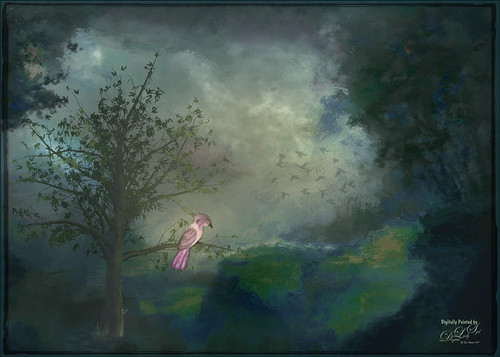
Just created this little image for fun. I started image by opening up the Tree Generator in Photoshop (Filter -> Render -> Tree – not available in CS6 unfortunately) and created a 16 Young Robina tree and just playing with all the fun sliders. If you have not tried out this fun little sub-program inside PS, you should give it a spin – lots of fun! Behind the tree one of my Corel Painter textures was placed and the Hue adjusted with a Hue/Saturation Adjustment Layer. The bird is from some clip art that I had and it was painted and liquified. The flying birds in the background are a free download from Jai Johnson. Not much to this image. I liked the colors that resulted…..Digital Lady Syd
The Red Lion in the Tower
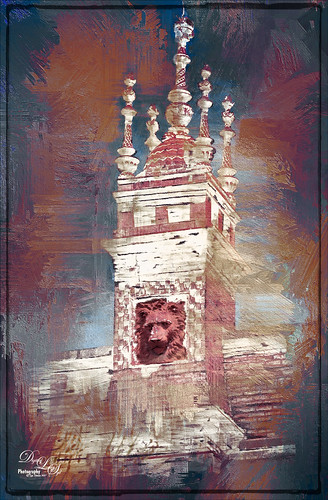
Took this image recently in St. Augustine of the back of the Alcazar Hotel (Lightner Museum) showing one of the beautiful red clay lions. Henry Flagler had these lions placed over both this hotel and the Ponce de Leon Hotel (now Flagler College) exteriors. To begin in PS, a free action by Chris Spooner called Engraved Effect Medium was used on the whole image. Lots of clean up with a mask. Then Topaz (see sidebar for website link) Impressions2 using a Van Gogh preset was applied and the effect was painted off back in PS on the lions face. Melissa Gallo’s Painted Textures Mist on the Lake (no longer available)) was applied twice – one set to Normal and one to Linear Burn at 55% layer opacity. A Hue Saturation Adjustment Layer was used to adjust the color. Then a stamped layer was created (CTRL+ALT+SHIFT+E) was placed on top and taken into Topaz ReStyle using the Cream and Plum preset (one of my favorites) was applied to the image and set to Hue blend mode at 76% layer opacity. On another stamped layer Nik Viveza2 was applied to adjust the contrast just right. Last step added just a simple line border. That was it. I love these beautiful clay lions – they are so striking!…..Digital Lady Syd
Topaz Labs AI Gigapixel
Check out AI Gigapixel stand-alone software for upsizing your images. It’s incredible! And it can now be used as a plugin when in Photoshop. Also Topaz Labs Photo AI has some great sharpening and denoise tools along with Photo Video AI.

Luminar Neo
Click here to visit Luminar for more info and check out their new AI Filters.

GRUT BRUSHES – Photoshop Brushes for Digital Artists
Click here to visit GrutBrushes.com
And be sure to check out his Free Brush of the Week and Brush Sampler! These are the best brushes you can find!

Topaz Studio 2 and Legacy Topaz Labs Filters
Unfortunately Topaz Studio 2 and other Topaz Lab filters are no longer available for sale as of 2020. If you had bought these filters and would like to put them back on, here is a link to the Legacy Apps where they can be downloaded again. Below is an example of the wonderful Remix AI Filter from Studio 2. The wonderful Impression still works fine in Photoshop right now along with Adjust (all versions), ReStyle, and even PhotoFXLab!

On1 Photo Raw
Wonderful software to use as a substitute for or plugin with Photoshop. Many great filter effects and lots of AI capabilities!
