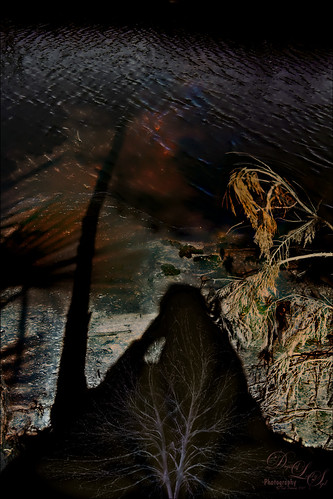
This image represents to me a contemplative mood – a connection with the Fall season and nature, and the nature of man with nature. It was a lot of fun to create. A tree from Pixelsquid was added into the shadow. Some of the colors are from using Lucis Pro. Topaz (see sidebar for website link) ReStyle’s Single Fawn was applied to the image. This image was taken into Luminar 2018 (see sidebar for website link) and the Adjustable Gradient Filter was added to the whole photo and the Sun Rays filter was added to just the foreground tree by using a layer mask. Loved how the tree turned out. PS Liquify filter was used to stretch the foreground tree where I wanted it. Some clean up layers and that was it. Love the whole concept of this image…..Digital Lady Syd

Latest
Dreaming

Have you ever had a dream that just seems so vivid that you remember several parts of it. Well that is what a lot of this image is showing – one of my very vivid dreams. I see a lots of stories going on here – like flowers actually filling the sky with planets or moons? Or bubbles being shot at a target? Really??? And what about those giant 3-leaf clovers guarding the bubble machines? Hum! So there you have it, the inside workings of my sleeping brain. So what I did here is basically just sketch this out and paint it. The clover is from PixelSquid, my favorite resource for all kinds of odd things. The bubbles were created using Grut’s FX IL Rinse Drip from his Inky Leaks Set (I love this brush set) and used Hue/Saturation Adjustment Layers with black layer masks to paint in the different color bubbles. The little bubbles were from Lizard Queen Water brush 8. The last step was using Topaz (see sidebar for website link) ReStyle Swamp and Sherpea Blue preset set to Screen blend mode in the plug-in and 44% layer opacity in PS to adjust the colors to match my dream. Sometimes things get a little crazy when you paint what you dream!…..Digital Lady Syd
A Beautiful View
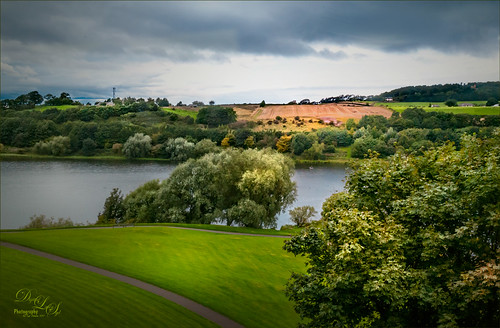
Loved this view of the Scottish countryside taken from a window in Linlithgow Palace – this is the palace where Mary, Queen of Scots was born in 1542 and lived for 7 months but did not return for another 20 years. Lots of interesting history here. Started adjusting this image in Lightroom doing Basic Panel adjustments. In Photoshop on a duplicate layer, Lucis Pro (no longer available) was applied, then a black mask added and painted back just areas that needed more definition. On a stamped layer (CTRL+ALT+SHIFT+E) On1 Photo Effects was opened and the Color Enhancer filter, Tone Enhancer, and Textures was used to help especially in the sky area. On another stamped layer Nik Viveza 2 was applied to even out the lighting in the front foreground and midground areas. That was it!…..Digital Lady Syd
The Magic Violin
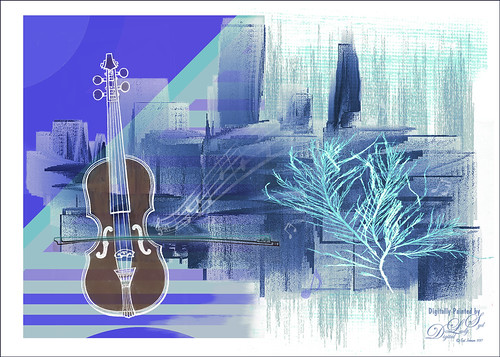
This image was inspired by a wonderful piece of clip-art from The Design Shop called Vintage Violin clip art. From there the image just kept building. The background abstract city element was created in Corel Painter and a few cool brushes created in PS for more detailed elements. This whole image was just a lot of fun to do and no filters this time!…..Digital Lady Syd
Looking for a Dragon Slayer
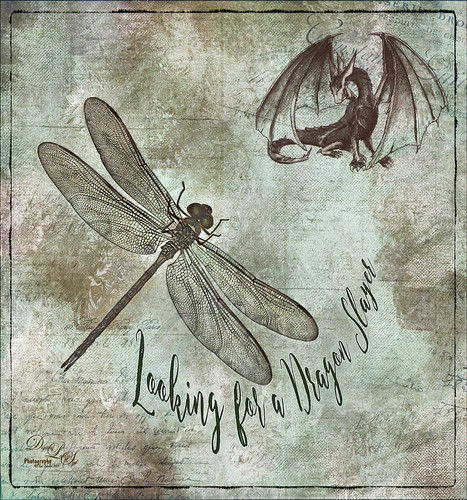
This is an image of a dragon fly that was sleeping upside down on the roof of my front porch. These bugs are huge – like 4 or 5 inch wing span! Anyway, got a good image so decided to play with it and see what effects I could get. What really surprised me is that the background actually came out inside the wings. The fly was selected using the Quick Selection Tool and then taken into Refine and Mask where this really nice detailed selection of the wings was created. A lot of textures were created. These textures were used: 2 Lil’ Owls (see sidebar for website link) Sea Storm Canvas and French Brocante 10 set to Soft Light, and Daily Texture Exploration 7 set to Multiply blend mode at 60% layer opacity. The Sharpen Tool was also used to sharpen the wings. The Dragon is a brush by Rob Marks. Nik Viveza 2 filter was used to even out the background. The font is called Enchanted Brush. Lots of fun to create!…..Digital Lady Syd
Trick or Treat!

Happy Halloween to everyone! Just thought I would post a little Halloween cheer using a photo taken at the local Lowe’s Garden Center. Sometimes the displays are more creative than what you see in the neighborhood! I am not sure what this little guy is but he sure is scary! So had some fun with this image. Started by selecting the subject and putting him on his own layer. Then underneath used Shadowhouse Creations Halloween Pattern 3 HP3 and topped it with Julia Dreams Halloween icons Pattern 1 – actually used the Blend If slider to get the strips to show up underneath by setting This Layer black tabs split to 131/174. It gave a really nice effect. Add the Machovka_bat and text – the Adrenaline Brush font with a Stroke Layer Style- were added. Color was added to the letters by clipping Pattern Fill Adjustment Layers to the three text files. Had to replace the font on the bowl as it was not very sharp and added the Old English Text MT font – a layer style was added using a Stroke, Inner Shadow and Outer Glow effects. On a Stamped Layer (CTRL+ALT+SHIFT+E), Nik Viveza 2 was applied to adjust the focal point of the image. Then a 50% Gray Fill Layer was used to Dodge and Burn with just a black or white brush. The cobwebs were placed in the subject’s eyes – Obsidian Dawn’s Halloween Vector Cobweb 10 brush was used. Last step involved add Halloween Cats Brush by altergromit (love this cat) – added a mask to pop him out of the bowl and added an orange Outer Glow Layer Style around him. That was it – check out some of these resources for other interesting Halloween items…..Digital Lady Syd
Happy Halloween

This Halloween grouping was taken at a local Lowe’s Garden Center on my Android – just could not resist the cuteness of these guys. I would love to have one of those straw looking characters but we do not get many Trick-or-Treaters here so no need to put outside. Anyway, since it was just a JPEG taken on the fly, the image itself needed some work. Only basic adjustments were done in LR, then in Photoshop the first thing done was to run the Shake Reduction Filter to try and sharpen up the edges a little. Next the background was removed using the Quick Selection Tool and Mask and Select command. One of my textures was placed underneath for a background. To further sharpen the image, it was taken into Lucis Pro (no longer available) and it really helped. On a stamped layer, Nik Color Efex Pro 4 using one of the Flypaper recipes presets to get this overall vintage feel – I forgot to write down which preset. So many of them looked good. Two inches were added to the bottom of the image and the Naive Deco Sans font was selected for type. On a New Layer a Mixer blender brush was used to smooth edges. Nik Viveza 2 was applied on a stamped layer to draw focus to the center pumpkin. Last step was to add a Curves Adjustment Layer for a little vintage feel to the overall image. Happy Halloween Everyone!…..Digital Lady Syd
A British Countryside
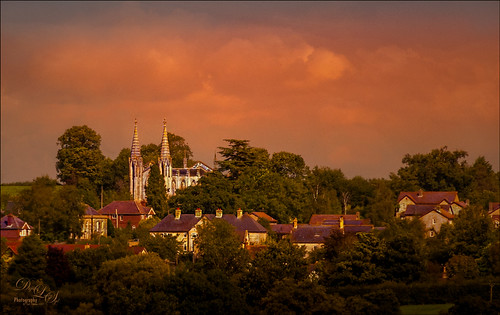
This image was taken of the British countryside on the way to Stonehinge. Lots of post-processing in Lightroom following Serge Ramirez’s instructions and using his very Sunset preset. Check out his My Most Liked Photos-Part 1: The Making of a Composition for basic info on this. Then in PS used Lucis Pro (no longer available) to really sharpen up the image. A couple Curves Adjustments layers, Topaz (see sidebar for website link) ReStyle to really add the nice color treatment, and Camera Raw Filter to add a top bluish gradient. A final little sky clean up and that was it. Really like the nice feel of the little town…..Digital Lady Syd
Countryside Contentment
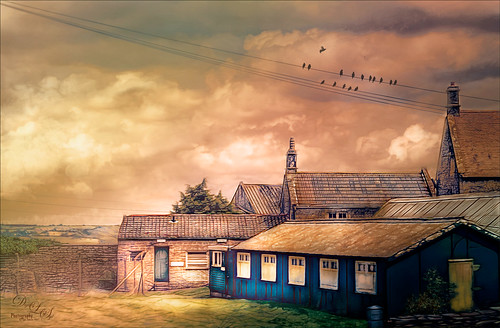
This image was take on the highway to Bath, England. I did not realize what a beautiful sky was in the image so I had not looked at it in Photoshop. Now I think it looks rather idyllic. This image actually took a lot of layers to get it looking the way I wanted: Topaz (see sidebar for website link) Studio was used to bring the contrast into the image and the Radiance Adjustment was used to get some very precise lines. Some spotlight effect was used to direct the eye and Nik Viveza 2. To warm the sky a Light Gradient using clear, yellow and pink colors was added to warm up the whole image. Blake Rudis’s gradient map vignette technique was used to finish up the image. (See my Yet Another Great Way to Create a Vignette! blog.) Overall a lot of fun to do!…..Digital Lady Syd
Smokestacks in New York City

The above image is from the Library of Congress and is an image taken of the Business District in Manhattan, New York City, cc1900. Shorpy.com showed it as a blog image and has posted some really interesting info about what buildings were in this original image. What intrigued me is the smoke from all the smokestacks and all the American Flags (I counted at least 160), most flying on top of the buildings. A lot of clean up was done first and the image had to be converted to RBG from Grayscale and reasonable size needed to be set. On a cleaned up stamped image (CTRL+ALT+SHIFT+E), Topaz Studio was opened and one of my uploaded Community presets (SJ Building Sharp) was applied. I did go through and tweak the four adjustments (Basic, Precision Contrast, Precision Detail, and Dehaze) in this preset, but it is pretty much the same settings. The last step in Topaz was to reduce the total effect in the sky – used a Mask Transparency of 0.33 with a brush and then added a Feather of 0.23 in the More Mask Options section. In Photoshop a Color Lookup FoggyNight preset added at 11% layer opacity and Linear Burn blend mode. Two textures from Flypaper were added: Alice set to Overlay blend mode and 100% layer opacity and Villa Adriana set to 36% layer opacity and Overlay blend mode. Last step was to open Nik Viveza 2 and add a little lightness on the buildings facing the sun and in the corners for a subtle vignette effect. Really fun picture to work with……..Digital Lady Syd
Topaz Labs AI Gigapixel
Check out AI Gigapixel stand-alone software for upsizing your images. It’s incredible! And it can now be used as a plugin when in Photoshop. Also Topaz Labs Photo AI has some great sharpening and denoise tools along with Photo Video AI.

Luminar Neo
Click here to visit Luminar for more info and check out their new AI Filters.

GRUT BRUSHES – Photoshop Brushes for Digital Artists
Click here to visit GrutBrushes.com
And be sure to check out his Free Brush of the Week and Brush Sampler! These are the best brushes you can find!

Topaz Studio 2 and Legacy Topaz Labs Filters
Unfortunately Topaz Studio 2 and other Topaz Lab filters are no longer available for sale as of 2020. If you had bought these filters and would like to put them back on, here is a link to the Legacy Apps where they can be downloaded again. Below is an example of the wonderful Remix AI Filter from Studio 2. The wonderful Impression still works fine in Photoshop right now along with Adjust (all versions), ReStyle, and even PhotoFXLab!

On1 Photo Raw
Wonderful software to use as a substitute for or plugin with Photoshop. Many great filter effects and lots of AI capabilities!
