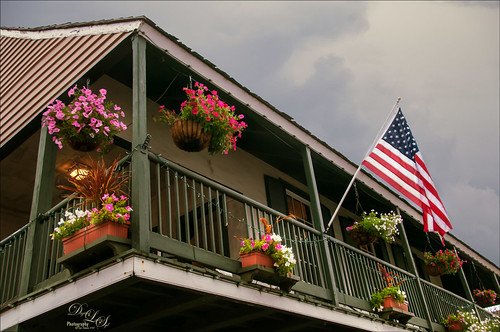
This is the Arrivas House located at 46 St. George Street in St. Augustine, Florida and was built cc 1760. (Click on link for some interesting history on this site). It is now home of the Panama Hat Company store. Used the HDR command in Lightroom to create an image from three images exposed at -1 1/2, -1/2, and +1/2. The sky was totally washed out so had to bring in a sky image taken from my backyard – it was so overcast a sky with similar attributes had to be selected. Then two Curves Adjustment layers were added, one for tone and one for color. A Dodge & Burn layer using a 50% gray layer was created – painted with white and black at low opacity to sharpen up the blues in the flag and color on the flowers. A New Layer set to Overlay blend mode was used for a little spotlight effect placed on the little flowers to brighten them up a bit more. Last step was using Nik Viveza 2 to pull the whole image together. St. Augustine is a great place to visit if you get a chance…..Digital Lady Syd

Latest
Blowing a Kiss
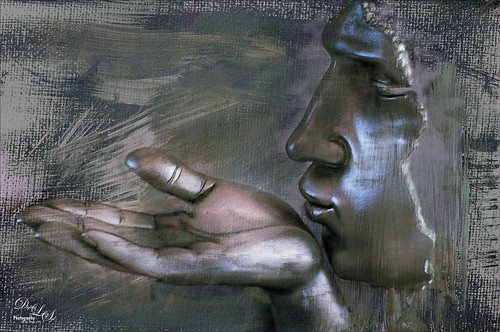
On my Fun Photoshop blog (see my Using a 50 mm Lens as a Macro Lens – Really? blog) recently I had two image taken as macro’s on the face of the above sculptor. Thought I would do another macro image, this time using my regular lens and not a flipped 50 mm lens, and get a little creative with the RAW file. This image was just basically post-processed in Lightroom using mainly the Basic Panel. Then in Photoshop Melissa Gallo’s Taupe Canvas (no longer available) was placed on the bottom, then a black layer mask was placed on the LR image on top. Just painted back in what I wanted to see using a couple different brushes at different brush opacities. Created a Darken Layer to outlines the focal point lines and a New Layer for a white Spotlight Effect on the face and hand. A Black and White Adjustment Layer set to Luminosity blend mode to adjust the colors. Then Blake Rudis’s action called 5 Tone Heat Map was used to add some more subtle color to the image – set to 88% layer opacity. I sort of like the feel of the image…..Digital Lady Syd
View from the Road
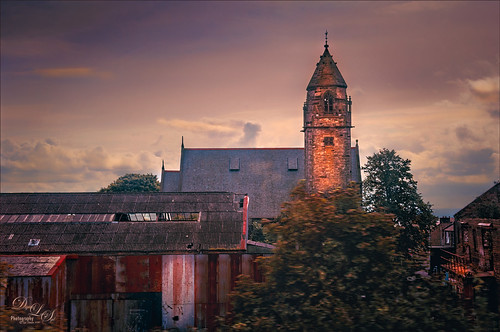
This image was taken somewhere in Scotland. I tried a few different effects but finally ended up with this rather simple result. Used Topaz (see sidebar for website link) Studio for this image. Started with the Desaturated Blush I preset and changed several sliders. Then used the Tone Theme Filter which made the barn more of an orange color – this is a really nice filter and you should check it out if you own it. Back in PS, created a stamped layer (CTRL+ALT+SHIFT+E), applied a Black and White Adjustment Layer set to Luminosity blend mode, a Red Channel Luminosity Curves Adjustment Layer, and a regular Curves Adjustment Layer. Next applied Topaz ReStyle Zambezi Zest to the image at 42% layer opacity. Again back in PS, did some clean up and Black and White Adjustment Layers. A Gradient Fill Adjustment Layer to add a soft vignette and a Selective Color Adjustment Layer for a corner blue sky issue were then applied. Next added a Blake Rudis 5 Tone Heat Map to add a really pleasing look to the image. ……Digital Lady Syd
Blowing in the Wind
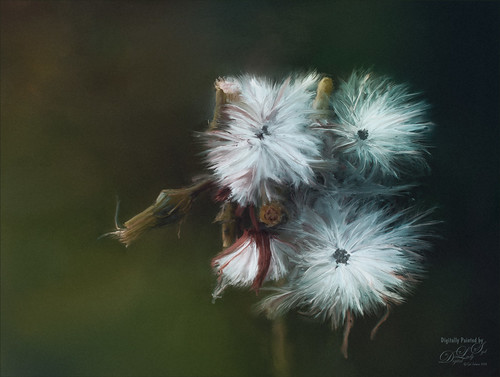
Got back to basics and painted this image of what I believe is some variety of dandelion. Painted using three main parts: a background layer to begin, then blocked in the main subject on a middle layer, and detail was added on top, which took several layers and different brushes. Mainly used Fay Sirkis’s (a Corel Painter Master) PS mixer brushes. (These brushes are pretty hard to find now but worth it if you paint in PS – KelbyOne still has them if you are a member – just search for her name.) Hypothermia action was applied at 24% layer opacity (See Chris Spooner’s 10 Free Winter Blues Photo Effect Actions for Adobe Photoshop blog). And another fabulous action by Blake Rudis was applied – got to check out How to Use the 5 Tone Heat Map in Photoshop video and try this. Last step added a grain layer I built a while ago and put in my Library in PS. Lots of fun to paint again…..Digital Lady Syd
Room with a View
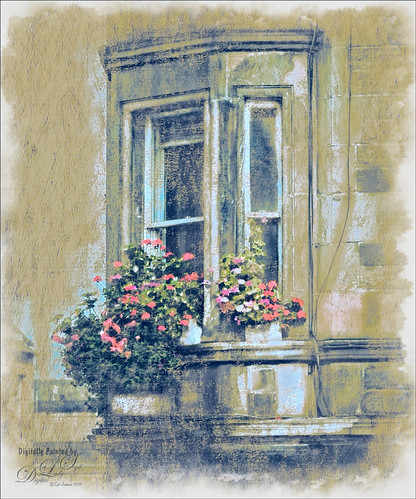
Decided to do a little watercolor painting in Photoshop of these flowers sitting on a window ledge that looks at Edinburgh Castle in Scotland. Basically cleaned up the image using Topaz (see sidebar for website link) ReStyle to set some colors, and then used Melissa Gallo’s method to paint the image using her watercolor brushes. I took her class several years ago, but the method still works. (If you are interested in purchasing her Painting with Photoshop class, it is still available. There are so few really good PS painting classes, but Melissa’s may be the best of the bunch.) Topaz ReStyle was actually applied again at the end to create a more interesting color palette. The last step used my watercolor border frame. Lot of fun to paint again…..Digital Lady Syd
Orange Daisies
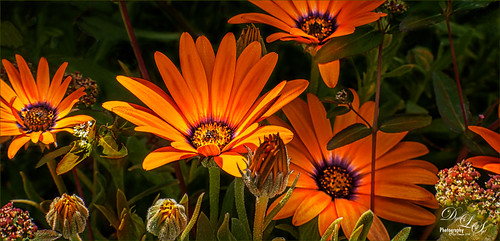
Found this image of some orange daisies from my yard taken a while back. It was a macro shot using a 60 mm lens with a Bower 0.5 x High Res Lens at F16. In PS Luminar 2018 (see sidebar for website link) was opened and the Details Enhancer filter, Structure filter, and the Top & Bottom Lighting filter were used. Then in PS just did a little clean up on the petals and the background, and added several layers to lightly spotlight various parts of the image. Finished up using Matt Kloskowski’s vignette (see my How to Create a Subtle Vignette blog). These flowers were so pretty to photograph!…..Digital Lady Syd
A Glowing Tiger
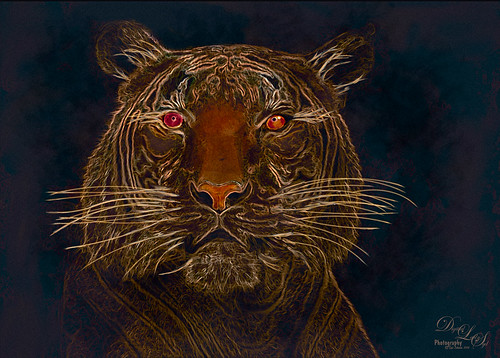
This image of a Malaysian Tiger was used to get this rather different glowing effect. This image took a whole lot of time to do with lots of layers which I will not bore you with this time. A old tutorial I found in the Photoshop Creative Collection 9 called Make a Glow Effect was used to create this look. The basic steps are to sharpen the image using the Unsharp Mask Filter, the Glowing Edges filter and several Adjustments Layers to adjust the color and luminosity of the image. A layer style was used to enhance the glow. The whole process is pretty nice but I found it very complicated to get the final look. It was a lot of fun to try something totally different……Digital Lady Syd
Deer on a Fountain
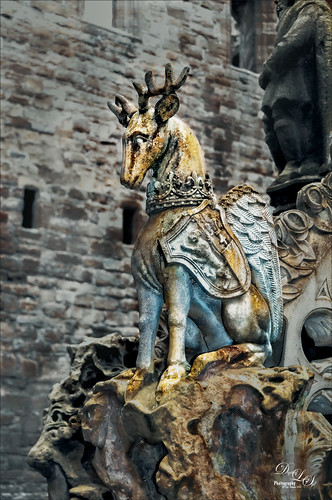
This image is of a a fountain built in 1538 by James V at the old Linlithgow Palace in Scotland – it has been known to flow with wine on a few occasions. This actual center fountain is not this colorful, but these colors came from the image itself so I imagine at some time it was quite beautiful. I loved the regal look of this deer statue on the fountain. On1 (see sidebar for website link) Photo Raw Effects 2018 made this image really nice and sharp – used Overall Settings filters of Dynamic Contrast (which really adds the nice detail to just the deer), Glow (47% opacity) and Color Enhancer, and Local Adjustments of Vibrance to just the deer at 57% layer opacity. On a stamped layer, Topaz ReStyle (see sidebar for website link) Zambezi Zest preset was applied. Nik Viveza 2, a Black and White Adjustment Layer and several Curves Adjustment Layers were used to get the final look. On a New Layer a white Spotlight Effect was added to the deer head to draw the eye. That was it. Wonderful place to visit and explore!…..Digital Lady Syd
A Golden Snow on a Clock Tower
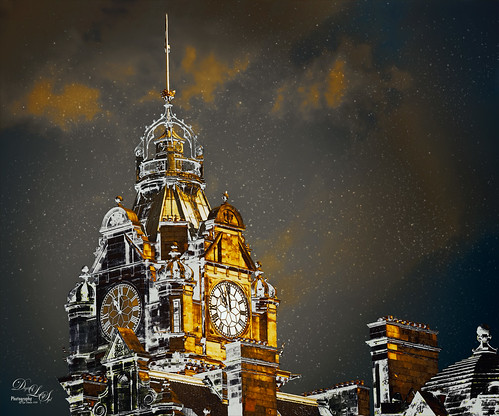
If you have ever been to Edinburgh, Scotland, you will probably recognize the historic Balmoral Hotel and Clock Tower that is near the Train Station (since 1902 the clock is set 3 minutes fast so people do not miss their trains). I was just playing around with the image thinking it might make a nice black and white image when I can up with this result. Started with a rather vintage looking preset from my LR 4 days. It gave that really nice warm feel that looked nice. Then it was cropped and Lucis Pro (no longer available) was applied to overall sharpen the image – it was way overdone. Not sure why I tried this, but I set the layer to Divide blend mode and got all this wonderful snow on the shadow side of the tower! A black layer mask was added to hide most of the effect and just painted in the white snow areas. The layer was then set to 92% layer opacity to let some of the sharpness show through. On a New Layer a particle brush created from Corey Barker’s video called Corey’s Universal Particle Brush was used to add the falling snow effect and set to 59% layer opacity. It looked pretty nice just this way. On a stamped layer (CTRL+ALT+SHIFT+E), Topaz (see sidebar for website link) ReStyle – one of my very favorite Topaz filters – was opened and this is basically what it looked like by using the Peat and Rock preset. This is why I love this filter – you always get some interesting results you had not thought of trying. It has not been incorporated with their Topaz Studio interface yet. Next used the Matt K vignette technique (see my How to Create a Subtle Vignette blog) to create a soft vignette effect. I kind of like the illustrative look created by using the Divide blend mode on this image. Lots of fun here!…..Digital Lady Syd
Happy New Year!
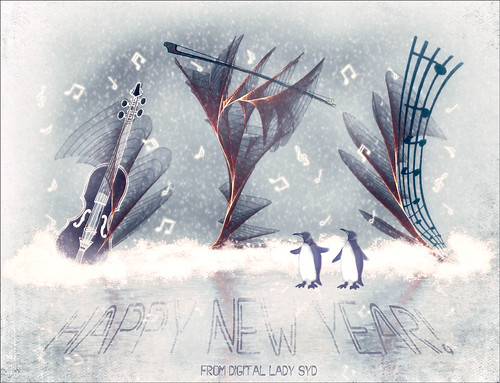
Just wishing everyone a Happy New Year! I am really looking forward to trying out some new techniques and keep working on my digital art, as shown above. I actually painted this image a while ago and decided to make into a Happy New Year greeting by adding the cute penguins brush by Altergromit and some text. There are lots of layers in this image. To get the string look, a Corel Painter brush called Spring Light was used to get this effect. It was saved down as a PSD file and where I could finish up the design. Violin and Bow are from the Design Shop.The notes are from FX Ray Music Brushes. The font is Starway. And lots of snow brushes were used – mine and other peoples to get this wintry look.
Topaz Labs AI Gigapixel
Check out AI Gigapixel stand-alone software for upsizing your images. It’s incredible! And it can now be used as a plugin when in Photoshop. Also Topaz Labs Photo AI has some great sharpening and denoise tools along with Photo Video AI.

Luminar Neo
Click here to visit Luminar for more info and check out their new AI Filters.

GRUT BRUSHES – Photoshop Brushes for Digital Artists
Click here to visit GrutBrushes.com
And be sure to check out his Free Brush of the Week and Brush Sampler! These are the best brushes you can find!

Topaz Studio 2 and Legacy Topaz Labs Filters
Unfortunately Topaz Studio 2 and other Topaz Lab filters are no longer available for sale as of 2020. If you had bought these filters and would like to put them back on, here is a link to the Legacy Apps where they can be downloaded again. Below is an example of the wonderful Remix AI Filter from Studio 2. The wonderful Impression still works fine in Photoshop right now along with Adjust (all versions), ReStyle, and even PhotoFXLab!

On1 Photo Raw
Wonderful software to use as a substitute for or plugin with Photoshop. Many great filter effects and lots of AI capabilities!
