Anything Photoshop or Photography

Latest

A Flamingo’s Private Park

Composite image at Waimea Valley in Oahu, Florida.

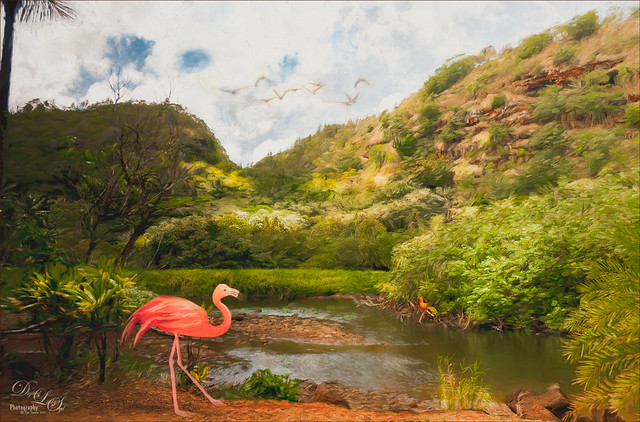
This image was created because I watched a couple really interesting videos and thought I would try them out. The original image was pretty nice, every image taken in Hawaii is usually pretty good, but it was boring. This is actually an image from Waimea Valley on Oahu. One technique I did try out was Dinda Unmesh’s technique for adding a Saturation layer mask to a Hue/Saturation adjustment layer. The video was called Saturation Mask? A Great Way to Enhance Colors. (This is very similar to my blog and video called Using Adobe Photoshop’s HSB/HSL Filter as a Saturation Mask). The Flamingo is one from PixelSquid – a polygonal looking bird that had to be painted to smooth him out. The Flying Birds are also from PixelSquid. The other bird near the water is free stock image. A shadow was created for the Flamingo using another new technique by Jesus Ramirez called How to Make Realistic Shadows in Photoshop – it used a 3D technique that was quite easy to do. Then his Color Matching in Photoshop Fast and Easy Method video was followed – this is major easy and works great using the Curves Adjustment Layer settings. Amazing! It blended all the objects into one image. Otherwise just followed my workflow to finish up and added a white painterly looking texture I created a while back. It was a lot of fun to try out some new techniques……Digital Lady Syd

Happy New Year!

Happy New Year message with a Christmas Cactus image

Happy New Year to everyone – thanks for visiting my blog when you get a chance. This image is of my Christmas Cactus that was in full bloom for my holiday this year. To get the soft background, used Topaz (see sidebar for website link) AI Remix (A Neon Rose preset with the leaves brushed out at 50%). Painted some texture and snow on the image. Last step was to add Nik Viveza 2 to sharpen up the petals a little. The font is called Buffalo Inline 2 Grunge. Looking forward to have a wonderful 2019!…..Digital Lady Syd

Santa Relaxing after Busy Holiday Flight

Just an image of one of the my son’s favorite tree ornaments. Nothing like a warm dip after a hard night’s work. Workflow included a few changes and a crop in Lightroom. In Photoshop used Topaz (see sidebar for website link) AI Clear, Lucis Pro 6.0.9 applied with a black layer mask and painted in on Santa’s beard and Reindeer face, and some clean up and line accent. A spotlight layer was created on Santa and the Reindeer’s faces. Last step was to add a little Nik Viveza 2 to add a slight vignette effect. Hope everyone is having a wonderful holiday!…..Digital Lady Syd

Posing for the Family Christmas Picture

Merry Christmas to everyone! Enjoyed making my annual Christmas images – this one was particularly fun since I really like the free funny vector characters in the image from Spoon Graphics. The really cool spiral was created using the Hibiscus flower in Topaz (see sidebar for website link) Studio using the Motion Blurs Swirl set to an angle of -1.00. Back in Photoshop, the Hibiscus flower was selected and taken back into Studio where the Impression Adjustment was using Jai Johnson Oil Glaze Light preset (see her In the Digital Studio January 6 2017 video for the settings). Then some snow was added on the ground and a white texture added and set to Multiply blend mode. My free SJ Snow 2 Overlay slight blur PNG was placed on top at 54% (I still think mine is the best out there since it is a png – no blend modes needed to use it). The font is Honey Script. Maybe you can download or use some of these resources. Anyway, have a very Happy Holiday!…..Digital Lady Syd

Happy Place for a Hornbill

Love this guy! This Hornbill is definitely in charge of his domain and seems to blend right into it. This image is exactly why I love Topaz (for website link see sidebar) – this Studio Adjustment called AI ReMix never ceases to amaze me. The original image was not good and I had basically decided this Hornbill would never be used. But I am finding AI ReMix is a game-changer for me – this guy turned out pretty nice! (The Studio settings were: AI Clear – Remove Noise Medium and Sharpen High; and AI ReMix: Desert Prism at 65% opacity, Low Style Strength and Brightness -0.35, Contrast 1.04 and Sat 0.75.) Back in Photoshop, a little spotlight effect with a white brush was used to brighten up the tree fronds to get a bit of a translucent effect. It took a little clean up to get the final, but overall, this plugin saved an image…..Digital Lady Syd

Mockupped Sailboats

I have never used a Mockup File before to show off my images, but this one sort of seemed to fit this image since there is a strong triangle effect. First a free Abstract Mockup file by Best Pixels was opened up in Photoshop.  The top layer is a Smart Object layer which must be opened by double-clicking on the thumbnail icon and then your own image can be placed in and aligned with a Free Transform (CTRL+T) if needed to fit the frame opening – must Save this image when warning comes up (the file does not appear anywhere in your folders but you still have to save to add in your image). This is where my Sailboat image from Camachee Cove was added into the image. On top of the bottom layer a Solid Color Fill Adjustment Layer was added using a light blue sky color. Next one of several free beautiful Watercolor Clouds Textures by Presets Galore was placed under the Smart Object ans set to 45% layer opacity. In a layer mask, the picture frame areas and few other places were masked out with a black brush. On top a Curves Adjustment Layer was added. Nik Viveza 2 was added on top where a little warmth was added into parts of the mockup. That was it. I love the dreamy feel this created…..Digital Lady Syd

Joyous Ornaments Lining Up for the Tree

Image of Christmas Ornaments
This is just one of those crazy photos that make me laugh. It is not all that sharp but sort of exemplifies the total chaos it is for me to get all the ornaments up and hanging right! Biggest issue I had was to get this image sharper without deteriorating the quality. In Lightroom’s Develop module, used my SJ Sharply Dark LUT (created in my blog and video called How to Create Profiles in ACR from LR Presets and Some PS LUT Files) and set it to Amount 81. Then did just the normal adjustments. Radial Filters were used to help sharpen up some of the ornaments I wanted particularly in focus. Went into Topaz (see sidebar for website link) Studio from LR and used AI Clear (applied it twice to get some additional sharpness and it worked!), the Precision Contrast adjustment, Topaz Lens Effects Diffusion Adjustment to soften overall just a little and Topaz Studio Focal Blur Adjustment, placing it over the main ornaments to keep sharp. Then back to LR where it was opened up in Photoshop. Did a little clean up of some edges and used Nik Viveza 2 to emphasize the focal point on a few ornaments. That was it. I find this a really soft sort of happy image – not one that goes up on the wall but one that reminds me of Christmas!…..Digital Lady Syd

View from The London Eye

Black and white image from
Just thought this image from the London Eye looked nice with a black and white treatment. This time in Lightroom used one of Sergei Ramelli‘s preset called AA Drama Gradient Filter (subscribe to Serge’s newsletter to get the preset and lots of others) and then went in and tweaked the settings – added some Radial Filters also to emphasize the setting sun on the buildings. Did a crop of the image before taking into Photoshop. On a duplicate layer used Topaz (see sidebar for website link) AI Clear Adjustment, applied it, and opened up Topaz Black and White Effects plug-in from the top drop-down. This time selected from the Traditional Collection the Classic with Grain preset – but turned off the Basic section and used mainly the Adaptive Exposure, Regions, Detail, and Detail boost sliders. In the Finishing Touches selected the Silver and Paper Tone and adjusted to get a nice off-black, almost purple color. Back in Photoshop added a Curves Adjustment Layer. Not much too it…..Digital Lady Syd

A Little Wintry Guitar Playing

A Little Winter Guitar Playing
Well here is one of my favorite ISORepublic images called Guitar Man that I often choose when trying out a new technique. I used to play guitar and I think that is why I like it. This time I liked the result so well I decided to post it. I spent a lot of today watching a video (unfortunately it was not a talky), but it was so good I took notes and worked along with the basic steps anyway. The video is on You Tube and called Technical Dost/Digital Painting/Smudge Painting/Photoshop Tutorial by Nikhil Shirkar – some of the technique just did not work for this image like a lot of the smudging, which seems to apply to portraits more than this type of image. What I did like were the brushes he linked for the download. I especially liked the Danger Pig Strokes 01 free brush set and there was also a nice white watercolor grunge texture to use. I decided to use my own background texture, but his is quite nice. Otherwise it is just adding in elements and strokes to get a nice grunge feel. I used a watercolor border at low opacity to give a little vignette effect. The notes were created from some sheet that was downloaded and made them into brushes – I use them all the time. Overall just a lot of fun to do and the only filter used was Topaz (see sidebar for website link) AI Clear to sharpen the image. And also beware that when using some free images (including this image), the resolution is set to 72 dpi. Need to adjust this by going to Image -> Image Size and setting the Resolution to 300, then uncheck the Resample – the Width and Height will readjust – and recheck. That will give you a normal size image with the correct Resolution. ….. Digital Lady Syd

Fishing the Osprey Way

Osprey perched on a branch
Here’s an image of a beautiful Osprey checking out the swampy area he apparently lives above. I don’t know how he balances on that tiny branch, but you can see how big his talons are so that explains it. Initially I did not think the image was sharp enough to use this cropped in. After adding Topaz (see sidebar for website link) Studio’s AI Clear adjustment and following Unmesh Dinda’s video called The Hidden 3D “Contrast” in Photoshop, the bird just sort of popped. Used a rather washed out texture I created behind him and added a Hue/Saturation Adjustment Layer on top for the blue tones. Then added a Curves Adjustment Layer to brighten the image back up. The free font is called Old Originals……Digital Lady Syd