Anything Photoshop or Photography

Latest

How Did This Happen?

Image of a Ring-Tailed Lemur caught in a bottle.

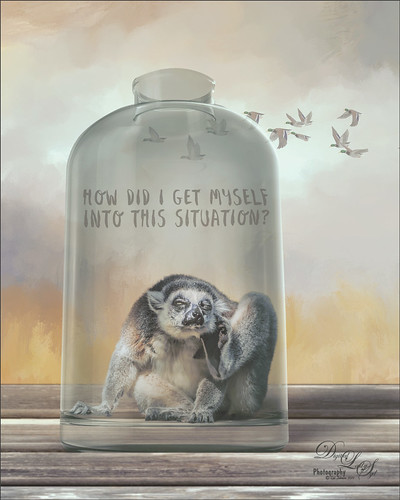
I had initially post-processed the Lemur as its own image. Then I ran across a nice video by Jesus Ramirez called The Best Way to Select and Mask Glass (or Transparent Objects in Photoshop. I had to try it and that is how my Lemur buddy ended up in a bottle. The original Ring-Tailed Lemur image was taken at the St. Augustine Alligator Farm in Florida. This image used a Noise Gradient Map Adjustment Layer (see my How to Randomize Some Color with the Gradient Map Adjustment Layer blog). The Lemur was selected out of my original image that I may post sometime and was run through the Select and Mask command before moving him into a glass bottle from Pixel Squid. The flying Canadian Geese are also from Pixel Squid. The background is one I painted in Corel Painter and the wood is a texture from Kelby One. Just a lot of fun to put together!…..Digital Lady Syd

Hiding in the Shadows of a Tree?

Image of a Koi in the pond at the Asian Bamboo Gardens, Jacksonville Zoo in Florida.

Took this image of the colorful Koi in the Asian Bamboo Gardens pond at the Jacksonville Zoo in Florida. The fish almost looks like he is in a tree but those are just reflections of the large trees around the pond. Topaz (see sidebar for website link) Studio’s AI Clear Adjustment was used on the fish along with the Edge Adjustment to define his body edges and details a little more clearly. Dehaze was also applied at 0.89, a pretty heavy amount to clear up the hazy water. In PS Topaz’s new Sharpen AI filter was set to Stabilize at an amount of 70. (See my Topaz Sharpen AI – Good or Bad? And Yes, Free Upgrade for Topaz Infocus Owners blog for more info.) Back in Photoshop, Topaz Restyle’s Swamp and Sherpa Blue preset was applied. Then on top one of my own Lookup Tables was applied at 40% layer opacity. The last step used a slight spotlight effect on the Koi’s head. There were several quite beautiful large fish in this pond that made it look very interesting. ….. Digital Lady Syd

The Trail from ??????

Image of the Trail in Ravine Gardens with the Azaleas blooming.

This image was taken at Ravine Gardens State Park in Palatka, Florida where it is known for their beautiful Azaleas. They were blooming a bit early this year so my Photo Club made a quick trip to catch the buds at just the right time. How could this beautiful flower lined trail be so bad? Word to the wise if planning a visit to this park. It is quite steep in places and the stones are very unevenly placed so it is a little tricky to hike on, especially if carrying a heavy camera around. In this Park’s defense, it was heavily damaged by Hurricane Michael last year and they are just getting it back up to speed. Not a lot was done to this image (after all it is of gorgeous Azaleas – what else do you need?) but of course I used my trusty Topaz (see sidebar for website link) Studio AI Clear. Just enhanced the steps with a spotlighting effect for where the sun was peaking through already, added a pink overlay to enhance the pink color, and added a little vignette. Lots of fun to explore!…..Digital Lady Syd

My Magical Garden

Image of Spanish Moss at Ravine Gardens in Palatka, Florida

This Spanish Moss image was photographed at Ravine Gardens in Palatka, Florida. Since the trees do not have their leaves yet, the Moss is just hanging off the bare branches and with the sun was just rising, it gave a sort of magical feel. This image took a lot of post processing. Topaz (see sidebar for website link) Studio’s AI Clear was applied and this time the Exposure was set up to 0.53 and Clarity to 0.36 to lighten up the whole image. And a little bit of Topaz Detail was used to really sharpen up the moss effect. Some lighten and darken Curves Adjustment Layers were used to add some contrast. On a stamped layer Topaz ReStyle”s Polo Blue and Pink Lace preset was applied at 62% opacity using the Color blend mode. Another stamped layer was created and Luminar’s (see sidebar for website link) Image Radiance (this creates a really nice effect) and Cross Processing using the Auckland preset at Amount of 20 finally gave me the result I liked when set to 53% opacity. Nik Viveza 2 was used to even out all the coloring and adjust the focal point. Who knew all these filters would be needed to get this magical effect???……Digital Lady Syd

Best Friends

Image of Two Toucans at the St. Augustine Alligator Farm in Florida

Just went a little crazy here and had a bunch of fun in Topaz (see sidebar for website link) Studio! My recent trip to the St. Augustine Alligator Farm was a lot of fun but my pix of these two characters did not come out well. (They reminded me of Heckle & Jeckle from cartoon days past.) So I decided to improvise using a lot of adjustments to get this colorful Toucan image. Used AI Clear, Ai ReMix twice, Edge and HSL Color Tuning – threw them all into a preset and put it up in the Community called SJ AI ReMix Cartoon Look if you want to give it a try. Back in PS just cleaned up the image a little, and added an Exposure Adjustment Layer on the eyes (yep, use it even on cartoon looks). This was a lot of fun to create. …..Digital Lady Syd

Old Scotland

An image of Edinburgh using a Wet Plate Template effect

Decided to do something different today. This image of Scotland taken from Edinburgh Castle was created using a pretty cool template to get this vintage effect. This is a Wet Plate Template file by Photo Spirit. The file comes in as a PSD file and one of your images is inserted in the Smart Object layer provided. There are then all kinds of groups provided that can be adjusted to get the final effect you want. In this case the Light Textures group and the Dark Textures group were used. Lots of fun here and I think it gave a pretty realistic old image effect…..Digital Lady Syd

Twirling Out of Control

Just had some fun trying out a technique shared by one of my Photo Club friend Joe. Apparently this twirling technique was quite popular several years ago and it creates some really interesting results. This image started out as a macro image of purple and white pentas growing in my front yard. By adding several Radial Blur, Twirl, and Mezzotint filters, this interesting combination of lines and swirls is created. Here are links to two short and interesting videos on how to create this effect if you would like to try it yourself: The first by Steve Patterson is very well done and is called How to Create Abstract Twirl Effects in Photoshop, and the next one by Jay adds some more ideas to enhance the effect and is called The Twirl Effect Using Photoshop. I found several color schemes that worked really good with this result and finally ended up with a light more muted effect. Try Topaz (see sidebar for website link) ReStyle for some interesting results. Guess I had better get back to really post-processing some of my images. …..Digital Lady Syd

Don’t Take My Picture!!!

Image of a roaring Jaguar

This unhappy Jaguar was stomping around his terrain at the Jacksonville Zoo when I creeped up on him to get his image – he was not at all happy about it – I guess he thought I was the paparazzi. Such a beautiful cat with such a humongous roar! Anyway I got his photo in spite of his attitude and luckily he was behind a fence. Used the technique from my How to Get Rid of Those Darn Fences in Zoo Shots blog. In Lightroom I just used settings that worked, then into PS and the Topaz (see sidebar for website link) AI Clear to sharpen it up a bit more (settings: Remove Noise – Auto and Enhance Sharpness Low – Exposure -0.12 and Clarity 0.19). Actually used the Shadows and Highlights Command to pop the eyes a bit (see my The Eyes Have It – How to Make them Pop in an Image blog). Then used some Darken and Lighten Curves Adjustments Layers. The texture was an old free basic one from Jai Johnson called coffee wall, and then a Hue/Saturation Adjustment Layer was used to fine tune the background color. That meant I needed to select the Jaguar to put him on the nicer background and it took a while – those whiskers were a problem and eventually they had to be painted back in by hand. A Color Lookup Adjustment Layer was added using the Candlelight preset set to 56% layer opacity. Now just some clean up was done. This guy took several hours to really catch his personality. Wow what a cat!!!…..Digital Lady Syd

Observing the Local Terrain

Image of two Abdim's Storrks

As I stated on Flickr, these Abdim’s Storks are huge and they were not real happy about being in a rather crowded aviary at the Jacksonville Zoo. So at their request, here they are in a more appropriate setting. They seem to be quite comfortable now. First in Lightroom Serge Ramelli’s Safari Warm Dramatic Light preset was used – then adjusted his Graduated Filters and Radial Filters before bringing them into Photoshop. (For presets go to his video called How to Edit Amazing Landscape Photos in Adobe Photoshop and Lightroom.) The birds were selected using the Quick Select Tool and the Select and Mask command. Then to find a good background, I used one of Serge’s free skies called Blue Morning from his his video called Replace the Sky in 2 minutes using Photoshop Libraries. I did create a PS Library Group for these skies and added a few of my own. Then just some clean up and an Eye Exposure Adjustment Layer. Nik Viveza 2 was used to even out the color tones in their bodies and last step was a Curves Adjustment Layer. I think they look much happier……Digital Lady Syd

Happy Valentines Day

Valentines Day image of some Greater Flamingos

These beautiful birds, the Greater Flamingos which are not real bright pink like the American Flamingos, are enjoying the holiday – here they are observing some rather tree-like hearts in the pen. Since it is a holiday, I will not go into major detail on how I created this effect – it was a major trial-and-error in this case. The hearts are all from Julia Mead, a really great scrapbook object creator. The texture is called Imperfect Heart Soft Pink by Evelyn Flint (can’t find a link but it was in her Flickr feed at one time), and the font is Antalia Script. The rest is my own doing. Used so many different filters: Topaz AI Clear and AI ReMix, Luminar, and Nik Viveza 2 and Color Efex Pro 4. Lots of clean up layers and adjustment layers. Lots of fun to do. Everyone have a very Happy Valentine’s Day…..Digital Lady Syd