Created this image using Adobe Firefly AI – created a layer and clicked on the new bottom icon that says “Generate an image using a text prompt.” Used the prompt “surf shack at the beach at sunset, with surfboards. Silhouetted surfer holding surfboard looking at sun.” I got the above basic image with an ugly surfboard so another a selection of it was made. Ran another Generative Fill with the prompt “Hawaiian flowered surfboard” and got the above variation. Had to select the surfboard and do a Free-Transform (CTRL+T) for it to fit over the original ugly surfboard. Added in some birds and a little clean up to get a very nice Hawaiian scene. The font is Zahra Inline Grunge. This was actually a lot of fun to do!…..Digital Lady Syd
I like Mark English‘s work a lot and decided to try it again to get my creative vibe flowing. Not sure this is exactly a “self-portrait,” but I do think it represents my recent feelings. For info on how I discovered his art, check out my Masked Tidbits Blog with more info on this. No AI was used in this image – all digitally drawn and painted in Adobe Photoshop 2024. Just a couple things make this image unique for me – I created a brush to give a really heavy texture feel to the image. In a 50-pixel Chalk brush, I added a texture pattern from Jessica Johnson – she uses this pattern (TM-6) a lot in her brushes (see Texture section of brush to download-check the little + sign on right of pattern), but I did not use her Pattern Stamp brushes, just the texture. Since Transfer’s Flow Control Panel was set to Pen Pressure only, it can be painted over to get a more dense effect if needed. Used the same texture pattern in a layer style for the hair with the Pattern Overlay set to Opacity 17 and Scale 93 – layer was set to 46 Opacity and Fill 0, and just the hair was painted over on the layer. Otherwise just the same workflow for drawing. Lots of fun to create this…..Digital Lady Syd
I tried out Google’s ImageFX to see if I liked it as well as Adobe Firefly – thought it did a pretty good job but still not sure how to use the prompt to get exactly what I wanted. Only used one prompt called Sketchy – it created several beautiful sepia and black and white sketches. On this image a pencil outline of the original sketch was created. The various AI brushes from my other blogs were used to paint in the face and hair. Then took the image into Portraiture Pro and completed her face features. Went back into ImageFX and used the prompt “Dinosaur Open Mouth” and added the dinosaur in the upper left. A Selective Color Adjustment Layer was added to adjust his coloring. Made a Vignette using my Using a Levels Adjustment Layer for a Vignetting blog (great for precisely setting up the vignette on the image). The Font is called Lobster and used an Outer Glow Layer Style. Overall, I would say that ImageFX is doing a better job with faces, but it appears there are limited choices when a prompt is used (or I need to learn how to use it better). Anyway, it was fun to try out….Digital Lady Syd
Spanish Cay is on the northern edge of the Bahamas – in this image you can see the blue water from the Atlantic Ocean outside the little cover areas shown. There are plenty of small beach areas that look wild and secluded just like this beach. This image was post-processed using Photoshop’s Sky Replacement panel as the sky in the original photo was totally flat (the sky is from a company that is out of business now); On1 Effects 2023 using the AI brush to select different parts of the image – used Dynamic Contrast on the dead branches, foreground water, and fence (see Getting Started with On1 Effects 2023 by On1 and How to Reveal Stunning Detail in Your Water Photos by Scott Davenport); and Camera Raw Filter (see The Photo Editing Trick Every Photographer Should Know! by Mark Denney). It was fun trying out all these techniques. …..Digital Lady Syd
Had to get load my camera with my favorite 60 mm F/2.8 macro lens (with my Bower 0.5 x High Definition Wide Lens attached) to get some pix of this crazy (and major hungry) grasshopper. Never seen such a large grasshopper in my life. (I could actually hear him chomping in the garden)! He was playing peak-a-boo with me while I was taking the images. Topaz Sharpen AI did a fabulous job capturing all the beautiful detail on this insect. Then just some dodge and burn for more on his details (see my The Best Dodging and Burning Technique! blog), an Autumn Colors Lookup Adjustment Layer, Black and White Adjustment Layer to adjust the tones, added a highlights layers and a shadow vignette, and ended up with a Curves Adjustment Layer. He really is quite a spectacular kind of guy!…..Digital Lady Syd
Very classic view of Piccadilly Circus – added the Milky way to spice it up a bit. Decided to try out the new Lightroom Detail’s AI Noise Reduction Denoise Filter on an older image taken at night. It worked pretty darn good! If you have LR, check it out. It may take a while to process, but it will improve you image! In Photoshop used the Remove Tool to try to get ride of some of the more obvious people in the image and some distracting bright spots – worked fine also. Then added Serge Ramelli‘s Milky Way texture and set it to Color Dodge. By using the Blend If in the Layer Style (Current Layer black tab split and set to 0/96), it looked more natural in a city setting. A Color Lookup Adjustment Layer using Africa from Photo Focus – set to Screen blend mode. Used a Selective Color Adjustment Layer to adjust colors a little and that was it. Totally impressed how well an unusable turned out!…..Digital Lady Syd
Just had some fun trying out the new Beta Adobe Firefly AI – used one of my drawn images of my tailless cat Sophie as a reference photo to create the cat items in this image. A new Generate Image was created using the prompt “A futuristic city.” Generate Image means a whole image is created at a higher resolution than the original Firefly 1 which is currently in PS 2024. For a square image, it now generates at 2048 px X 2048 px versus Firefly 1’s lower resolution square at 1024 pixels X 1024 pixels. For a really good explanation of all the new features, check out Dave Kelly’s YouTube video called Fire Image 3 Now in Photoshop Beta. Generative Fill layers were run for the 3 cat elements. The image did need some clean up and a couple Color Lookup Adjustment Layers were used. Lots of new things to try! ….. Digital Lady Syd
Just enjoyed posting an image a Bonobo Monkey at the Jacksonville Zoo – needed some wildlife post-processing practice! Used the Remove Tool, Sharpen Tool, a texture, Liquify Filter, layer for filling in hairs by painting using Coyote Mange animal hair brushes (still the best out there for this), Viveza, Lighten and Darken layers, Exposure Adjustment Layer for the eyes, Red Channel Curve Adjustment Layer, Luminar Leo Filter using my favorite Mystical effect, and Color Efex Pro Filter (an oldie but goodie for me). These are all techinques I have discussed on my Fun Photoshop Blog or my Tidbits Blog here at some time or another. As you can see, I still use them a lot. …… Digital Lady Syd
Just had fun with this one. Took a very blurry snapshot from an old colored short video of the streets of Paris. I actually wanted a copy of the dress one of the ladies was wearing in a different segment for drawing, and thought this interesting cafe image would be fun for try out. Just good ole’ Topaz plug-ins were used on this image. On a duplicate layer Topaz Studio 2 was opened and AI ReMix Crinkled Portrait preset was used changing some of the Brightness and Color sliders in the panel. Then on a New Layer above, Topaz ReStyle was opened to add the final effect using a preset called Midday Hay Fields. A Black & White, Color Balance, Levels and Selective Color Adjustment Layers were add and some text using the Broadway Engraved BT font. Enjoyed going back to my basic filters!…..Digital Lady Syd
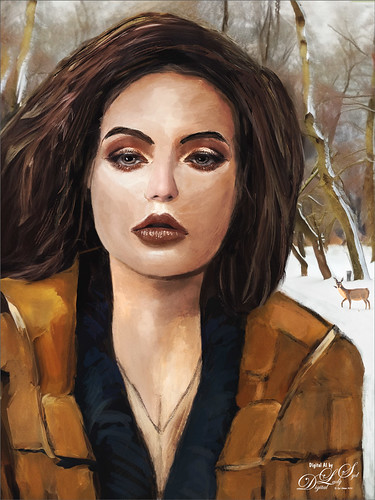
My AI Generated selfie has found herself surrounded by snow and wildlife creatures in her own winter wonderland. For this image I wanted more of a painterly effect, so mainly painted with Kyle’s Thinner Oil brush from his Winter 2024 set. Since I have covered just about everything I do with my selfies, I will only add a couple new tips. First off, on this image an Airbrush set to Opacity 100%, but Flow at only 18% was selected – softens a lot of the hard edges that the Thinner Oil brush left on her skin. Can use any brush tip for this brush (set Size Jitter Control to Pen Pressure, Transfer Opacity Jitter to 92% and Control to Pen Pressure, and Build-up and Smoothing checked on). The other tip I thought I would mention is that it helps a lot to do some screen shots of faces that have make up applied and would look good on AI the face. If you have used the AI Generative command at all, you know there are always bad variations created. Many of them are created and deleted to get something as nice as this variation, and then it can take several hours to get the painterly effect wanted, as in this case. The background was created by selecting the Selfie and inverting the selection, then in the Generative Fill prompt type “digital oil painting of wintry park scene.” The deer was taken from a different variation in the group (just used the old Apply Image Trick; selected the deer and copied it onto its own layer, and then moved into this image – see my Fun Photoshop Blog Placing Any Photoshop Generative Fill Variation on a Layer Easily). The other brushes used were the Painterly Smudge Brush and the 36% Blender for face from Grut’s watercolor Late Never brush. For settings on these brushes, see the bottom of my Fun Photoshop Blog A Few Selfie AI Tricks.) Hope you enjoy her!…..Digital Lady Syd
Check out AI Gigapixel stand-alone software for upsizing your images. It’s incredible! And it can now be used as a plugin when in Photoshop. Also Topaz Labs Photo AI has some great sharpening and denoise tools along with Photo Video AI.
GRUT BRUSHES – Photoshop Brushes for Digital Artists
Click here to visit GrutBrushes.com
And be sure to check out his Free Brush of the Week and Brush Sampler! These are the best brushes you can find!
Topaz Studio 2 and Legacy Topaz Labs Filters
Unfortunately Topaz Studio 2 and other Topaz Lab filters are no longer available for sale as of 2020. If you had bought these filters and would like to put them back on, here is a link to the Legacy Apps where they can be downloaded again. Below is an example of the wonderful Remix AI Filter from Studio 2. The wonderful Impression still works fine in Photoshop right now along with Adjust (all versions), ReStyle, and even PhotoFXLab!
Please note that I do make a very small commission on purchases made if you click through to the websites using the links above – it helps me keep my site going. Thanks for clicking.