Anything Photoshop or Photography

Latest

Monarch Butterfly’s Magical Dust

Image of a Monarch Butterfly at the Harry P. Leu Gardens in Orlando, Florida

This was one of many lovely Monarch and other types of butterflies that were very busy spreading the magic dust to the beautiful flowers that were in bloom at the Harry P. Leu Gardens in Orlando, Florida. This image took me forever to decide what to do with it! It had a really distracting background with all the crazy leaves going all over the place – it was a hard image to capture as the butterflies were going crazy on the hot day I visited. In Photoshop Luminar’s (see sidebar for website link) Flex was used to calm it down some and add some structure to the butterfly, then Viveza 2 twice to try and soften the background, before using Topaz (see sidebar for website link) ReStyle to get the final color palette. That’s along with some painting, spotlight effect, and Red Channel Curves Adjustment Layer. I think I finally got the mystical magical effect I was trying to create……Digital Lady Syd

Mars from Above

Image from the HiRISE camera aboard the Mars Reconnaissance Orbiter.

I follow a blog that sends out B&W images from the HiRISE Camera (link shows original image) on board the Mars Reconnaissance Orbiter. Every now and then a really interesting one shows up with lots of detail and depth like in the image above that shows Recurring Slope Lineae (dark markings on steep slopes). The image needed to be sharpened so Topaz’s (see sidebar for website link) new Sharpen AI was used. Then several adjustments layers were added: Channel Mixer set to Hard Mix blend mode at 36% opacity and 6% Fill, Gradient Map set to Vivid Light at 36% opacity, another Gradient Map set to Overlay, Hue/Saturation where the Greens were adjusted, and Curves set to Darken. Several Spotlight Effect layers in different colors were used to further direct attention to certain areas. Nik Viveza 2 was used to even out the tones and sharpen the focal points, and the font is called Abraham Lincoln. This was a lot of fun to do and it is hard to believe the image is from Mars!…..Digital Lady Syd

Splendiferous Bougainvillea

Image of pink Bougainvillea blooms

The beautiful blooms above are growing in my front yard right now – they are quite pretty and textured. Shot manually My 60 mm Nikkor macro lens was used with a Bower 0.5 x High Resolution Digital Lens with Macro added to the lens. I always love the results of this lens. Luminar 3 (see sidebar for website link) was used to bring out the detail (used Structure, Details Enhance, Image Radiance, and Top and Bottom filters). A mixer brush was used to smooth out the background. The font is called Beauty Angelique. Nik Viveza 2 was used to further highlight the focal area. That was it!…..Digital Lady Syd

Wanted: Female Interested in Long Relationship

Image of a painted Lappet-Faced Vulture

This handsome specimen of a Vulture (he really is not that grumpy when you meet him) was really fun to paint. A couple of textures were used, one I painted in Corel Painter and another containing a heart bokeh effect, an Evelyn Flint Flickr Texture. The bird was separated from his background and then my newly created Flat Fan mixers were used to paint in his feathers. Some spotlight effect was used on his face and the text font is called Parkway Lush. Lots of fun to do!…..Digital Lady Syd

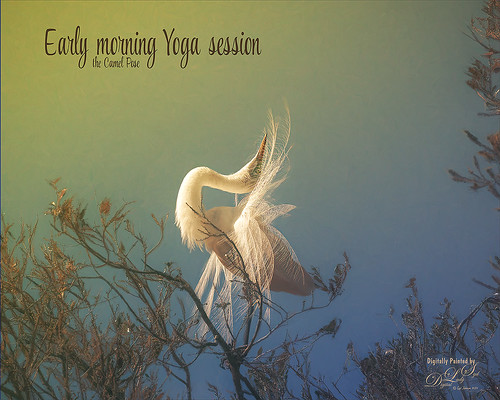
Early Morning Yoga Session

Image of a Snowy Egret stretching at the St. Augustine Alligator Farm rookery

This beautiful feathery Snowy Egret is getting up early and doing a few Yoga exercises to get ready for a full day of finding a mate. Image was taken at the St. Augustine’s Alligator Farm’s fabulous rookery. Tried out the new Lightroom Texture slider which made the feathers just pop out really nicely. In Photoshop, Topaz (see sidebar for website link) Studio where AI Clear was added first. Then the Default setting for Impression was used, but this time the Painting Progress was set to 0.31 so only a bit of paint was added to the tree branches which looked really bad. The paint was removed from the bird using a Luminosity mask and painting out some more at 0.42 Mask Transparency. Then some Mixer painting clean up was done in Photoshop to smooth out some of the edges around the bird. A yellow light leak was added to make the sky look warm and to match the lighting on the bird. The text used the font called Style Casual. That was about it. …… Digital Lady Syd

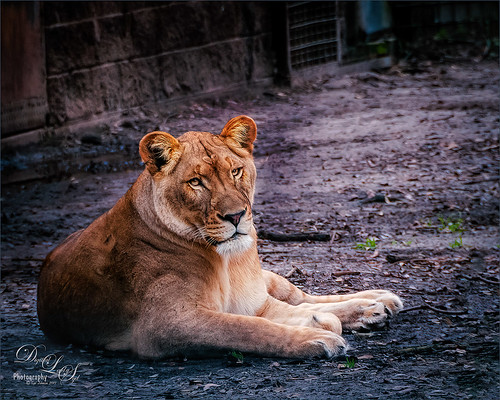
The Lioness – Need I Say More?

Image of a Lioness at the Jacksonville Zoo.

This beautiful lioness named Taum (I think) lives at the Jacksonville Zoo and looks totally regal while she watches over her domain. She was originally post-processed in Lightroom using Serge Ramelli’s Safari Animal Vignette Cold Medium (click for video to download link) and then made changes to fit this image. Overall it just gave a nice cool feel to the background. In Photoshop Topaz (see sidebar for website link) DeNoise AI was used and it just gave a very subtle effect. So the image was taken into Topaz Studio using the AI Clear Adjustment (Remove Noise Low, Enhance Sharpness High, Recover Details 0.33, Exposure -0.13, and Clarity 0.35), and the Precision Detail Adjustment (Subtle Sharp preset and in layer mask, inverted it and then painted back the lion face and end of foreground paw – middle paws were set to 0.50 and painted back just a little). This creates a very good combination for sharpness. Then just added in some contrast and a Lookup Table (Fuji Reala 500D Kodak 2393 preset) to give a moody feel to the image. That was it……Digital Lady Syd

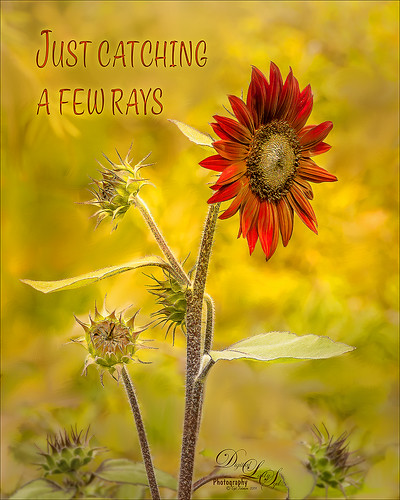
Just Catching a Few Rays

Image of a red Sunflower taken at the Harry P. Leu Gardens in Orlando, Florida.

I loved this beautiful red Sunflower taken at the Harry P. Leu Gardens in Orlando, Florida. The color is so striking. I put the flower in a warm background since it was so busy – used a soft mixer brush by David Belliveau (his brushes are really good) to smooth out any unusual lines or blobs. Topaz (see sidebar for website link) Sharpen AI set to Stabilize and both sliders to 50 to get a super sharp image. Nik Viveza 2 was used to sharpen the little buds individually and the center of the main flower. Text was one of my favorites fonts called Style Casual. An Inner Glow and Outer Glow layer style was added to the type. A Spotlight Effect using a white color to emphasize the center of the flower to draw the eye a little more. A slight vignette was created using Unmesh Dinda’s Levels Adjustment Layer technique. The last step was to create a Stamped Layer (CTRL+ALT+SHIFT+E) on top and a Gaussian Blur set to a Radius of 4.3. Then in a layer mask, the Gradient Tool set black to white and a Linear Gradient was used on just the bottom so only the very bottom buds were blurred out a little. The main stems were painted back at 50% brush opacity. That was it. I love the yellow and red color palette. ….. Digital Lady Syd

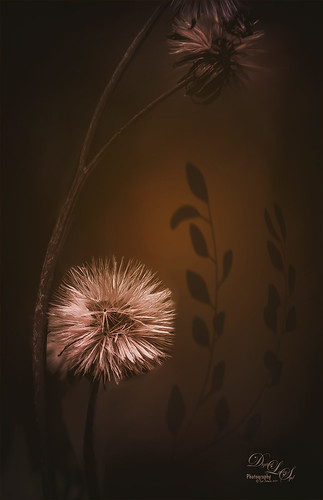
Thistles at the Zoo?

Image of thistles taken at the Jacksonville Zoo

It is amazing the things you can find at the zoo. There was a large blooming thistle bush growing along one of paths so I had to take a few shots. In Lightroom used Serge Ramelli’s Tone Bleak Mountains preset (a freebie from Kelby One) and added a couple radial filters to light up the plants. In PS, not much was done but a Center Spotlight Background was added – I used one I created in a recent Design Cuts tutorial on How to Create an Epic Poster Design in Photoshop – the tutorial was actually a little hard to follow but at the beginning a nice background effect was created. I just saved it down as a file to be used again. Shapes by amber & ink Floral Shadow 11 was used in the background – did a Free Transform and warped the shadow to fit. Last step used On1’s Color Lookup Table Moody 5 (part of owning On1 Photo Raw software) and was set to 43% layer opacity. Last step added a Curves Adjustment Layer and that was it……Digital Lady Syd

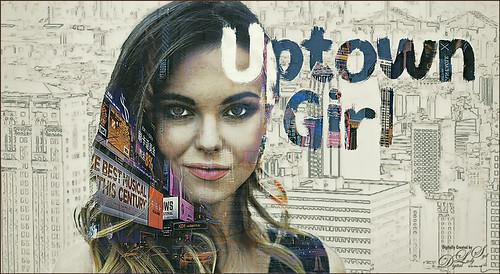
Another “Uptown Girl”

Image of a double exposure with a woman's portrait and NYC
Enjoyed creating this double exposure in Photoshop – had not done a lot of this so it was fun to try out a new tutorial to see how it went. This time a video called How to Combine Double Exposure and Selective Color Design in Photoshop by Ahmad Salahuddin was followed. (No voice so you have to watch carefully, but he has provided resources to download to follow along – very helpful.) To get the effect, the text (the font is called Adrenaline Brush) has to be set to white and clipped to the selected portrait layer (Unsplash-Portrait of a Young Woman, Florina, Greece by Pete Bellis) and then duplicated, set to black, and moved under the image. Then the image to fill up the portrait is placed on top and set to Lighten blend mode – duplicated and flipped so the words all fill up with the image. Finally the NYC image (from 20 Free New York Photos Deeezy image 05) was placed underneath – it was reduced to a sketch by using Topaz (see sidebar for website link) Studio’s Black Only II preset set to 48%. A Hue/Saturation Adjustment Layer was clipped to the NYC image and the lines were set to brownish color. The last step involved taking a Composite (stamped) layer into Topaz ReStyle and applying the Surf and Tallow preset. I was surprised how nice the final image came out. Lots of fun!…..Digital Lady Syd

Posing for a Portrait

Image of a Ring-Tailed Lemur taken at the St. Augustine Alligator Farm.

This Ring-Tailed Lemur looks like he has been posing for portraits before – he does have a bit of that Star Wars Yoda look going for him. Biggest problem I had with this image was a really large black fence across his body. Had to get a little creative but it was not really that hard. Mainly used the Clone Stamp Brush and Spot Healing Brush to paint over the bars and remove any patterning. In a couple places some new hair needed to be added so using an older free Wildlife Texture Brush Pack by Coyote Mange, several fur brushes were used to add it in – these are terrific brushes so if you do need animal hair brushes in PS, try them out. Otherwise just the basic PS workflow to get the final result. Really love this image…..Digital Lady Syd