Anything Photoshop or Photography

Latest

Where is This?

Image taken at the Infinite Space art show in Washington, DC

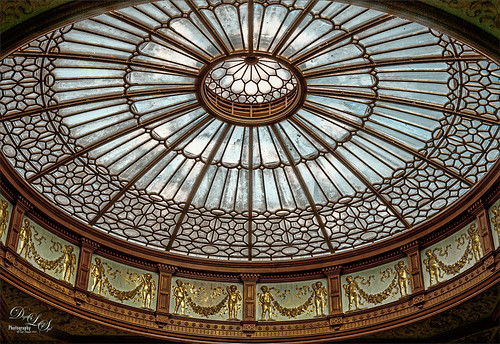
This is another image from the totally fabulous art show called Infinite Space in Washington, DC until September 2nd. The art is by Refik Anadol and is an exceptional virtual experience. For another example, check out my recent Star Wars on Steroids Tidbits Blog.

Very little was done in post-processing for this image. Only a little texture added in Lightroom. In Photoshop, just some cropping to even out the edges, Luminar Flex was used to sharpen it up a little using their Structure, Details Enhancer,and Microstructure filters – then selectively adding them with a Masking brush. And of course AI Clear to remove Noise – but is was masked out so in the black areas but left in the colored areas as I liked the natural grainy effect it created. last step was a Curves Adjustment Layer. That was it! I really love this art!…..Digital Lady Syd

Woodpecker on Guard

This little male Downy Woodpecker was visiting one of his favorite snack spots in a beautiful shaded yard. Not much was done with this image as the bokeh effect was from the 70-300 mm lens shot at 300 mm and set to f/7.1 at ISO 200, 1/50 sec and EV -1/2. In Photoshop Topaz (see sidebar for website link) Sharpen AI was used to really popped the bird (Processing Mode Stabilize, Remove Blur 0.50, and Suppress Noise 0.20). Otherwise not a lot here. Viveza 2 was used to further sharpen the bird and a Curves Adjustment Layer was added to add some contrast. What a wonderful little bird!…..Digital Lady Syd

Bison Buddies

Two Bison located at the Smithsonian National Zoo

These two Bison were trying to find a nice shady place to hide from the exceptionally hot day in Washington, DC. Since the original color in the image was so beige and brown already, it was an easy choice to make the image a sepia tone. I started with the color tones from one of the best wildlife photographer’s, Nick Brandt, creating a Lightroom very subtle preset (Split Tone section: Highlights Hue 23/Sat 6 and Shadows Hue 41/Sat 6). There was a large fence line through the bison and two different methods to remove it were used. For Wilma, just a Curves Adjustment Layer and a Hue/Saturation Adjustment Layer clipped to it. Zora was a little harder – had to select and feather the fence line and then put the selection on its own layer. Again a Curves Adjustment Layer was used, but the edges were still showing so several painting layers using Coyotemange fur and poodle curl brushes were used to sample and match the regular fur. The light color was just harder to match so you do what you have to do! Then a little text and some Viveza 2 to finish them off. ….. Digital Lady Syd

Blushing Roses

Pink Roses taken at the Harry P. Leu Gardens in Orlando, Florida

Loved the way these roses were lined up at the Harry P. Leu Gardens so I decided to give them a texture and post them. These flowers were first post processed in the updated Topaz (see sidebar for website link) Studio 2 using the Impression filter’s default with Type 03 brush, then tried out one of my old Topaz Studio 1 presets (now Looks) that was migrated over in to the new program – it had a Texture filter and a HSL Color Tuning filter. Adobe’s Paper Texture Pro was opened and the texture named Newt was added using the Overlay blend mode at 76% blend mode. Viveza 2 was used to sharpen up the top flower, and Topaz ReStyle using a preset from an old image’s colors saved down as a preset finished up the effect. I ended up with the sort of dreamy look I wanted!…..Digital Lady Syd

Star Wars on Steroids

Image from Infinity Space Art Show in Washington, DC

Image taken at the Infinite Space Art Show by Refik Anadol in Washington, DC. If you get a chance to see it, definitely go – absolutely wonderful. The silhouette was created from people sitting on soft cushions enjoying the show. This image, shot during a video, reminded me of flying into the Death Star in Star Wars. Not much work had to be done to the image. Luminar Flex was opened and Structure, Details Enhancer and Exposure filters were used to really sharpen up the image. Then on a stamped layer in PS, Topaz (see sidebar for website link) Studio 2 was opened and AI Clear was used to remove the noise in the image. Precision Detail was used just on the Highlights and Precision Contrast’s High Contrast slider was used to really darken the black. Back in PS a Curves Adjustment Layer was added. That was it. This show was full of beautiful color and movement!…..Digital Lady Syd

A Rose Hanging In There

A painted pink rose from the Harry P. Leu Gardens in Orlando, Florida

This once beautiful rose was trying its best to show pretty even though its outer ring of leaves were pretty much spent. I decided to paint it since it had some pretty leaves and nice central rosebud. Several painting layers were created using Photoshop’s Legacy Brush called the Fan Flat Blender. I created a couple variants so color could be added easily, but it is pretty much the same brush. What is so nice is that it has a texture in the brush which adds a great effect to the mixer brush. Also Color Efex Pro 4 was added using the Darken/Lighten Center, Film Efex Vintage, and Detail Extractor filters. In PS On1’s Moody 5 Color Lookup preset was added at 61% layer opacity. And the last step was to use Viveza 2 to emphasize the center of the flower and give a slight vignette effect…..Digital Lady Syd

The Queen Emma Bloom

Image of a Queen Emma blossom

This is one of my favorite blooms in my yard. I take a lot of images of them and here is another one. This one was shot at using my Nikon 60 mm macro lens at F/5.6, ISO 200, and -1/2 EV. In Lightroom Serge Ramelli’s Safari Warm Dramatic Light preset was applied (to download, check out his How to Edit Amazing Landscape Photos video). In Photoshop Topaz (see sidebar for website link) Sharpen AI set to Remove Blur 30 and Suppress Noise 40 was applied – then a layer mask was added and the effect was painted off the dark background area. Luminar (see sidebar for website link) Flex was applied on a duplicate layer – used these filters: Structure, Brilliance/Warmth, and Advanced Contrast. That was all that was done – pretty simple. ….. Digital Lady Syd

Flagler Beach Fishing Pier

Image of people fishing on the Flagler Beach Pier in Florida.

Now I love my image of the Flagler Beach Fishing Pier taken a while back. It was not that great an image so I added a new sky of the beautiful clouds taken at my house which is only 7 miles away. Luminar (see sidebar for website link) Flex was opened and many filters applied to get this sort of vintage feel to the image. A Color Look Up table was used in the Photoshop and a Gradient Overlay Adjustment Layer to get the soft colors. A little Viveza 2 was used to even out the colors for the focal points and that was it! ….. Digital Lady Syd

Can You Spot the Photo Bombing Kids?

Image of trail with pink azaleas at Ravine Gardens State Park in Palatka, Florida

This image is another one of Ravine Gardens National State Park in Palatka, Florida. In March the trail is filled with Azaleas. As I was post-processing this image, it felt a little weird to me but I was not sure why. Then I discovered the three kids hidden in the upper center background who were patiently waiting for me to finish my shot before trouping down the trail – it really startled me to see them in perfect focus back there!

For this image, Luminar (see sidebar for website link) Flex was used in Photoshop first – the Accent AI Filter 2.0, Details Enhancer, Image Radiance, HSL, Dodge & Burn, Highlights/Shadows, and Vignette filters were applied. A Color Lookup Table was added using a preset from Photofocus. Topaz (see sidebar for website link) Studio’s Impression was applied using the default and set to 71% layer opacity in Photoshop. I find these garden images very difficult to post process due to the dappled light patterns. Still a beautiful place to visit…..Digital Lady Syd

Look Up!

Image of Glass Dome at the Waverly Train Station in Edinburgh, Scotland.

Sometimes you see something really spectacular if you just Look Up! This glass dome structure is located at the Waverley Railway Station (cc1866) in Edinburgh, Scotland. I did not think much about the image, but started playing around with it this week, and got a pretty interesting result. Just regular workflow in Lightroom. In Photoshop used the Luminar (see sidebar for website link) Flex filters – these are really fabulous, especially if you want sharp details. Details Enhancer and Structure filters were used to get that sharpness. It was converted to a black and white in Flex also and back in Photoshop set to the Darken blend mode. A PS Photo Filter Adjustment Layer using a Cyan Filter at 46% Density was added and set to 59% layer opacity. Then my favorite Grut Cloud Brush Set were used in a new layer to add the white clouds above the dome. To remove the clouds from the dome form, a Blend If Layer Style – Underlying Layer was used so the darker dome lines popped back. Last step was Viveza 2 to add a little brightness to the dome to pop it. Not sure how I missed this image!…..Digital Lady Syd