Anything Photoshop or Photography

Latest

Bird of Paradise

Image of White Bird of Paradise plant blooms

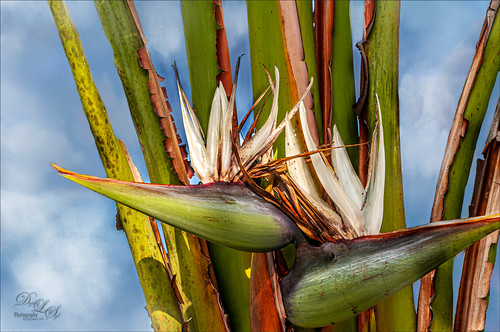
This is a rather towering Bird of Paradise plant that grows by my garage and protects the house from intruders. Well, maybe not the intruder thing but it is pretty intimidating for a plant. I just had some fun trying out the new Photoshop 2020 Content-Aware Fill update that works incredibly well when the Custom mode is used. My house and other parts of the plant were around this part of the plant, and they were removed pretty quickly with the Custom mode and the paint brush where you paint over the part of the image you want your selection to use for the replacement. It is a little bit like the Patch Tool. It did an incredible job of adding in the clouds, which I painted in by the way, to give a beautiful sky for the background. Otherwise not much to this image – just had fun trying this new functionality. ….. Digital Lady Syd

Happy Halloween!

My annual Halloween image

I wasn’t going to do one this year, but I just love make Halloween pix so here it. These are the resources used in case you want to make one next year. Thanks to PixelSquid who has such fabulous objects to using for compositing on their site – the tomb, skeleton and both trees are from the site. Just used mainly a little Layer Style wizardry on them. The Cat and Bats from Deviant Arts mutato-nomine were custom shapes loaded into Photoshop. The Milky Way was from a Serge Ramelli video download and the moon from a free set called from Design Cuts called Planet Space Explosion Background and Ancient Texture. The text is called East Liberty Signature. Totally fun to do!…..Digital Lady Syd

A Distinguished Forefather Lemur

Image placed in an image of a famous painting.

I have always wanted to try this and I finally found a really great Photoshop tutorial on how to do it. This image started with a wonderful painting by Sofonsiba Anguissola called Portrait of a Spanish Prince from 1567 (it is probably an image of Prince Phillip III – the link gives some interesting perspective on this guy). Anyway, I will not go into all the steps since I pretty much just followed the steps presented in Chris Spooner’s video called How to Make a Fun Oil Painting Pet Portrait in Photoshop. This effect is especially popular with people’s pet images. The trick is to find an image that works with your pet image. It took a lot of manipulation using the Free Transform Tool with the Warp in the Options Bar to get it looking correct. And in this case, I had to use two other images of lemurs for the hands. The colors can be matched using the video after the images are combined. 2 Little Owl’s Carnevala 23 texture was added on top and set to Vivid Light at 65% layer opacity to get the illuminated effect in the background. If you want to have some fun, give this a try……Digital Lady Syd

Museum of Natural History

Image of one of the areas of the newly renovated Smithsonian National Museum of Natural History in Washington, DC

This image was take on the second floor looking down on one of the newly renovated areas of the Smithsonian National Museum of Natural History. There is a lot to see in the Museum. And don’t forget, when in DC all the Smithsonian Museums are free to the public! The image was really hard to get straight and looking good. (Thank you Topaz AI Sharpen – see sidebar for website link.) Used about everything in my workflow but it was worth it. I love this image!…..Digital Lady Syd

More Guitar Man

Corel Painter practice with a man playing a guitar

The above is a bit of an abstract painted image using Corel Painter 2019 and a few new brushes. This image is one of my favorites to just try different effects on and I have used it several times. (For image link, see ISO Republic called Guitar Man.) In Corel Painter George Ireland’s Flat Drip Lucious Bristle brush was used (can download the category of brushes at his website, which is in both Germain and English – his images are fabulous). Added a few sketch lines and some oily squiggles in the background. Then took image into Photoshop and totally changed the colors. This was done by using a custom Gradient Map Adjustment Layer – used Gradient Editor, selected Gradient Type Noise, Roughness 12, Color Mode LAB with Restrict Colors checked – kept pressing randomize button until I got this purplish/orange effect. The layer was set to Soft Light blend mode and 83% layer opacity. Then on a stamped layer, Topaz (see sidebar for website link) Simplify was opened up and a cartoon preset was applied (see Serge Ramelli’s How to Turn a Photo into a Cartoon or Painting with Topaz video to create preset that was used). Back in PS it was the layer was set to Linear Burn at 66% layer opacity. On a New Layer the splotches were from Kyle Webster’s Summer 2019 collection which included the Pollock brush (download from inside PS – open Brushes Panel pop out in upper right and select Get More Brushes) and set too63% layer opacity. That was it. Just a lot of fun to paint again!…..Digital Lady Syd

Don’t Even Think About It!

Image of a Cattle Egret with his wings stretched out from the St. Augustine Alligator Farm in Florida

In Lightroom I started out with a new free preset downloaded from SparkleStock called Instant Hipster X Pro 2 and a few Basic changes before going into Photoshop. On a stamped layer applied Topaz (see sidebar for website link) Sharpen AI set to Stabilize, Reduce Blur 0.80 and Noise Reduction 0.12 – a whole bunch of detail became visible in the wings especially. Next a Color Lookup Adjustment Layer was added using PhotoFocus’s Africa preset set to 49% layer opacity. On another stamped layer set to a Smart Object (for any additional edits), Luminar Flex was opened and the Structure and Details filters were applied. Back in PS, A black mask was added and just the wing lines were painted back for a little more detail. An Exposure Adjustment Layer was used on the eye. (See my The Eye Have It – How to Make Them Pop in an Image blog.) That was all that was done! Love this crazy bird!…..Digital Lady Syd

Checking out a Flower

Image of a Swallowtail Butterfly in Virginia.

This beautiful Swallowtail Butterfly (of some type I believe) was enjoying a pink and white flower while in a rural area of Virginia a couple months ago. What a beauty she was! And this plant had at last 20 or 30 butterflies flying around it. In LR, just my basic changes were made – no presets, filters or brushes. In PS Topaz Sharpen AI was set to Stabilize, Remove Blur 0.79 and Suppress Noise 0.49. A Color Lookup Adjustment Layer set to PhotoFocus LUT called PF-Candlelight at 62% layer opacity was next. On a New Layer, some of the small halos around the green leaves was renived by cloning out with a very small brush. The image was lightened just a little with a Curves Adjustment Layer. A New Layer was set to Overlay blend mode and used a small brush to add some contrast into just the flowers. Viveza 2 was used last to adjust the colors and focus of the image. What a pretty butterfly!…..Digital Lady Syd

The Purplepassion Flower

Image of a purple Passionflower from Harry P. Leu Gardens in Orlando, Florida

This Purplepassion Flower image was taken at the Harry P. Leu Gardens in Orlando, Florida a while ago. It is a very beautiful bloom and there is a little bee hiding in it. Mainy did the clean up in Luminar (see sidebar for website link) Flex with their wonderful Structure, Detail Enhancer, Image Radiance, Microstructure, and HSL filters. In Photoshop used a Gradient Map tAdjustment Layer to emphasize the color a little. Then used Topaz (see sidebar for website link) Studio 2’s fabulous Impression filter – just adjusted the default settings a little to smooth out the background. Then used Mixers brushes back in Photoshop to further blend in the effect. Finally used Topaz Lens Effects Fog filter to lighten the top slightly. Viveza 2 was used to adjust the focal point and the last step was a Curves Adjustment Layer. The text is a font called Brettany ….. Digital Lady Syd

Practicing in Painter

Corel Painting of sailboats

Just got an updated version of Corel Painter so decided to try out a few of the new Thick Paint Brushes. I will not go thru all the steps but the thick paint was used on the sails and parts of the boat reflections. I have to admit most of the real post work ended up in PS where I did more sketch work and added the textures. Overall it was just a lot of fun to do – and that is what it is all about. Check L. S. Lowry‘s art work as he did some beautiful paintings – and his original looks a lot different (and better) than this one. ….. Digital Lady Syd

Hiding in a Palm Tree

Image of a little bluebird female in one of my big palm trees.

I think this is a little Eastern Bluebird female who was helping me while I cleaned up my flower beds in my front yard. Not much was done in Lightroom, and Photoshop added Viveza 2 filter to sharpen her up a bit. The light was really dark in the palm tree, but really bright behind her so it was hard to get that looking correct. A Curves Adjustment Layer was used for this. Just a slight painterly effect was added in Topaz (see sidebar for website link) Studio 2’s Impression filter. Then in PS on a few New Layers, mainly just painted in some lines in the foreground palm fronds as they were really blurred. The Camera Raw filter was used to further tweak the color in the HSL panel. Topaz Lens Effects’ Soft Olive Green Vignette preset was added. That was it!…..Digital Lady Syd