Yes, this same beautiful butterfly (Palamedes Swallowtail) is showing off for New Years. This time she is covered with confetti created by using an old set of brushes from Morgan BW called Confetti and Streamer. The font is called Castile Inline Grunge. The Magnifier effect is from a free action called Adobe Looking Glass Actions – both actions in the set were used to create the effect. Also, the Pattern Stamp Brush was used to get the brightly colored background – I actually created the background pattern for this image using more free Pattern Stamp brushes from Jessica Johnson.
Happy New Years to Everyone! Thank you for following me here on my blog and on my Flickr account. Hope you have a great year ahead of you!…..Digital Lady Syd
This image (a favorite of mine taken of a little street in Edinburgh, Scotland) was used to try out a new Photoshop Action downloaded from Adobe Create Magazine. It is called Painterly and is very flexible as to how it can be used to make a very nice artistic effect of an image. The action was created by BlackNull (or Nuwan Panditha) and also included brushes and patterns needed to run the action. There is a very informative 6-page PDF file that explains everything you need to know on how to get good results. It was a lot of fun to do and only took an hour or so to get this final image. A couple of my regular tweaks in Photoshop were done after applying the action, but overall the effect was from the action. One disadvantage is that the image, which was set to 8-bit, became over 1 Gig in size. Since I had turned off many of the layers while adjusting the action, I just right clicked on the Layers Panel upper right pop-out and selected Delete Hidden Layers. Then it became much more manageable. Anyway, thought I would present the action as it was really nice to try out. Enjoy!…..Digital Lady Syd
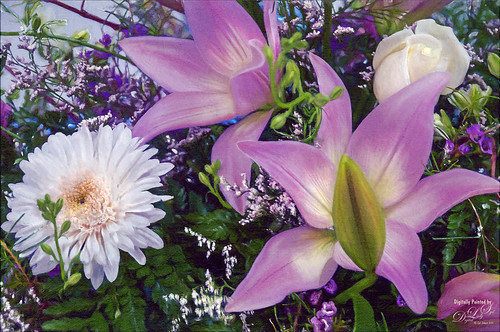
My image of this beautiful Palamedes Swallowtail Butterfly was converted to a wintry scene and put in holiday apparel. Butterflies like to dress up. To get her to this point, Perfectly Clear was used to do an overall exposure and sharpening effect. The background had a chain-link fence that looked terrible and a couple extra flowers on the left side. To get rid of all this distraction? Just select an 80% hard round brush set to 5% Flow and paint ed it away. If you accidentally paint over the edges, can either choose a small eraser or add layer mask to remove it. This is how the butterfly lines could be shown so clearly. It is amazing how easy a clean color can be achieved. Elements were added on each side to give a nice frosty look. For the right plant, used Sweet Floral Watercolor Bundle by Mnuk with a clipped Curves Adjustment Layer using the color channels to get the colors needed. The left element is Watercolor Leaves by Sunny Illustrations with a clipped Curves Adjustment Layer with both the RGB and Color channel color changes. Foreground leaf was covered up with a leaf by Sweet Floral using a Selective Color Adjustment Layer clipped to get the correct color. The font is called Alberobello Script and the free snow brushes were from Serge Ramelli (the best out there). It did take some time to do, but it was a lot of fun……Digital Lady Syd
Just posting a quick blog of an antique car that is usually parked outside the Cordova Hotel (now the Casa Monica Hotel) cc 1888 in St. Augustine, Florida. Lots of fun adding an old feel to the image. After watching Unmesh Dinda’s video called 4 Luminar EXCLUSIVE Effects Photoshop Can’t Create!, I decided to use my similar image and try out the technique. From Lightroom Luminar 4 (see sidebar for website link) was opened and his steps were followed. The LUT used is from the Street Look set called 60’s B&W preset. In Photoshop used On1 (see sidebar for website link) as a plugin to add Cross Processing filter using Yellow Strong and Vintage filter using Earth – all filters were set to Opacity 59%. Now the image had a more yellow/green look so in PS a Color Adjustment Layer was added to get more of a dark purple and cyan feel. A Levels Adjustment Layer was used to adjust the overall brightness of the image. Last step was to add a subtle vignette. I love doing vintage look images. …..Digital Lady Syd
Just had fun painting – I like to practice a bit each week so I do not forget how to do this. Topaz (see sidebar for website link) Sharpen AI was used to sharpen the image. Actually used a plugin I got recently, Perfectly Clear, to brighten up the image – just used Tone, Color and Preprocessing panels. Had to clean up a little and then put together several brushes in a group to use for painting -mainly mixers, blenders, and a couple regular brushes. A bevel and emboss layer style was added on top to get the canvas effect…..Digital Lady Syd
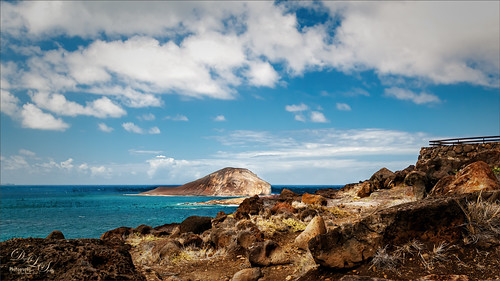
Just missing Hawaii. This image was taken at the Ka Iwi Scenic Shoreline in Oahu – great place to take pix. Just adjusted sliders in Lightroom – no presets or a local adjustments. A B&W Adjustment Layer, a Color Lookup Adjustment Layer using my preset, a Red Channel Curves Adjustment Layer, Viveza 2 to direct focus, a Spotlight Effect layer, Topaz (see sidebar for website link) DeNoise AI at 0.47 was added and applied to just the sky with a layer mask, and finally a Vignette using the Levels Adjustment Layer. Pretty much my basic workflow. ….. Digital Lady Syd
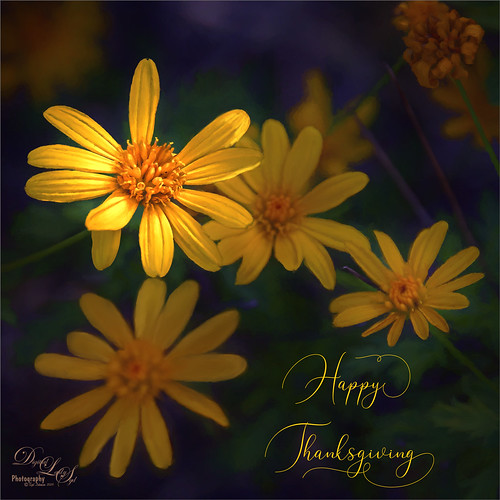
I still have a few yellow daisies blooming in my yard so they decided they would like their picture taken to wish everyone a wonderful Thanksgiving Day. What I like the most is the pretty font in this image – it is called Argentina Script. It lots of different Glyph settings to make your text look fancy. Also used Topaz (see sidebar for website link) Sharpen AI and Topaz Impression (for just the background – painted back the flowers), PS Color Lookup Adjustment Layer using Crisp Winter preset, a red Photo Filter set to 27% Density, and Nik Viveza. Great fun with this one!
I have tried to post process this image before without a lot of success. That was until I ran across an older video by the Photoshop Guru Unmesh Dinda where he used Luminar 2018 on a very similar image. I could not believe how great the details came out so I thought I would share the technique. The video is called 4 Luminar EXCLUSIVE Effects Photoshop Can’t Create and the effect used here is called Image Radiance. The image was taken in St. Augustine at the main entrance to Flagler College, aka the old Hotel Ponce de Leon built in 1890 by Henry Flagler. The dome stands 3 stories high and is still quite spectacular. The effect can be done easily with Luminar (see sidebar for website link) Flex but is much harder with Luminar 4. Here are the filters and settings used for the above – you can see the issue with Luminar 4 not having all the filters/sliders: Dramatic: Amount 39, Contrast 95, Local Contrast 69, Brightness -88, and Sat -42; Highlights/Shadows: Highlights -80 and Shadows 63 (for Lum 4-look in Light filter for sliders); Sharpening: Amount 89, Radius 50, Masking 35, and Dehalo 50 (for Lum 4-look in Details Enhancer – all but the Dehalo sliders are found in Advanced Settings); Image Radiance Amount 14, Smoothness 100, Brightness 29, Shadows 79, Warmth 19, and Sat -70 (for Lum 4 there is a Glow setting but no Shadow or Saturation slider) ; Microstructure: Amount 90 and Softness 50 (for Lum 4 there is not Microstructure filter-possibly AI Structure would work); and added Details Enhancer: Small 41, Medium 35, and Large 21. I also used Topaz (see sidebar for website link) Sharpen AI at the start using the Stabilize mode, Remove Blur 0.90 and Suppress Noise 0.30 – the best sharpening filter around.
Hope this post helped you a little, especially if you are working with the new Luminar 4 – Luminar 3 did have all the filters and sliders still. Have a great day!…..Digital Lady Syd
This was a pretty exciting moment when land is first seen after sailing across the Gulf Stream all night. There was a sailboat off in the distance in this image, but we did not see another one until Spanish Cay – the ocean is very empty around here. To post process the image, very little was done. The water was adjusted in Topaz (see sidebar for website link) Studio 2 by adding a little bit of the Impression filter set to the default to tone down all the white reflection on the water – it was masked off the sky. This is exactly how the clouds looked – totally incredible. A Color Lookup Adjustment Layer was added using the free SparkleStock’s Wedding LUT called Airy 01 set to 58% layer opacity. A Curves Adjustment Layer was added on top where the RGB curve was set to a little S curve for contrast and the Red Channel was used to lighten up the Cyan just a little. That was it. ….. Digital Lady Syd
Just enjoyed painting an image I took quite a while ago in Savannah, Georgia. These type of homes are everywhere in the historic district. In Photoshop used the Fan-Flat Blender that Photoshop provides in their Legacy set. Also used a couple others to get the smooth effect I wanted on the steps. In Corel Painter, used one of the newer Thick Paint Brushes to add texture and lighting to the ferns which were quite flat in the original image. Then brought the image back into PS to finish up. Actually ended up using a really old Topaz (see sidebar for website link) program called photoFXLabs and the Instatone effect since I could not get an the correct palette for the image. It worked great!…..Digital Lady Syd
Check out AI Gigapixel stand-alone software for upsizing your images. It’s incredible! And it can now be used as a plugin when in Photoshop. Also Topaz Labs Photo AI has some great sharpening and denoise tools along with Photo Video AI.
GRUT BRUSHES – Photoshop Brushes for Digital Artists
Click here to visit GrutBrushes.com
And be sure to check out his Free Brush of the Week and Brush Sampler! These are the best brushes you can find!
Topaz Studio 2 and Legacy Topaz Labs Filters
Unfortunately Topaz Studio 2 and other Topaz Lab filters are no longer available for sale as of 2020. If you had bought these filters and would like to put them back on, here is a link to the Legacy Apps where they can be downloaded again. Below is an example of the wonderful Remix AI Filter from Studio 2. The wonderful Impression still works fine in Photoshop right now along with Adjust (all versions), ReStyle, and even PhotoFXLab!
Please note that I do make a very small commission on purchases made if you click through to the websites using the links above – it helps me keep my site going. Thanks for clicking.