Anything Photoshop or Photography

Latest

Adding Some Pink Delight

Image of a beautiful pink flowering bush

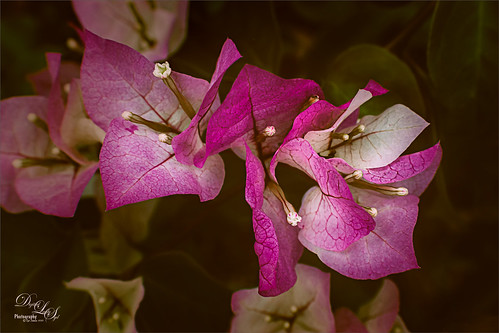
This unusual bush is blooming in my front yard – the leaves are actually the large pink colored looking blooms that will turn green soon. A High Pass Layer was created using a Radius of 12.5, much higher than usual. I have recently seen several people doing this and thought I would try it out. In the layer mask the part that should not be sharpened so much, mainly the background areas, were painted out with a black soft round brush. Otherwise just the same process I usually use – the Darken and Lighten Curves for dodging and burning, Color Look Table, Levels for a vignette, and Color Balance Adjustment Layers were applied. The last step was to add Viveza 2 to the main focal point area.

A Very Lonely Monkey

A Bonobo Monkey at the Jacksonville Zoo

Thought I would post another Bonobo Monkey image from the Jacksonville Zoo – the animals are very confused right now as their major source of entertainment is missing. Only a few things were done to this image after doing just a little Lightroom adjustments. In Photoshop one of my favorite plugins is called Flex by Skylum. They do not make it anymore because Luminar 4 (see sidebar for website link) is now released with some new and different Tools (previously filters). Flex has one Luminar 4 does not have called Image Radiance (Aurora still has it), and it gives a really nice effect to images. I am not sure why they dropped this filter as it is really a nice one. This filter was the main effect applied to this image – several other Tools were also used in Flex like Details Enhancer, Structure, Clarity, HSL, and Top and Bottom Lighting, and which are all available in Luminar 4. Back in Photoshop a Color Lookup Adjustment Layer using Joel Grime’s Soft and Desaturated LUT preset was applied at 89%. A Curves Adjustment Layer was added for some contrast, and darken and lighten spotlight layers were used on his face and body to direct the eye. That was it. I hope we can get back to visit our friends at the zoos soon! …… Digital Lady Syd

Queen Emma Lily Dressed Up

Image of Queen Emma Lily blossoms with inverted colors

Have been practicing my Macro Photography recently and decided to give some of my very favorite blossoms a different look. Today we are adding an inverted image (CTRL+I in thumbnail – then set to Color blend mode) showing greens and blues instead of the traditional reds and whites to our collection. These beautiful blossoms were accented with some purple glitter thanks to Kyle’s Concept Brush Small Branch Mix in PS that was converted to a Mixer, thanks to the expertise of Nicolai at Grut Brushes – did you know you can convert any brush into a Mixer by simply clicking on the Mixer brush and ALT+CTRL clicking on a regular brush in the Brushes Panel? That’s what was done here on a New Layer and set to Linar Burn blend mode. Some Sharpening was done using the new updated Topaz (see sidebar for website link) Sharpen AI filter and Lucis Pro. Topaz ReStyle’s Warm Steel Wash preset applied to further enhance the color to the Lily. Last step was to use a Levels Adjustment Layer vignette to further enhance the beautiful blossoms. Yes, the Lily is definitely ready for Spring Holiday Extravaganzas. ….. Digital Lady Syd

The Beautiful Queen Emma Entertains a Visitor

Image of a beetle in a Queen Emma blossom

Yes, since I am stuck at home, I decided to practice some of my macro photography by starting with one of my favorite subjects, a Queen Emma plant in my front yard. This beauty had a beetle of which I have no idea what kind it is, tromping around, but it did not seem to be hurting the blossom. There is also a photo-bombing ant – oh, my! I will keep an eye on the Queen from now on. Not much was done with this image other than using a profile in Lightroom called Artistic 02 at an Amount of 76 and a little sharpening on the beetle with the Adjustment Brush. In PS the file was duplicated and Luminar 4 was opened to sharpen up the beetle a little more – just used the AI Enhance Tool at 50%, and Structure on and Detail Enhance Tools on just the beetle, using a mask to do this. Used Viveza 2 to really adjust the color and lighting in the final image. That was it. What an intriguing visitor…..Digital Lady Syd

Bathing Beauties

Image of the Pink Flamingos at the Jacksonville Zoo.

These beauties were enjoying all the attention they got at the Jacksonville Zoo. I learned one thing about Flamingos – it is hard to get an image where they are all in a “descent” grouping. They are just like taking pictures of groups of people. For some reason I decided to give them a magical background by using one of 2 Lil’ Studios great textures set to 40% layer opacity – a mask was added to painted a bit of the middle. Also the birds were taken into Topaz (see sidebar for website link) Studio 2 and a basic dose of Impression was added to give them a bit of a painterly look. It was painted softly off their faces though. And yes, one of the Flamingos had to be brought in from another image because someone decided to show a not very interesting area of their bird body to the camera. Sort of like the “class clown!” A Color Lookup Adjustment Layer was added using the Foggy Night preset. That was it. This was a lot of fun to do!…..Digital Lady Syd

Keeping an Eye on the Gorilla in the Premises!

Image of a Guereza Colobus Monkey at the Jacksonville Zoo

This is a Guereza Colobus Monkey that resides at the Jacksonville Zoo along with several Gorillas, in fact one was roaming around him while he was sitting there. He was definitely keeping an eye on the big guy. What gives this monkey such an interesting background is the Topaz (see sidebar for website link) Studio 2 ReMix filter that was applied. The Beige Sketch Style was used along with the Glow filter to add the interesting line texture. The Edge Filter was also used to do the same. Then a little painting had to be done on the image back in Photoshop just to clean up edges and lines. Also his face had to be painted in as it was lost in all the line work from Studio. Last step was to enhance the texture a little more with the now defunct Luminar Flex – still love the results it gives so I use it a lot. I have a similar image that contained Toucan birds – it is a fun look for kids!…..Digital Lady Syd

Monkey Deep in Thought

Image of a Black Howler Monkey at the Jacksonville Zoo

This guy is an example of why I love to go to the Jacksonville Zoo – almost always there is a different type of animal to photograph that was not noticed before. This is a male Southern Black Howler Monkey from Argentina and Bolivia. The texture is one I created in Corel Painter and a Hue/Saturation Adjustment Layer was used to give it the matching blue tones of the monkey. The monkey was selected from his background by using the Quick Selection Tool and the Select & Mask panel. A Color Lookup Adjustment Layer was used using a free LUT called SS (SparkleStock) Bleak Trellick preset – I really like this set of LUTs. Viveza 2 was used to even out the lighting in the image and adjust it to his face. A Spotlight Effect layer was added and last a Curves Adjustment Level. I love they way this image turned out – a lot different than the Zoo image!…..Digital Lady Syd

Isn’t She Beautiful!

Recently went to the Florida Museum’s Butterfly Rainforest in Gainesville. There were several of these Blue Morpho beauties flitting around – and not standing still for very long – but little one had a ripped wing and was having a some trouble. It games me a chance to get a great photo of both the gorgeous iridescent blue on the back side of her wings and the camouflaged brown on the bottom side. These butterflies were just spectacular to see! And not much was done to get the color – mainly just some Topaz (see sidebar for website link) Sharpen AI and Viveza to some extra sharpness and adjust the color. Also the Camera Raw Filter was used to adjust color on the brown of the wings. These butterflies were definitely the hit of the season at the museum. …..Digital Lady Syd

A Vintage Gas Station

Historic image from Shorpy.com that has been colorized.

Had a lot of fun colorizing this vintage image taken in 1941 in Minneapolis, Minnesota, using mostly the settings from my recent blog called How to Convert Black and White Images to Colorful Paintings with Topaz Studio 2. Click here to see the black and white photo at Shorpy.com. In the Look I settings I provided, the unchecked ReMix AI was turned on and the Eye of the Storm style set to a High strength and the Overlay blend mode (Brightness -0.41, Contrast 1.42 and Hue -1.00 sliders). The Quad Tone Filter was added on top and the Strength was set to 0.65 – this added a little color in the sky and reduces the color around the flags. Back in Photoshop Viveza 2 was added and the attendant was highlighted to emphasize him a little. On a stamped layer Topaz (see sidebar for website link) Restyle was added using the Butterfly Wings preset – the ReStyle Opacity was set to 30% and the blend mode to Multiply. Give this a try if you have Topaz Studio!…..Digital Lady Syd

Introducing the Magnificent Great Orange Tip Butterfly

Image of a Great Orange Tip Butterfly from Japan taken at the Butterfly Rainforest at the Florida Museum in Gainsville.

Yes, brought in all the way from Japan is this little beauty, one of many exotic butterfly species that were entertaining visitors at the Florida Museum’s Butterfly Rainforest exhibit in Gainesville, Florida. She was totally enjoying all the bright colored flowers as she zoomed around the exhibit. I did use a free Lightroom preset, which I do not usually do, to get the really darkened down effect – it was called KP01-Lone Pine from the Explorer Pack at Adobe, then added a bit of Texture and Clarity to it. Very little was done to this image other than sharpen it up a little – used both Topaz Sharpen AI and Luminar Flex to do this. (see sidebar for links to both of their websites.) The Spot Healing brush and a soft round brush at 30% opacity was used to clean up a few rough edges and halos on the foreground yellow flowers. Otherwise that was it. I love combining two of my favorite subjects – butterflies and flowers – in one image!…..Digital Lady Syd