Anything Photoshop or Photography

Latest

Fishing in 1904

Image from Shorpy of guys fishing in Whitefish Bay, Ontario in 1904

This image is a fabulous one from Shorpy.com, one of the best places to see great historical images. I decided to use one of my colorizing techniques since the image was so clear and interesting. Used my blog called How to Convert Black and White Images to Colorful Painting with Topaz Studio 2. The first step is very important as noted in the blog – make sure you have adjusted the resolution and size of the image before beginning to change the image. When opened in Topaz (see sidebar for website link) Studio 2, only AI ReMix was applied using Daylight Fade preset, High, Brightness 0.60, Contrast 1.00, Sat 0.75, Hue 0.15. From within Topaz Studio, Topaz Adjust AI was opened and set to Standard and Strength 0.71 – then mainly all the sliders were adjusted to get a really nice look. Back in PS, the skin color was painted in as for some reason it did not pick up color. The blue color came from Topaz ReStyle and Nik Viveza was used to even out the whole effect. This was the perfect image for this type of coloring…..Digital Lady Syd

Some Sunshine when It Is Raining

Digitally painted image of some sunflowers in a vase

Had some fun painting these wonderful sunflowers in Corel Painter. If you have Painter, I hope you are following Karen Bonaker who has a great website on how to use the program. Last week she shared the image and several brushes and taught us how to paint the flowers. It has been a long time since using Painter so it felt good to get back to it. And of course for me, I have to finish up in Photoshop and do my same adjustments on photos to my digital art. Anyway, it felt great to be painting again……Digital Lady Syd

Queen Emma Lily Displaying Her White Blossoms

Queen Emma Lily Displaying Her White Petals

Another image of my beautiful Queen Emma Lily blossoms. This time she has three visitors – not sure these are wanted guests. Looks like a little garden work is in store. This image contained a very short workflow – a little sharpening in Topaz (see sidebar for website link) Sharpen AI, some dodging and burning, and Nik Viveza to adjust the background color and focus on the blossom. Pretty easy. ….. Digital Lady Syd

Scared Hood Ornament

Image of the Hood of an Antique Ford

This vintage Ford image was taken in the parking lot at the St. Augustine Alligator Farm a while ago. I did not realize how scared the hood ornament looked until I started to work on the image. In Lightroom I applied one of my presets called SJ HDR Split Tone – the image did not end up this way in PS, but it is how I started. In PS Topaz (see sidebar for website link) Sharpen AI, Lucis Pro – just a single slider to give it more of a cartoon effect, and a Color Lookup Adjustment Layer using a PhotoFocus preset called Africa set to 40% opacity (and killed the split tone from LR) were added. Did a little dodging and burning on the text and headlights. Finished up with a Levels Adjustment Layer to add more contrast and Hue/Saturation Adjustment Layer to give it a little more saturation (this rarely happens for me). That was it. Very easy and lots of fun. …… Digital Lady Syd

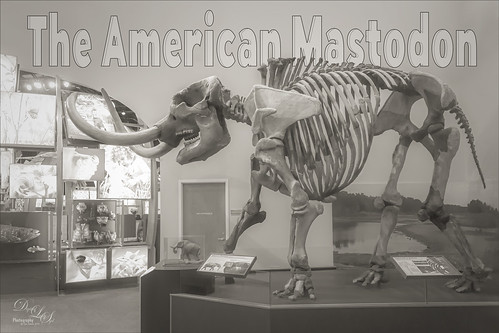
The Ferocious Mastodon

Image of the mastodon exhibit at the Florida Museum of Natural History in Gainesville, Florida.

I had such a good time at the Butterfly Rainforest at the Florida Museum of Natural History in Gainesville that it would have been easy to overlook the terrific exhibits this museum has inside. It was hard not to notice this huge American Mastodon. I decided to try a different type of treatment – followed an article in Kelby One‘s Lightroom Magazine No. 52 last year by Martin Evening (this guy is a terrific PS guru with some great books on it). He showed how to create an infrared preset in Lightroom so that is what is used on this image. It does not look like an infrared particularly, but it has a really nice effect to it. In Photoshop Topaz (see sidebar for website link) Sharpen’s plugin was applied, a little dodge and burning was done using two Curves Adjustment Layers, and some text using the Hillray font was added. It was really fun to try out a new technique. ….. Digital Lady Syd

Cherry Blossoms

Image of abstract painting of some cherry blossoms

Been missing the beautiful Spring in Virginia and the DC area so created this digital painting to get the essence of the beautiful colors of the Cherry Trees. It was started by using an image taken at the Jacksonville Zoo of trees covered with white Spanish Moss in February. Two textures by Kim Klassen were added: her Granny Cupboard (where the Blend If This Layer black tab was split and set to 187/221 to show just the tree trunks coming through this light colored texture) and Shine (a pinkish texture which was set to Darken blend mode). After that, just various layers were added using 6 different brushes in Photoshop. Also two Impasto Layer was created using a Layer Style created in my How to Create an Impasto Layer Style blog. I used Fay Sirkis’s Palette Knive Reflection Soft Blender #2 mixer brush to add the general impasto effect (KelbyOne is the only place I know that still has her brushes). Used one of Grut’s brushes to make tiny flowers – had changed it to create the blossom effect I wanted – basically little bunches of dots with Color Dynamics turned on. This brush was also used on the the Layer Style to add some depth to the brush strokes made on an earlier layer. Also used Topaz (see sidebar for website link) Lens Effects to create the soft pink color, add some light to the left side of the image, and add a graduated fog vignette. Overall it was a lot of fun to do. This is a great time to try out new techniques……Digital Lady Syd

Little House on Green Turtle Cay

Image of a small house locate don Green Turtle Cay in the Bahamas

This is an older image taken before Hurricane Dorian decimated Green Turtle Cay last year – I have not idea if this home is still standing. I remember seeing these types of clouds everywhere around the Bahamas. To create this effect, Jimmy McIntyre’s How to Use Luminosity Masks and Single Exposure video was followed. I could not be happier how it turned out! This guy is the best when it comes to luminosity masking! The technique separates the highlights from the rest of the image on three different layers. He is using the Apply Image command to create this effect. It takes several steps to do, but the results are spectacular and no noise was or haloing was visible. If you do landscape photography, I would definitely check out this video……Digital Lady Syd

One of My Zoo Buddies

Black and white image of a Lemur at the Jacksonville Zoo

This is a Black and White Ruffed Lemur that is one of several types of Lemurs located in the exhibit at the Jacksonville Zoo. He was much shyer than the friendly Gulliver (see my Just Gulliver Saying High Tidbits Blog) , but he definitely was interested in checking you out. I was surprised how much his face looks like some breeds of dogs. In Lightroom he was put into black and white using the B&W 02 profile at 51%, and then the other sliders were adjusted slightly. Also the Adjustment Brush was used to slightly lighten up his very dark fur. The image was taken into Photoshop and Luminar Flex (precursor to Luminar 4 – see sidebar for website link) was used – I love the way Luminar’s AI Enhance, Structure and Detail filters (now Looks) really brought out the expression of the monkey. Otherwise just some dodge and burning and eye sharpening to finish him up. What a beautiful monkey!…..Digital Lady Syd

Ready for a Snack

Image of a plate of Delicious Muscat Beauty Grapes

These Delicious Muscat Beauty Grapes really are quite delicious! I also loved the color and texture in the grapes themselves so I had to photograph them. Used my regular workflow in Lightroom. Then in Photoshop opened up Topaz Studio and applied the Impression filter’s default preset with a few tweaks, the Dehaze Filter, and the Precision Contrast filter. Back in Photoshop added Curves Adjustment Layer for additional contrast, smoothed out the background with a large blender mixer brush, and did a little edge softening by painting over the edges of some of the grapes at a low opacity. Used the Camera Raw filter to adjust the final color as it was too blue. Last step was to add a spotlight effect on some of the grapes to draw the eye. The font for the text is called Agatha. These grapes did really make a great snack!…..Digital Lady Syd

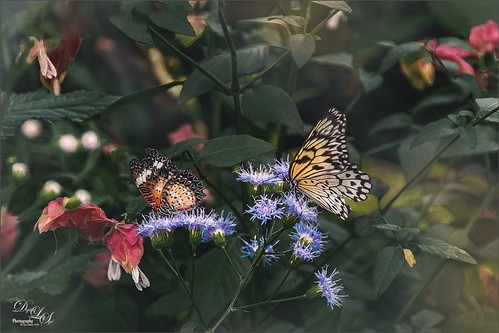
Butterflies Enjoying the Early Morning

Image of two butterflies at the Butterfly Rainforest in Gainesville, Florida

Had some fun with these beautiful butterflies trying out a new tutorial from Glyn Dewis on Creating Realistic Clouds in Photoshop – he used it on a sky photo but I thought I would try it to add a nice soft sunlight effect in this image, which was taken at the Florida Museum’s Butterfly Rainforest in Gainesville, Florida. The image was in pretty good shape out-of-camera so not much was done to the actual photo. Topaz (see sidebar for website link) Sharpen AI was used on the butterflies. The fog was adjusted so accentuate the butterflies and add the fog on the background areas. A Solid Color Adjustment Layer was clipped to the fog to give it the soft yellow sunlight feel – used the Colors White drop-down field and put sliders to Cyan +31%, Magenta +8%, Yellow +28% and Black -39%. On top added one of my Color Lookup presets and set it to 78% layer opacity. Otherwise a few clean up layers were added. These butterflies look so perky!…..Digital Lady Syd