
Defringe that Nasty Blue Edge from Trees On a Bright Blue Sky!
 |
This is a short but sweet way to get rid of most of those blue and cyan edges on trees shot in bright light against a blue sky. There are just times you have to take that image in the bright light of day and the fringe occurs frequently. These tips also work when you have a horizon line in a landscape shot that has similar issues.
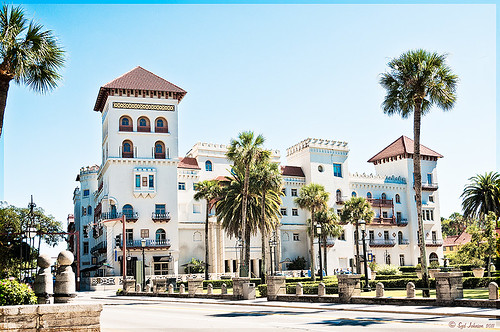
Hue/Saturation Adjustment Layer: The image above has that very problem and this method was used to get rid of most of the fringe. Hover the above image to see the before defringing image.
1. Simply add a Hue/Sat Adjustment Layer in Photoshop and in the Master field drop-down, adjust the Saturation slider left quite a bit and possibly the Hue slider a little until the blue edging disappears. For the above both Blue (Saturation set to -50 and Hue set to -8) and Cyan (Saturation set to -64).
2. Then Fill the attached adjustment layer mask with black (click on mask and CTRL+Backspace).
3. Click on the black layer mask and use a white brush to paint around the edges at roughly 40% opacity to remove the fringe color. You may have to go over it a couple of times but it will look more natural than setting the brush to 100% and painting over just once. You may need to adjust the opacity of the brush down more so the desaturation is not so noticeable.
Sponge Tool Method: Perhaps the easiest way to get rid of any extra fringe that might still be lurking in the image is to select the Sponge Tool and set it to Mode Desaturate. Turn off Vibrance in the Options Bar since that will only work on the more or less saturated colors and not the already saturated colors which we want to get rid of. Brushed over the fringe areas but try not to discolor too much of the neighboring sky also – it will look white and not the natural blue sky color.
Camera Raw Method: Open image in Lightroom or ACR and go to the Lens Correction Panel Manual Tab in the Chromatic Aberration section, set the Defringe to All Edges and adjust the Red/Cyan slider to the left and Blue/Yellow slider to the right to get the best result. This may take a bit of adjusting to get the right balance and watch out for any color shifts in the sky area around the leaves. There is no way to use a Saturation Adjustment Brush effectively to paint out the fringe as it does not have the choice of colors to remove – it desaturates everything you paint over – and it is hard to just pinpoint the fringe.
Saturation Layer: Digital Lady Syd’s Favorite way to eliminate a slight fringe edge is with a tip I presented a while back in a Tidbits Blog called “Selective Desaturation – the Easy Way!” This is a very simple technique – simply add a New Layer on top of your image and set the blend mode to Saturation, select the Brush Tool, set color to black (white or gray will also work) and 15% opacity in the Options Bar. Paint over the area you want to desaturate several times until you get the look you are after. If too much desaturation occurs, add a layer mask back and use a black brush to paint back any areas that you did not mean to desaturate. I think this gives as good a result as the first method so give it a try if you do not like the results using any of the other methods. I would post the image again but it is very similar to after image above.
Here are four options to try: Bottom line, try it and if you don’t like the results, don’t use it and try something else!
The final thought is a great quote I found from TWCDM’s Blog: “While these tricks are fine and dandy the best way to fix purple fringing to is avoid it in the first place. You can prevent purple fringing by using high quality lenses, stopping down your lens (shooting at an aperature of f8-f22), and if you are using a zoom lens avoid using the maximum and minimum focal range. A lenses “sweet spot” is usually somewhere in the middle focal lengths.” If you shoot it right to begin with you will not have this problem. (That apparently is my problem – hum!)
Hope these tips help you on those bright outdoor daytime images…..Digital Lady Syd
Think Pink! Rally for the Cure Pink Rose
 |
Since October is Breast Cancer Awareness month in the United States, last week I participated in a “Rally for the Cure” golf tournament. This beautiful pink rose came from this event. I am really pleased with the results for the above image that used the new Mixer Brush panel from one of my favorite Photoshop gurus, Russell Brown. Hover over the image to see the before photograph used to create this painterly effect.
One of the best new features in Adobe Photoshop CS5 are the Mixer Brushes. (See my Fun Photoshop Blog “Adobe Photoshop CS5’s Mixer Brushes” where I talk about how to use and create your own Mixer Brushes.) Dr. Brown created a new panel to load into Photoshop called the Painting Assistant that makes the whole painter process much simpler. I was able to create the above in very little time using this new panel. Basically it contains six button steps with very clear instructions listed – just click each button after you finish each step. This is pretty ingenious in my mind, but then that is what Dr. Brown is known for! To download the panel and a video, click here and scroll down to the 6th item. A text layer using the “Old Script” font was created and set on a slant using Free Transform – then a layer mask was used to paint out the lettering from the rose.
Give this technique a try, especially if you like the painterly look. It is very easy to do since the Mixer Brushes are already set up for your use. And if you get a chance to participate in a “Rally for the Cure” event, please do – they are always lots of fun and the proceeds could not go to a better cause!…..Digital Lady Syd
Get Rid of Those Power Lines Fast – with Paths and Spot Healing Tool!
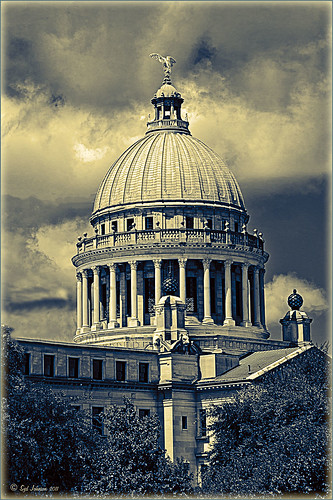
Since I like to shoot old buildings, and there always seems to be a never-ending batch of power lines in these images, here is the technique that works best to clean up those lines.This tip is from Bryan Hughes, Product Manager for Adobe Photoshop, called simply “Remove Power Lines.” Below is an example of an image of the State Capital Building in Jackson, Mississippi, that had some real problems with lines. Hover over the image to see the original power-lined shot. It was processed with Topaz’s Black and White Effects plug-in.
 |
Most of the lines were removed following the steps below:
- Select the Pen Tool (P).
- Go to the Path Panel and click along the wire setting anchor points as you go.
- Next select the Spot Healing Brush (J) – in Options Bar be sure that the Content Aware box is checked and that the size of the brush is roughly twice the size of the wire you want to remove.
- In the Paths Panel, click the “Stroke Path with Brush” icon at bottom of panel (2nd over from left).
- Once the wire disappears, delete the Work Path by clicking on the Trash Can. If the wire did not completely disappear, just paint with the Spot Healing brush over the exposed area to clean up.
This technique works great as long as you are not in front of areas like the building columns or details. I found in this case, still use the Spot Healing Brush on these areas – but just click once and move along. It will do an amazing job in most cases. Note: To get rid of the path line on the image, open Path Panel and press DEL to remove the work path.
In the image above, the only areas that caused a problem was where one line went through the large ornamental balls – these had to be copied onto another layer, transformed, and layer masked to line up. Otherwise, no major problems and very fast even though there were lots of power lines. The traffic light was cloned out, and street light was removed using Edit -> Fill – Content-Aware after selecting with Lasso Tool. The new Topaz Black and White Effects was used to create the color effect on this image.
Try using this tip – it is really fast and great to have in your arsenal of quick tricks…..Digital Lady Syd
Brushing up on Circles!

Well, for some reason I felt a little inspired and decided to play around with some really nice circle brushes. I know I have seen a similar look in some of the images sold in discount stores. With a couple textures added, a very nice grunge look can be achieved, and the best part is that you can choose your own colors to get the feel you want.
If you are interested in the circle brushes, both sets can be downloaded from Ar-Bent-Ing called 10 Dripping Photoshop Circle Brushes and 15 Grunge Circle Brushes. A couple textures, one from Shadowhouse Creations, were added, some layer styles to the brush layers, and basically that is it. Not real hard and a lot of fun! (Digital Lady Syd’s Rule No. 2) ……Digital Lady Syd
Like a Chameleon – The Color Replacement Tool!
Below is a 7-image Camera Raw HDR file (using Merge to Photoshop Pro in CS5) where just one color was changed very quickly but created a big impact. Hover over the image to see the original image.
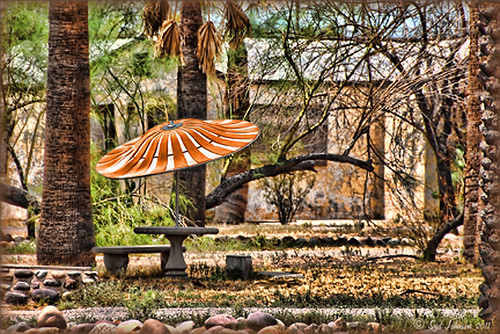 |
I used a little known tool, the Color Replacement Tool, which is hidden in the toolbox with the Brush Tool. It has been in Photoshop since CS but over the different versions, it has been placed with different tools. Not sure why it is not used more as I found it very easy to make this change.
Do your original clean up to the image. The last thing to do is use the Color Replacement Tool on the umbrella. Using the Color Replacement Tool, create a brush in the drop-down box. My settings were: Brush size 33 pixels, Hardness 0, Spacing 1%, Angle 0, Roundness 100%, and since I use a Wacom tablet, I set Size and Tolerance to pen pressure. Other settings in the Options Bar were Mode – Color, Sampling – Continuous icon pressed, Limits – Find Edges, Tolerance 30% and Anti-alias checked. Set Foreground color in the color picker to the new color and drag/paint away. Remember the brush only changes the pixels you drag over – try using a selection of the area you are changing to keep the brush from spilling over into other parts of the image if adjusting the Tolerance does notwork. It is amazing how it turns out!
I saved the brush settings as a Tool Preset (upper left icon on Options Bar) for the next time I want to replace a color quickly. (It is saved as a Tool Preset because of all the changes to be saved from the Options Bar that saving as a Brush preset will not retain.)
Try experimenting with some of the other settings. It is also used to get rid of red eye in images. I love it when I learn something new in Photoshop!…..Digital Lady Syd
I Didn’t Know That! Randomizing Gradients
Once again I stumbled upon another interesting feature in Photoshop. I learned from the new Practical Photoshop Magazine that you can actually generate a randomized gradient when in the Gradient Editor. This is not a feature that pops right out at you when looking for it.
- First click on the Gradient Tool and in the Options Bar, double click on the gradient preview window to bring up the Gradient Editor.
- Set the Gradient Type to Noise, Roughness to 100%, and check the Add Transparency box. If not set to Noise, you will never find the button.
- Click the Randomize button several times until you get the lines you like – then click OK
- Now drag the Gradient Tool on your layer to create the gradient.
Below is an image I used a Randomized Gradient to create a colorful background. I threw in a few of my cloud, a bird, tree and grass brushes from some of the posts I have done on my Fun Photoshop Blog.

Totally cool and fun! And now you know…..Digital Lady Syd
I Didn’t Know That! Comparing History States
Well once again I learned another little tidbit this week that really surprised me because basically I had never thought about it! Photoshop allows you to create a document from an earlier History State by just clicking a state you want to look at again, and dragging it down to the bottom of the History Panel’s left icon called “Create New Document from current State.” It will open up another window with the image as it appears in the older state. Below is an example of a photo I am currently adjusting where a Topaz Adjust Portrait Drama preset was applied (I know it is a landscape type image but it works!) and then a Nik Color Efex Pro Tonal Contrast filter was applied next. I wanted to compare the later combined filter state to the earlier Topaz Adjust only state. Pretty cool, huh?
There are those times when you just need to compare something you did before and this is perfect! Remember though, that you lose your History States when you close out of Photoshop so save that extra window if you want to keep the image for comparison. Later….Digital Lady Syd
I Didn’t Know That! Curves Adjustment Layers
Every now and then I find something that makes me go – “Wow – I didn’t know that!” Last week I watched a video by Moose Peterson, one of the very best wildlife photographers, called “Finishing Techniques using Nik Software.” Listen to this video if you have time – some very interesting images and processing tips are included.

In the image above of the Scottish Highlands, I used the Curves Adjustment Layer set to -1 Exposure Compensation so I could darken the foreground a bit and some parts of the clouds – the image was overall much brighter. The layer mask was then filled with black. With a white soft paintbrush set to 20% opacity, I painted over any areas that needed to be darkened slightly. The Curves Adjustment Layer was duplicated because I liked the vignette effect it was creating.
This tip could become very useful, if for example, you discover an image you really like is just a bit over-exposed. In Photoshop a Curves Adjustment Layer set as shown above could bring just a bit of contrast back into the image, as if you had adjusted the shot when taking the picture. Try using a +1 Exposure Compensation Curves Adjustment Layer if parts of an image need to be lightened a bit.
It had never occurred to me what I was really doing with the Curves Adjustment Layer. Thank you Moose! Hope this tip helped you a bit…..Digital Lady Syd
The Ruler Tool Rules in Photoshop CS5!
Have you ever gotten all the way through an image and suddenly realized that your horizon line is off just a tad and it starts driving you crazy? I try to straighten my images in Adobe Lightroom as a first step before I do anything, but there are times the horizon just gets messed up. I personally have never liked fixing horizons in Photoshop – I thought it was very cumbersome. Along comes CS5 with little known enhancement.
- First go to the Eyedropper Tool and select the Ruler Tool in the fly-out menu.
- Click and drag a line along the crooked horizon.
- Go to Options Bar and select the Straighten Button.
Voila, your horizon is straightened and cropped in one big swoop! By the way, if you do not want the image cropped, just straightened, hold down the ALT key when clicking the Straighten Button.

Sometimes it is not so obvious which is the horizon line as in the image above – it is easy to line up with the wrong horizontal or vertical line. Above is a before and after I used the Ruler Tool – it is a subtle but important difference. (Applied a Vintage preset in Adobe Lightroom to get the nostalgic look.) Hope this was helpful!…..Digital Lady Syd


