
A Glowing Tiger
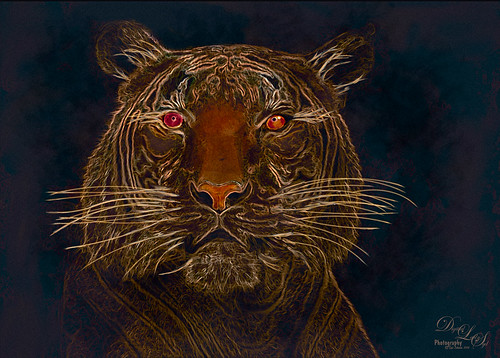
This image of a Malaysian Tiger was used to get this rather different glowing effect. This image took a whole lot of time to do with lots of layers which I will not bore you with this time. A old tutorial I found in the Photoshop Creative Collection 9 called Make a Glow Effect was used to create this look. The basic steps are to sharpen the image using the Unsharp Mask Filter, the Glowing Edges filter and several Adjustments Layers to adjust the color and luminosity of the image. A layer style was used to enhance the glow. The whole process is pretty nice but I found it very complicated to get the final look. It was a lot of fun to try something totally different……Digital Lady Syd
Deer on a Fountain
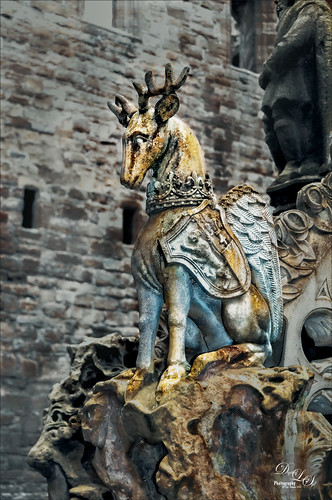
This image is of a a fountain built in 1538 by James V at the old Linlithgow Palace in Scotland – it has been known to flow with wine on a few occasions. This actual center fountain is not this colorful, but these colors came from the image itself so I imagine at some time it was quite beautiful. I loved the regal look of this deer statue on the fountain. On1 (see sidebar for website link) Photo Raw Effects 2018 made this image really nice and sharp – used Overall Settings filters of Dynamic Contrast (which really adds the nice detail to just the deer), Glow (47% opacity) and Color Enhancer, and Local Adjustments of Vibrance to just the deer at 57% layer opacity. On a stamped layer, Topaz ReStyle (see sidebar for website link) Zambezi Zest preset was applied. Nik Viveza 2, a Black and White Adjustment Layer and several Curves Adjustment Layers were used to get the final look. On a New Layer a white Spotlight Effect was added to the deer head to draw the eye. That was it. Wonderful place to visit and explore!…..Digital Lady Syd
A Golden Snow on a Clock Tower
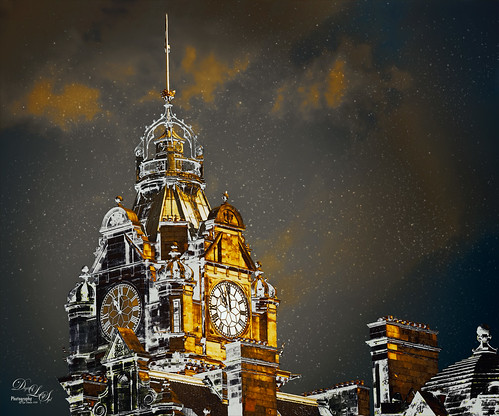
If you have ever been to Edinburgh, Scotland, you will probably recognize the historic Balmoral Hotel and Clock Tower that is near the Train Station (since 1902 the clock is set 3 minutes fast so people do not miss their trains). I was just playing around with the image thinking it might make a nice black and white image when I can up with this result. Started with a rather vintage looking preset from my LR 4 days. It gave that really nice warm feel that looked nice. Then it was cropped and Lucis Pro (no longer available) was applied to overall sharpen the image – it was way overdone. Not sure why I tried this, but I set the layer to Divide blend mode and got all this wonderful snow on the shadow side of the tower! A black layer mask was added to hide most of the effect and just painted in the white snow areas. The layer was then set to 92% layer opacity to let some of the sharpness show through. On a New Layer a particle brush created from Corey Barker’s video called Corey’s Universal Particle Brush was used to add the falling snow effect and set to 59% layer opacity. It looked pretty nice just this way. On a stamped layer (CTRL+ALT+SHIFT+E), Topaz (see sidebar for website link) ReStyle – one of my very favorite Topaz filters – was opened and this is basically what it looked like by using the Peat and Rock preset. This is why I love this filter – you always get some interesting results you had not thought of trying. It has not been incorporated with their Topaz Studio interface yet. Next used the Matt K vignette technique (see my How to Create a Subtle Vignette blog) to create a soft vignette effect. I kind of like the illustrative look created by using the Divide blend mode on this image. Lots of fun here!…..Digital Lady Syd
Festive Water Lilies

These water lilies were shot at the Philip Hulitar Sculpture Garden in Palm Beach, Florida. I decided to add a little color to them so this is how I did it. First did just the basic adjustments and a little highlighting on the leaves in Lightroom. In Photoshop, Luminar 2018 (see sidebar for website link) was opened on a duplicate layer and the Silver Fade preset was selected. (These settings were then changed: Color Temp: Temp 49, Tint 42; Tone: Contrast 11; Smart Tone 35, Highlights -41, Shadows 20, White -13, Blacks 20; Sat/Vibrance: Sat -30, Vibrance 58; HSL – Hue Yellow -21 and Green -20/Sat Red 7, orange 4, Yellow -25, Green -25, Aqua 16, Blue 5, Magenta -7; Lum Red 7, orange 7, Yellow -2, and Blue 5; Filters Amount 61.) A New Layer was created in Luminar and the Details Enhancer filter was added (Small Details 44, Medium Details 42, and Large Details 27). On another New Layer in Luminar, the Dodge and Burn Brush Filter was selected (Amount 100; used the Darken brush at 50% and then 16% to paint in dark areas within the whole image; used Lighten at 16% Strength to paint in the light parts of the pin flowers). Thought I would give you the detailed info so you can see that Luminar 2018 can build up some interesting effects by using different filters on different layers within their own software interface. Back in PS, the Luminar layer was set to Overlay blend mode at 50% layer opacity. On a stamped layer (CTRL+ALT+SHIFT+E), Topaz (see sidebar for website link) ReStyle was used to give the beautiful overall color scheme – it was from one of the presets I had created a long time ago so I am not sure what original preset was used. On another stamped layer, applied Nik Viveza 2 which really lit up all the colors. One of my free Double Edged Frames – Photoshop Layer Styles was used to finish up – the frame colors were sampled from the image.
Merry Christmas from Digital Lady Syd!
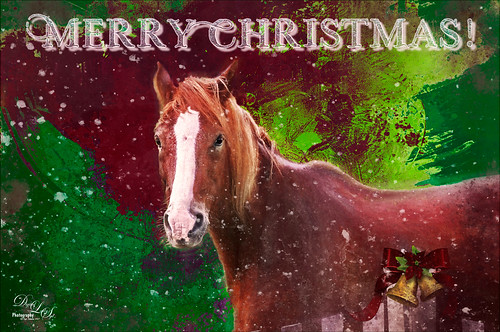
Wishing everyone a Merry Christmas here at Digital Lady Syd’s Tidbits Blog! This lovely horse image was taken in Belarus a while ago – for some reason I felt like adding some painterly Christmas effects to him. He definitely was checking me and my camera out. Normal LR changes and then in PS, Lucis Pro was used to sharpen the image. On a duplicate layer above, Topaz Studio was opened and a Topaz Impression preset called Chalk Smudge was applied. Next I did a selection of the horse. Underneath one of Jai Johnson’s Unpredictable PNG’s was added. A Hue/Saturation Adjustment Layer was used to create the Christmas colors. And under that, a solid blue-filled New Layer was added above the the background from keep white from showing through. On top a New Layer using Kyle’s Spatter Brush Beautiful Mess (comes with PS CC) was used in darkish red to create a subtle vignette. The eyes were sharpened with a Curves Adjustment Layer. A Black and White Adjustment Layer was set to Luminosity at 82% layer opacity. Texture Mate’s original starfield texture was added for the snow effect – set to Screen blend mode at 68%layer opacity. The Font is called Winter Holidays with a Bevel & Emboss, Outer Glow, and Drop Shadow Layer Styles added. That is about it. Hope everyone has a wonderful holiday season!…..Digital Lady Syd
Posing!
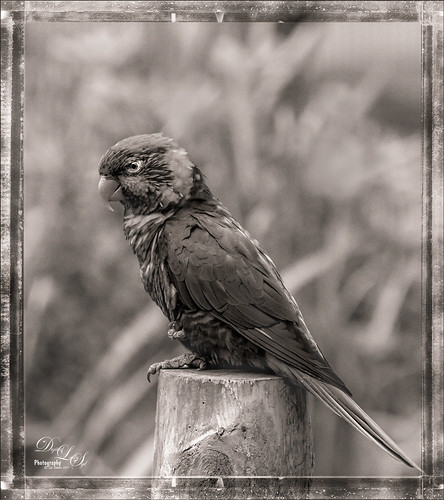
In honor of a sweet little brown bird that was caught in my screened-in porch since Wednesday (he actually trotted out the door once we calmed him down), I decided work on a bird image just to see what a colorful would look like in a basic brown bird look. This image was first processed in On1 Photo Raw 2018 (see sidebar for website link) and then finished up in Photoshop. Followed Steven Dempsey’s short video called Using Color Temperature with B/W Images in On1 Photo Raw 2018. Followed most of the steps using my own settings of course. Then in Photoshop’s Camera Raw filter, applied one of my favorite Split Toning presets, Nick Brandt’s Animal Sepia (Highlights Hue 23 and Saturation 6 and Shadows 41 and Saturation 6). Several Curves Adjustment Layers were used on the eye and beak. Lightened the background slightly with another Curves Adjustment Layer and painted the bird back in the layer mask. I think the On1 workflow for this type of image was very good……Digital Lady Syd
Just Saying Hi!
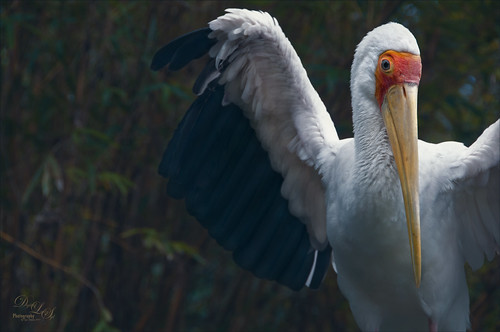
This beautiful big yellow-billed crane lives at the Jacksonville Zoo and I believe he is in charge of the aviary as he greets every person who walks through the door. I have never seen such a tame big bird and he will give you quite a show. This guy did a complete 360 wing spread for me while I was about 6 feet from him. Just a few basic adjustments were done in Lightroom. Once in Photoshop, Lucis Pro (no longer available) was used to slightly sharpen the bird’s face and beak and to define a few feathers (used a black layer mask and just painted back those areas). On a New Layer painted in a little white spotlight at very low opacity to lighten up lower wing area. Used a Selective Color Adjustment Layer to brighten the beak yellow just a little. Used a Curves Adjustment Layer to lighten his eye. Added the Foggy Night Color Lookup Adjustment Layer preset set to 57% layer opacity. Not much to this image as it was pretty nice as shot…..Digital Lady Syd
Turn Around
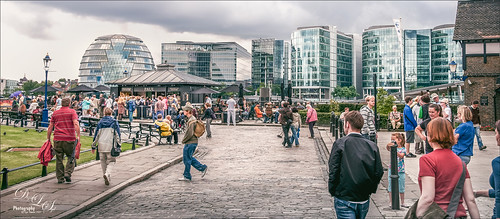
Good example of the image that is behind you – was actually going into the Tower of London tour and this was behind me. I love all the people doing all kinds of things and the buildings look so modern compared to where I was going! I am so glad I turned around – need to remember to do this more often. Not much was done with image – it is not an HDR – pretty much out of camera. A little was done in Camera Raw using a couple graduated filters and radial filters and the image was cropped more to a panorama size. That was about it……Digital Lady Syd
St. Giles Cathedral
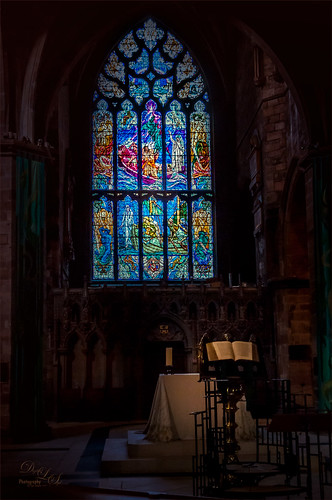
This beautiful stained glass image was taken at St. Giles Cathedral in Edinburgh, Scotland. In Lightroom used Serge Ramelli’s Bad Weather 9 preset as a starting point and added my own highlights and gradients. Not much was done in Photoshop – just some clean up, Nik Viveza 2 where 4 control points were placed in image with 2 on the glass and 1 on the Bible. A little noiseware was used on the image and a Gradient Fill Layer to darken the top slightly. That was it. There really is a lot of detail in the shot if seen at a larger size……Digital Lady Syd
Harvesting Orange
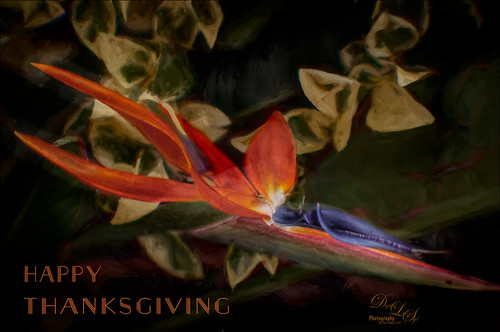
Wishing everyone a very Happy Thanksgiving in the US with this perfectly colored Bird of Paradise bloom that was growing in my front yard. Used setting from Urban Walk 15 Vintage Street preset in Lightroom. In Photoshop just practiced some of the things I have been learning about the various plug-ins filters. This image used Topaz Studio’s (see sidebar for website link) Impression default with some slider changes including the Painting Progress slider at 0.60 – then painted out most of the effect off the flower. Then the Precision Contrast filter was applied at 0.84 opacity and the Lighting Shadow set way down to give it a very dark background. Back in PS, On1 Photo Raw 2018 (see sidebar for website link) Effects was opened and their Glow Filter Orton Hear a Who preset at 75% opacity and the Noise Reduction filter Shadows preset was applied. A little burning was done on a layer above to emphasize some of the flower lines a little. (See my How to Create a Subtle Dodge and Burn Effect blog.) Some selective sharpening was done with a 50% gray layer and painting was done on the flowers using my SJ Pastel 3 Brush (see my How to Create my Favorite Brush blog). On a layer on top, a Spotlight Effect was created on the flower (see my How to Add a Spot of Light blog). The last step added the text using Naive Deco Sans font. Enjoy the holiday!…..Digital Lady Syd
A Beautiful View
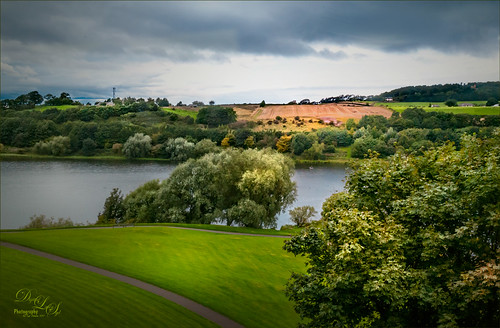
Loved this view of the Scottish countryside taken from a window in Linlithgow Palace – this is the palace where Mary, Queen of Scots was born in 1542 and lived for 7 months but did not return for another 20 years. Lots of interesting history here. Started adjusting this image in Lightroom doing Basic Panel adjustments. In Photoshop on a duplicate layer, Lucis Pro (no longer available) was applied, then a black mask added and painted back just areas that needed more definition. On a stamped layer (CTRL+ALT+SHIFT+E) On1 Photo Effects was opened and the Color Enhancer filter, Tone Enhancer, and Textures was used to help especially in the sky area. On another stamped layer Nik Viveza 2 was applied to even out the lighting in the front foreground and midground areas. That was it!…..Digital Lady Syd
Looking for a Dragon Slayer
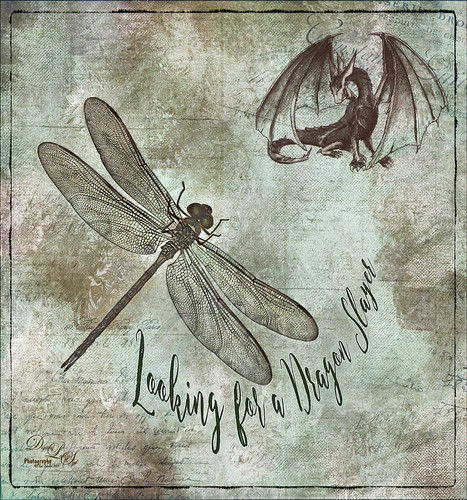
This is an image of a dragon fly that was sleeping upside down on the roof of my front porch. These bugs are huge – like 4 or 5 inch wing span! Anyway, got a good image so decided to play with it and see what effects I could get. What really surprised me is that the background actually came out inside the wings. The fly was selected using the Quick Selection Tool and then taken into Refine and Mask where this really nice detailed selection of the wings was created. A lot of textures were created. These textures were used: 2 Lil’ Owls (see sidebar for website link) Sea Storm Canvas and French Brocante 10 set to Soft Light, and Daily Texture Exploration 7 set to Multiply blend mode at 60% layer opacity. The Sharpen Tool was also used to sharpen the wings. The Dragon is a brush by Rob Marks. Nik Viveza 2 filter was used to even out the background. The font is called Enchanted Brush. Lots of fun to create!…..Digital Lady Syd
Happy Halloween

This Halloween grouping was taken at a local Lowe’s Garden Center on my Android – just could not resist the cuteness of these guys. I would love to have one of those straw looking characters but we do not get many Trick-or-Treaters here so no need to put outside. Anyway, since it was just a JPEG taken on the fly, the image itself needed some work. Only basic adjustments were done in LR, then in Photoshop the first thing done was to run the Shake Reduction Filter to try and sharpen up the edges a little. Next the background was removed using the Quick Selection Tool and Mask and Select command. One of my textures was placed underneath for a background. To further sharpen the image, it was taken into Lucis Pro (no longer available) and it really helped. On a stamped layer, Nik Color Efex Pro 4 using one of the Flypaper recipes presets to get this overall vintage feel – I forgot to write down which preset. So many of them looked good. Two inches were added to the bottom of the image and the Naive Deco Sans font was selected for type. On a New Layer a Mixer blender brush was used to smooth edges. Nik Viveza 2 was applied on a stamped layer to draw focus to the center pumpkin. Last step was to add a Curves Adjustment Layer for a little vintage feel to the overall image. Happy Halloween Everyone!…..Digital Lady Syd
Smokestacks in New York City

The above image is from the Library of Congress and is an image taken of the Business District in Manhattan, New York City, cc1900. Shorpy.com showed it as a blog image and has posted some really interesting info about what buildings were in this original image. What intrigued me is the smoke from all the smokestacks and all the American Flags (I counted at least 160), most flying on top of the buildings. A lot of clean up was done first and the image had to be converted to RBG from Grayscale and reasonable size needed to be set. On a cleaned up stamped image (CTRL+ALT+SHIFT+E), Topaz Studio was opened and one of my uploaded Community presets (SJ Building Sharp) was applied. I did go through and tweak the four adjustments (Basic, Precision Contrast, Precision Detail, and Dehaze) in this preset, but it is pretty much the same settings. The last step in Topaz was to reduce the total effect in the sky – used a Mask Transparency of 0.33 with a brush and then added a Feather of 0.23 in the More Mask Options section. In Photoshop a Color Lookup FoggyNight preset added at 11% layer opacity and Linear Burn blend mode. Two textures from Flypaper were added: Alice set to Overlay blend mode and 100% layer opacity and Villa Adriana set to 36% layer opacity and Overlay blend mode. Last step was to open Nik Viveza 2 and add a little lightness on the buildings facing the sun and in the corners for a subtle vignette effect. Really fun picture to work with……..Digital Lady Syd
On Safari
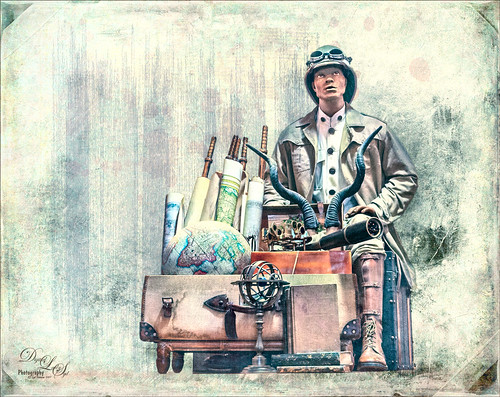
This image was taken at Universal Studios-Florida in a gift shop. I thought it was a very interesting display. Just followed one of my basic image workflows for this one. First selected the display from the background. Then added underneath a Texture from 2 Lil Owls (see sidebar for website link), a texture I created a long time ago set to Darker Color at 46%, and an object of just vertical lines on top of it set to 46%. The actual cut-out layer was opened in Lucis Pro to get the almost illustrative effect. Then some clean up layers and Nik Viveza 2 to direct the eye properly. A Red Channel Luminosity layer, Topaz (see sidebar for website link) ReStyle’s Ash Gray and Eggshell on another layer, and a Camera Raw Filter to add grain were the final steps. That was it. I really like the overall effect…..Digital Lady Syd
Abandoned Texaco Station
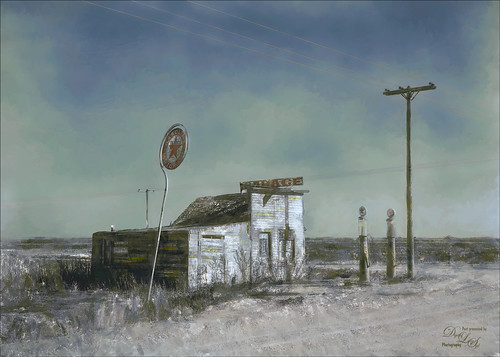
I found this image of an abandoned gas station in 1937 on Highway No. 2 in western North Dakota at Shorpy’s Historic Photo Archive but downloaded the original as a tif file from the Library of Congress. Seemed like a perfect candidate for colorizing in the new Topaz (see sidebar for website link) Studio. When working with these vintage black and white images, you always need to first adjust the resolution and resize it in Photoshop by going to Image -> Image Size command – set to a resolution of 300 by unchecking the Resample button, inserting 300, then rechecking the button to change the size. Next duplicated the layer in PS and opened up Topaz (see sidebar for website link) Studio and selected my SJ Colorize Black and White Image preset (it is up on the Community Site). Then added: Reduce Noise Adjustment and painted out the foreground in a mask so it only affected the sky; Dehaze Adjustment set to a Strength of 0.39 and Suppress Artifacts to 0.82; and Impression Adjustment using the Default settings changing the Stroke type to Stroke 09 and set the Painting Progress slider to 0.27. Back in Photoshop just did my normal workflow although it took a little more work. Used Nik Viveza 2 to adjust the overall image and several painting layers to smooth out the sky. Lots of fun here!…..Digital Lady Syd
Feeding Egret
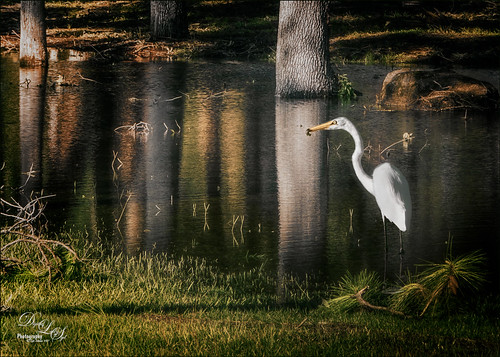
This image was taken in my neighborhood soon after Hurricane Irma visited recently. This is just standing water from the large amount of water received from the storm – it has now almost completely evaporated. Needless to say the birds loved it!
Note much done to this image – most of the processing was done in Topaz Studio, the new free interface for the Topaz plug-ins. (See my Introducing the Free Topaz Studio blog) I am still trying to figure out how to use all the adjustment settings. (Here are the settings used: Basic Adjustment – Exp -0.22, Clarity 0.28, Shadow 0.52, Highlight -0.16, Sat 0.29, Precision Contrast – Micro 0.30, Low 0.10, Medium -0.11, High -0.30, Shadow -0.35, Sat -0.22, Vibrant -0.79, and Color Contrast -0.37; and Radiance 0.28 opacity, Strength 0.11 and Fade 0.38.) A Red Luminosity Curves Adjustment Layer was applied. (See my How to Use a Red Channel to Create a Nice Blended Image Effect blog.) Last step involved using a Selective Color Adjustment Layer and reducing the brightness of the over-powering Yellows. …..Digital Lady Syd
Beautiful Horse
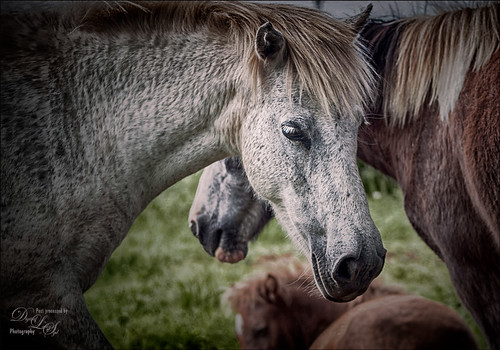
This beautiful image is a stock photo from Deeezy Cute Animals. I wanted to try out a technique that John Paul Caponigro presented on his blog recently called Creative Image Sharpening with HDR Software. This technique is applied to only one image and does not work well on all photos, but I liked the effect on the fur texture. Unfortunately his blog addresses the older version of Nik HDR Efex Pro and the newer free Nik HDR Efex Pro2 is a very different interface. Therefore I had to play around the various settings, but I got what I consider a pretty nice result. There are a couple nice videos on how to use this software at the link also. In this case, only one image was used to increase the detail on the texture (here are the settings I used: Tone Compression 60%, Method Strength 72%, HDR Method Depth subtle, Detail realistic, and Drama natural. Structure was then set to 67%, Blacks move to middle of slider and Whites almost to end). A control point was placed on the horse eye and nose to add a little fine sharpening. A vignette was created. It was fun trying out the filter and it definitely does make the image a lot sharper, but it can look really bad on some images. I always liked the filter for HDR, so definitely continue using it for that if you have it. But if you have an image with some nice texture in it, give this single photo technique a try. …..Digital Lady Syd
A Beautiful Bedroom
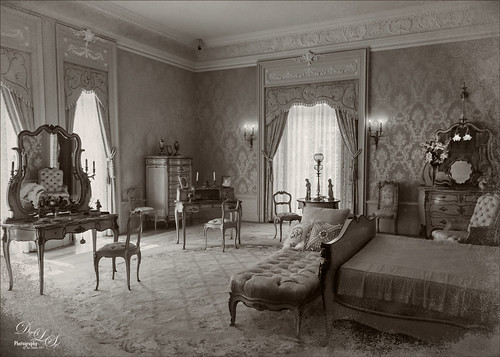
Decided to experiment and turn this Master Bedroom in the Flagler Museum or Whitehall in Palm Beach, Florida, into a monotone color – it just looked pretty after David DuChemin’s Lightroom Develop Preset was applied called B+W Duo-Cool to Warm. It actually was a little too bleached out but this is point that I started in Photoshop. I wanted to have a vintage feel to the image. The actual image was done in bright golds and yellows. The image was sharpened using Lucis Pro (no longer available) and then adding a black layer mask and painting back just some of the detail. An outside border was created using Shadowhouse Creations Heavenly Vintage Texture Set-Lavender Texture which was desaturated (CTRL+SHIFT+U). Nik Viveza 2 was added to sharpen up the left mirror reflection. To add a little color tone to the image, a Color Fill Adjustment Layer was added using a beige-pink color – set to Color blend mode at 54% layer opacity. I really like the overall effect…..Digital Lady Syd
Watching the Sky
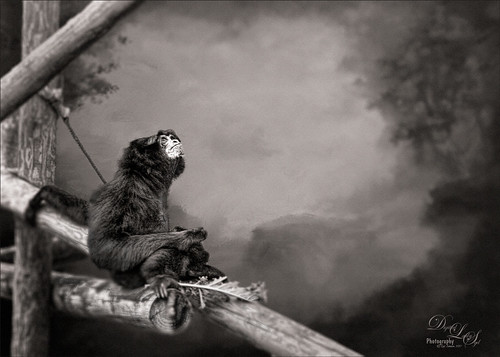
This Siamang Ape lives at the Palm Beach Zoo – he has just finished his breakfast and is getting ready to run to the top of the trees and announce the opening of the Zoo for the other animals. The technique used in this image was presented in a video by Glyn Dewis called Use Photoshop to Take a Picture from Good to Great in 5 Steps – it is based on an effected created by wildlife photographer Nick Brandt. One of my Corel Painter backgrounds was used as a background placed under the ape image. Then used a layer mask to remove the original background. Then basically sharpened the image and then blurred the image in selected areas of the image. Last step involved adding grain into the image. The video goes through most of this. This was a lot of fun to try! Thank you Glyn Dewis for showing us how to do this!….Digital Lady Syd
Beautiful Clouds at Stirling Castle
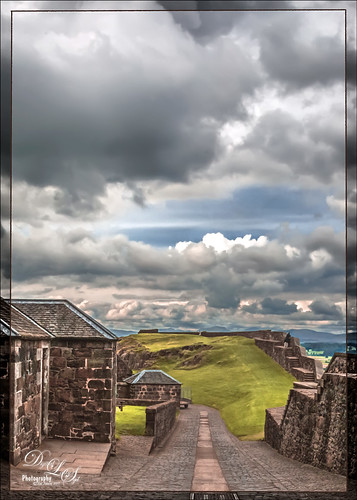
This image was taken at Stirling Castle in Scotland. The sky was so dramatic that there were many different ways to process the clouds, but I settled on a less dramatic and more sunny feel to the image. It was actually quite an overcast day when this image shot. There was not a lot done to this image. Biggest problem was some noise – both Luminance and Color so Adobe Camera Raw was used to clean it up. I can’t remember the last time I had color noise so this was unusual. On a stamped layer, Lucis Pro was applied and the clouds were painted out in a layer mask to keep them from being too crisp. Nik Viveza 2 and a Red Channel Luminance Adjustment Layer was added. Then I realized I had a slightly crooked image so PS Adaptive Wide Angle Filter was used to straighten it up just a little – worked perfectly! (See my How to Use the Adaptive Wide Angle Filter blog.) Then a border was created using single line rectangle, selecting the outside, adding a layer mask to a stamped layer, and clipping a Black & White Adjustment Layer on top. That was it. What a wonderful place to visit!…..Digital Lady Syd
Feeling Happy
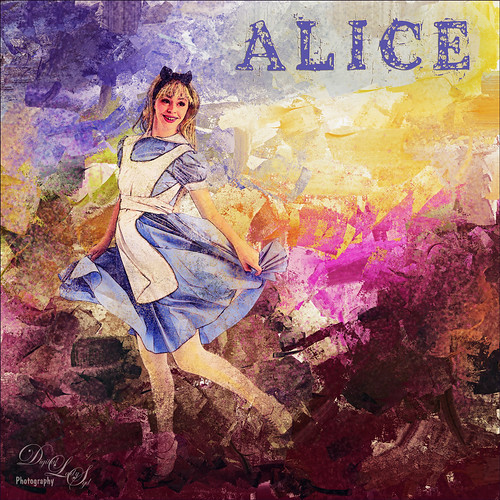
This is a composite image that I created using stock images and a texture I had created in Corel Painter. The beautiful Alice is from Faestock on DeviantArt. The first step was to create a New Document set to 8 inches X 8 inches at 300 dpi. Next the stock image of Alice was added and the girl was selected and removed from the white background. On this cut out image, an effect used by Corey Barker at Creative Live during the 2017 Photoshop Week was applied. I cannot seem to find another source for this effect but Corey has used similar effects in Photoshop User Magazine and a Kelby One blog. Anyway, the basic effect gave Alice a rather gungy look using different brushes in layer masks. The Alice layers were put in a group. Then the texture was added underneath the group. Selective Color Adjustment Layers and a Curves Adjustment Layer were used to blend this all together. Nik Viveza 2 was added to draw focus to her face. The font is the Old Printing Press Free Version. It is fun to make just a care-free image that makes you smile!…..Digital Lady Syd
The Whisker Cactus
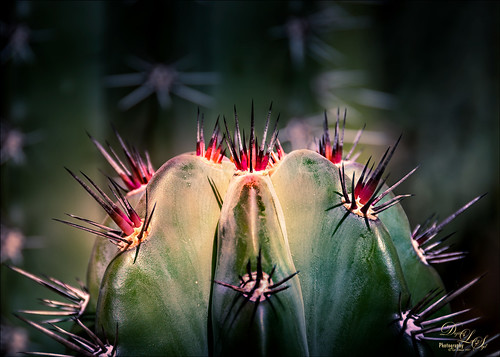
A local hotel in Phoenix, Arizona, labelled this a Whisker Cactus – the red spikes are at the top of the stalk. They had this wonderful cactus garden with several different types. Unfortunately I did not have my macro lens with me, but this image has a pretty nice macro feel to it. A lot of the post-processing was done in Lightroom using the Bad Weather 8 preset by Serge Ramelli with adjustments to the Gradient Filters and Radial Filters. In PS, Lucis Pro (no longer available) was used to just add some texture and sharpening into the cactus only. Nik Viveza 2 was used to emphasize the plant colors. Matt Kloskowski’s technique was used to create a vignette. (See my How to Create a Subtle Vignette blog.) On another layer the Sharpen Tool and Blur Tool was used selectively and a 50% gray Dodge and Burn layer was used on the focal point areas. That was it. These cactus are pretty but incredibly sharp!…..Digital Lady Syd
The Neighborhood Puppy
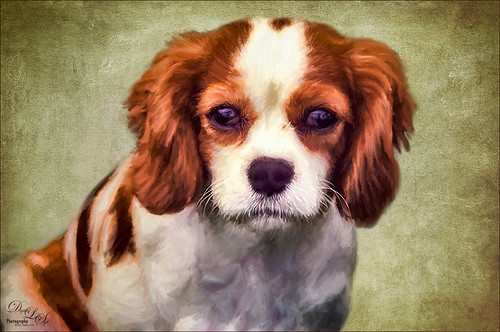
This is one of the cutest puppies I think I have ever seen. Her name is Kaila and I get to play with her every now and then when she is on one of her neighborhood walks. This time she let me take a few images of her, so I thought I would take advantage of this photo and try out a recent Topaz blog called Cartoon Your Critter – Make Your Pet a Work of Art by Taylor Seaton. I did not follow the steps exactly since my image is not really a cartoon effect, but I liked the final results. So how did I get to this point? Well I used Topaz (see sidebar for website link) ReMask, but I also tried Photoshop’s Mask and Select, which gave a great result too, just to see which is is better. (I think the results depend totally on the image IMHO, so if you do not like the results of one, try the other.) I did not like the results Topaz Simplify gave to this image, so Lucis Pro 6.0.9 (unfortunately no longer available) was applied on a duplicate layer of just the selected dog. Again the layer was duplicated and following the Topaz blog, the image was taken into Topaz Impression 2 where the Cartoon Your Critter preset was downloaded from the Community. No changes were made to it. Next Artiste Old Master texture from French Kiss (see sidebar for website link) was placed underneath the dog layer. Topaz has several nice textures in their blog that can be downloaded if a nice one is needed. Then created a stamped layer (CTRL+ALT+SHIFT+E) on top so it can be taken back into Topaz Impression 2. On separate layers above lots of painting with PS was done to add my own painting flair. On another stamped layer Nik Viveza 2 was applied and just a little bit of vignetting was added along with a little work on the nose and mouth. I really like the results. And as always, it was a lot of fun to do!…..Digital Lady Syd


