
Squirrel Resident at Universal Studios

This was probably not the greatest image but I loved the way the squirrel’s tail looked so I had to do some processing on this photo. This shot was actually taken once again at Universal Studios Orlando. I wanted a painterly look, but I did not want to spend a lot of time painting it since it was not the best original image. Trey Radcliff‘s Gradient Endless Weekend Lightroom preset was applied. The photo was opened in Photoshop CC and the Shake Reduction Filter was used. Next Topaz (see sidebar for website link) Detail 3 was used to overall sharpen the image. A black layer mask was added and just the squirrel and the closer plants were painted back. A stamped layer (CTRL+ALT+SHIFT+E) was created and turned into a Smart Object where Alien Skin’s Snap Art 4 was opened. I used a preset I had created in Snap Art 3 based on the Historic Oil Paint preset (settings were Background – Brush Size 14, Photorealism 23, Paint Thickness 77, Stroke Length 63, Color Variation 0, and Bristle Brush Brush Style; Detail Masking – on Squirrel, Effect Detail, Brush Size -10, Photorealism 100, Paint Thickness -40, Stroke Length -49, Color Variation 36 and Brush Style Bristle Brush; and on mid-back leaves, Effect Detail Brush Size 23, Photorealism -59, Paint Thickness 73, Stroke Length 79, Color Variation 85, and Brush Style Bristle Brush; and Colors Brightness -38, Contrast -14, Saturation 33, and Temperature 36; Lighting – Default; and no other settings used). Using Photoshop’s Flat Fan Single Bristle Wet Edge brush as a Mixer, the overly bright spots were blended in on a separate layer. Next Topaz ReStyle Rustic Red and Orange preset was used (the settings used are ReStyle Color Style Lum Third -0.48 and Fifth -0.39; Texture Strength 1.00; Basic Tone Black Level 0.11, Midtones -0.31, and White Level 0.30; and Detail Structure 0.11 and Sharpness 0.73). This turned the image color palette into a bit warmer feel. Nik Viveza 2 was added to add a little more tonality to just the squirrel and add some blue into the sky. The last step was to use Photoshop’s Radial Filter in Camera Raw on just the squirre to draw further attention to him. It was a lot of steps but always fun to do……Digital Lady Syd
The Mighty Tulip

Just another photo of a very colorful red and yellow tulip and some pink daisies from my local grocery store. Just practicing my painting. This time using my basic workflow. Add Seim’s (see sidebar for website link) Power Workflow 4 Magic Flat Light Fixer. Next Topaz (see sidebar for website link) Detail 3 to sharpen up the image a little, and Topaz Simplify to use as a base coat to paint above. On a New Layer above, used Photoshop’s Flat Fan Single Bristle Wet Brush as a regular brush to paint over the yellow tulip and some of the greenery. French Kiss (see sidebar for website link) Atelier GA Brush created in my blog was painted on the next layer. (See my How to Paint with a Texture Brush from Your Image blog for how to make this brush.) Melissa Gallo of Painted Textures Desert Sky Canvas texture was applied twice to create two texture layers, first set to Hard Light at 56% layer opacity, and then set to Color Burn at 24%. Created a Stamped layer (CTRL+ALT+SHIFT+E) on top and then copied the Topaz Detail 3 layer and placed underneath since I had some bad places on the petals. In the stamped layer, added a white layer mask and lightly painted back part of the tulip that were not sharp enough. Then on a New Layer above, used my Chalk 60 brush as a mixer to smooth over the tulip. I decided this image needed some pizazz – it was just too yellow and bright green. On yet another New Layer took my Chalk 60 brush with the texture turned on and painted some bright colored blotches all over it in oranges and yellows and greens and pinks – kind of went crazy. Set this layer to Pin Light. Added a Curves Adjustment Layer and a Levels Adjustment Layer to add contrast. On a stamped layer, Nik Viveza 2 was opened up and Control Points were added to the yellow tulip and the purple daisy in front. Topaz ReStyle was opened on another stamped layer above. (Here are the settings: SJ Very Muted Sepia preset. Changes to preset were: Restyle Opacity 88%; Lum Primary -0.58, Third -0.36, Fourth -0.45, and Fifth 0.30; Texture 1.00; Basic Opacity 23% set to Hard Light blend mode; Color Temperature -0.11; Tone White Level 0.25; and Detail Structure 0.06 and Sharpness 0.83.) The last step involved adding the beautiful Canvas Vignette border by the wonderful Corel Master John Derry – can be downloaded from this link. This is the final image. Okay – it is a bit of workflow, but sometimes it just takes a lot of manipulation to get the look you like!….Digital Lady Syd
The Most Delicious Caramel Apples!
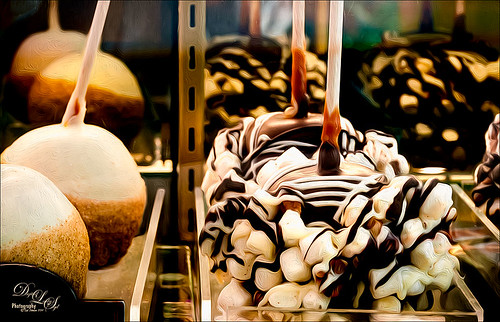
The above is what happens if I am in Photoshop when I am hungry! These delicious Rocky Road Candy Apples were located at Snookers Candy Store in Seuss Land at Universal Studios Orlando. May be the most tasty looking candy apples I have ever seen! Wanted to use this image as an example of just a subtle painterly effect added to an image for just a little enhancement. This image was processed in Lightroom where cropping and Seim’s Workflow 4 (see sidebar for website link) Hill and Lucas preset was applied. Photoshop’s Shake Reduction Filter was applied and it actually sharpened up the image just a little. Did lots of clean up since this was shot through a plastic case. Finally I went into Photoshop CC (CS6 also has it and Pixel Bender still has it for CS5) Oil Paint Filter – I am really sad this filter has been eliminated in the new CC 2014 version – I thought the marshmallows and chocolate would look nice with this effect. (Settings used: Brush Stylization 10, Cleanliness 10, Scale 1.14, Bristle Detail 10, Lighting Angular Direction 300, and Shine 1.35.) A layer mask was added and with my Chalk 60 brush, some of the effect was painted out in areas that looked overdone. To really make the image pop, Nik Viveza was applied – both globally and with control points to add just the right amount of vignette and sharpness. This filter is still just incredible! A Curves Adjustment Layer was added to lighten up the whites just a little more and a layer was used to add some burning to define the marshmallows in the front apple from the one further back. (See my The Best Dodging and Burning Technique! blog.) This was really a fun image to work with and just adding a little painterly effect really made it stand out!…..Digital Lady Syd
The Archaeologist
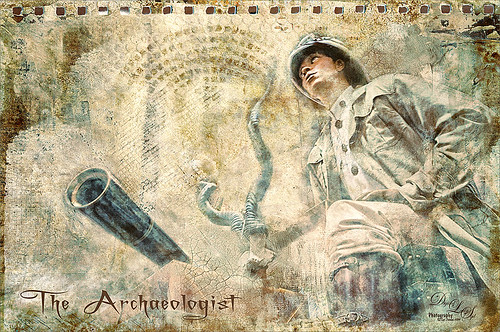
This is part of a really interesting display in one of the gift shops at Universal Studios Orlando. I shot the image up at a rather life-like mannequin and really liked the results. Seims (see sidebar for website link) Power Workflow 4 Magic Flat Light Fixer preset was used in Lightroom. In Photoshop the Shake Reduction Filter and Topaz (see sidebar for website link) Detail 3 was used to sharpen up the whole image. Kim Klassen‘s Autumn Burst was applied on top and a layer mask was added. Using my Chalk 60 brush in the mask at 30% brush opacity, the man and objects were lightly painted back so they show through the texture. Kim’s 1402 magic texture was placed on top and set to Soft Light at 32% layer opacity. Next 2 Lil’ Owls (see sidebar for website link) Ultimate Texture Collection’s Jewel Chalks was set to Divide at 33% layer opacity – this gives the bluish colors in the image. Next a Text layer was added using the font called A Charming Font Superexpanded at 70 pt. On a New Layer the Sharpen Tool was used on the person’s face. Nik’s Viveza 2 was used to sharpen up the face even a little more and to add a slight vignette effect in the corners of the image. That was about it. It turned out to be a really different image and the Difference blend mode turned an ordinary image into something quite interesting……Digital Lady Sydf
My Scottish “Secret Garden”
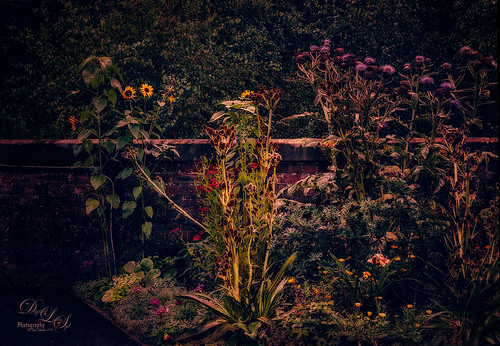
This was a pretty ugly image to start with – very light green and hardly any contrast – it was a good challenge to get something I liked from it! It was taken in some little town in Scotland that was on the way to the highlands. I actually used Topaz (see sidebar for website link) Infocus to sharpen it up a little and it did a pretty good job. This plug-in seems to be a lot like the Sharpen Shake Reduction filter in Photoshop CC. Did some clean up. Created a stamped layer (CTRL+ALT+SHIFT+E) and applied Nik Viveza 2 to the image Helped me direct the attention to the center flowers. Next Topaz ReStyle was applied TRS-Tangerine Gauze preset. (Settings were: no changes to ReStyle section; Basic Temperature 0.13, Tint -0.14, and Saturation 0.06; Tone Black Level -0.59, Midtones -0.12, and White Level 0.34; and Detail Structure -1.00. Masks paintd back the center flowers using Color Aware brush and sampling the green leaves in middle – paint with 1.00 strength and Hardness 0.62 just the center flowers, little pink flowers, and purple thistles.) On a new stamped layer Nik Color Efex Pro plug-in was opened and several filters were stacked. (The filters were: Detail Extractor with Detail set to 69%, Contrast 68% and Saturation 26% and a control point was set on just the center yellow plant; Darken/Lighten Center using Shape 1, Center Lum 39%, Border Lum -57%, and Center Size 44%; Midnight Color Set Neutral, Blur 35%, Contrast 36%, Brightness 65% and Color 77% and overall Opacity 81%; Film Efex Vintage using Film Type 16 and overall Opacity set to 31%; and Vignette Filter Shape 1, Adapt Edges 19%, Transition 38%, Size 27%, and Opacity 43% and the overall Opacity 67%.) On a New Layer did a little edge clean up using my Chalk 60 brush, a Curves Adjustment Layer to add some contrast back into the image, and the Sharpen Tool on the middle plant thistles to emphasize them a little more. This seemed to take a long time. Wanted to show you that with the Color Efex Pro filters, there is usually an overall Opacity slider after the control points section that can really help adjust the filter look the way you want it. Anyway, it was a little “Secret Garden” that I saw!…..Digital Lady Syd
An Oldie but Goodie!
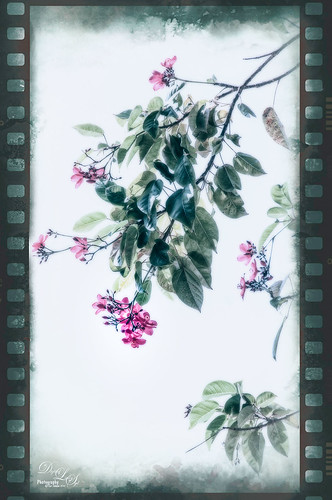
Doing an oldie but goodie of some flowers taken in Hawaii. Image was opened in Nik Color Efex Pro 4 where three different filters were used – Bleach Bypass (Brightness 19%, Sat -41%, Contrast 48%, Local Contrast 62%, Shadows to 2/3 right, and Highlights 1/3 right); Pastel which turned the photo from the yellowish tone to this palette (Method 1, Diffusion 20%, Sat 62%, Contrast 31%, Shadows under d, and Highlights under i); and my favorite Color Efex Pro filter Midnight – Color Set Neutral, Blur 28%, Contrast 40%, Brightness 50%, Color 60%, Shadows 3/4 right), which gives the soft inky feel to the image. The really cool frame is from the now defunct OnOne PhotoFrames called film_35_emulsion_cool_decay_r2_3X5, just in case you still have it loaded – I can’t keep it going on Photoshop CS5 since I have their newer suite. OnOne (see sidebar for website link) Photo Effects 8.5 does still have many of the frames from PhotosFrames, but it is not the same. The last step was to open up the Camera Raw filter and created a Radial Filter around the just the lower tip of the pink flowers (settings Exposure +0.40, Contrast +44, Shadows +34, Clarity +35, Sat +100, and Sharpness +7)……Digital Lady Syd
Scottish Waterway
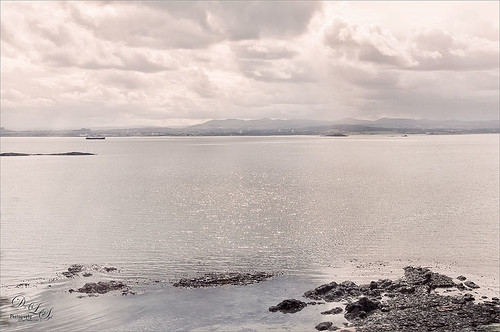
I so love the images I got from Scotland several years ago and I just felt like doing a regular post-processing on an image. This image is probably not the best, but I actually like the total feel of the image so I decided to work on it anyway. The sky in this image is just awesome! So what did I do, well just the basic changes in Lightroom – no presets. In Photoshop the Blur Filter Shake Reduction was used and help a little bit. Also Nik Viveza 2 was used to tone up the foreground rocks. A stamped version (CTRL+ALT+SHIFT+E) was created on top. Next Nik’s Color Efex Pro 4 was opened and Flypaper Textures Fly Shell Collection preset was applied (it contains the Cross Processing and High Key filters) – I am enjoying these presets as Flypaper Textures has created some very nice filter combinations in this set. A couple layers of clean up were done to add some contrast in the background mountains. Then my biggest problem in this image was a little bit of chromatic aberration with red edges around the rocks. I could not get Lightroom to remove them so I still had this issue. This time I added a Black and White Adjustment Layer, filled the mask with black, zoomed way in, and with a small 4 pixel white brush set to 70% brush opacity, painted out the red so it became desaturated. It took a bit of time but it did the trick and now there is no more edge color issues. The last step was to add in a slight pinkish Color Fill Adjustment Layer set to Color blend mode at 20% layer opacity to the whole image – just wanted a little warmer feel to the image. Now I have the view I want to remember!…..Digital Lady Syd
Some Pretty Flowers on an Old Vintage Building
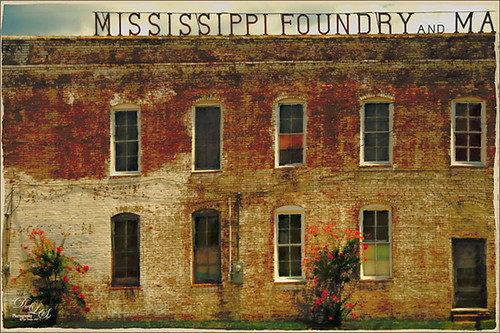
Just an old vintage photo I found that looked like fun to process. A lot of clean up was done on this image and it was straightened by selecting the whole image, then pressing CTRL+T, then the Warp Tool in the Options Bar. This made a huge difference! Don’t forget you can always straighten an image up with the Transform Command, not just Puppet Warp or Perspective Warp. I applied one of my presets in Topaz (see sidebar for website link) Black & White Effects and Topaz Restyle (not sure which preset). A little grunge border was added and that was it. Very simple!…..Digital Lady Syd
The Old Cream Separator
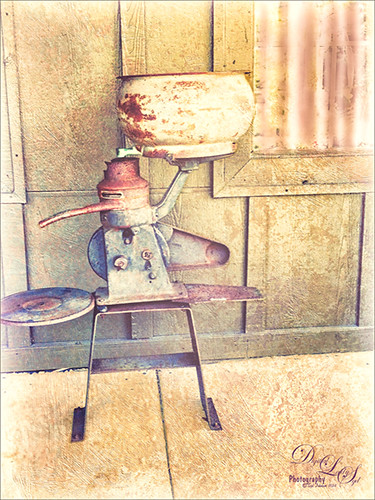
Loved this piece of antique machinery – a vintage cream separator (check out this link if you ever wondered how this works like I did) – that was outside one of our local Cracker Barrel restaurants (and where I bought my office friend Ted). Had to take a picture! I actually opened this image up on an old laptop and applied Nik’s legacy plug-in Color Efex Pro 3.o’s Cross Processing L08 at 80% strength. I did have to paint in some light curtains over the window using my Adobe Chalk 60 Brush set to 19% Angle Jitter to remove the reflections in the glass – used a Gaussian Blur on the layer afterwards to soften the effect. Then Nik’s Analog Efex Pro 2 was used to get the real vintage feel. Just the Basic Adjustments, Lens Vignette, Frames, and Levels & Curves filters were used. What makes this vintage look work is that the Luminosity curve is adjusted to make the object show up sharply. This is my favorite feature in this plug-in! That was it and a really nice vintage effect is achieved!…..Digital Lady Syd
A Little Vintage Dr. Seuss
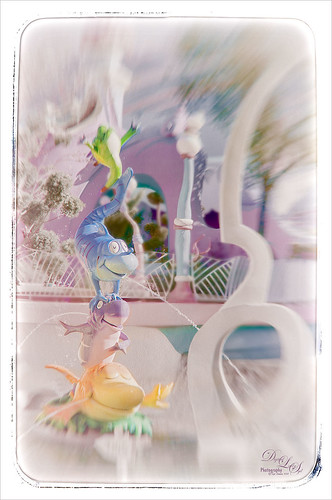
Just another fun shot from Universal Studios-Orlando in Orlando. Apparently I got a lot of what I call “fun” shots and they are fun to process! This image has 2 Lil’ Owl Studios (see sidebar for website link) Transfer Texture 10 added and the main characters painted by on a white layer mask. It was set to Saturation Blend Mode at 100% layer opacity. On a stamped layer (CTRL+ALT+SHIFT+E) above, one of my favorite creative plug-ins, Nik’s Analog Efex Pro 2, was applied – the Zoom feature was used to get the cool blurred background effect. Back in Photoshop on a New Layer, the Sharpen Tool was used to sharpen the faces just a little. That was basically all that was done but I think it turned out really cute!……Digital Lady Syd
More St. Augustine – What a Beautiful City!
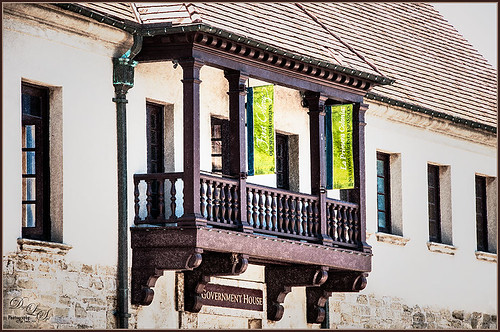
This is an image of the Government House Museum in St. Augustine, Florida – it was the original Courthouse that governed Florida when it was just a territory. Wow – I just realized this image is an optical illusion – it does not look like a rectangle although it is one! In Lightroom Seim’s Power 4 Workflow (see sidebar for website link) Magic Flat Light Fixer preset was applied with some basic changes. In Photoshop Alien Skin Snap Art 4 plug-in was opened and Pencil Sketch was applied with two masks to bring out more detail on the balcony and the stone. Just a Curves Adjustment Level for overall contrast and a Levels Adjustment Layer to add even more contrast but with a black filled mask – just the stones and some parts of the windows were painted back. The last step involved adding the Camera Raw filter and two radial filters to draw focus to the flags and balcony even more. I really love visiting St. Augustine and seeing all the beautiful architecture!…..Digital Lady Syd
A Dr. Seuss Topiary

This image is another one of the adorable topiaries growing at Universal Studios-Orlando in Dr. Seuss Land. This photo was just a fun image to work on – loved the colors. An an old Trey Radcliff preset called Cross-Into the Sky from his Lightroom Presets Volume 1was applied first – liked the slightly vintage look it had. In Photoshop Topaz (see sidebar for website link) Detail 3 was selectively applied where the Highlights were emphasized and shadows were weakened. A black layer mask was added and only the edges of the topiary and the eyes were left sharpened. A Curves Adjustment Layer with the mask converted to black (CTRL+I in mask) was placed on top to the lower part of the topiary. Next Topaz DeNoise 5 set to Overall 73 and Highlights 69 (these are the highest settings I have ever used in this program) were set and on a white layer mask only the lower topiary and the eyes were painted out to keep them sharp. On a New Layer the Sharpen Tool was used again on just the eyes. A Levels Adjustment Layer was added and applied to lower part of the topiary by painting in a black layer mask. Finished up created a stamped (CTRL+ALT+SHIFT+E) layer and added my free SJ Double Edge Frame layer style – sampled an outside color from the image for the frame. Really love this part of the park – very colorful and fun!…..Digital Lady Syd
The Old and the New
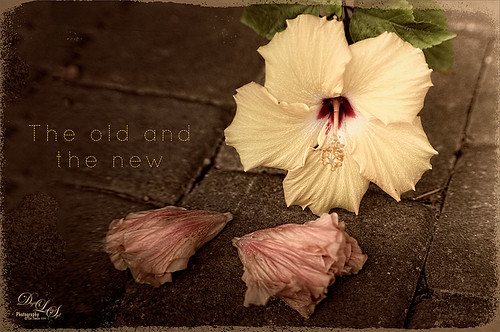
Just a set up image of my beautiful yellow hibiscus blossom and two spent Painted Lady pink blossoms. In Lightroom using Seim’s Power 4 Workflow (see sidebar for website link) Dreamscape preset and Dave Delnea’s LR Develop Custom Tone 002 preset were applied before going into Photoshop. The image size was extended using the Crop Tool: then the Magic Wand Tool to select extra canvas: then Select -> Modify -> Expand 4 pixels; and finally Edit -> Content Aware Fill. Got pretty good results! Used Topaz (see sidebar for website link) Detail 3 to overall sharpen the image, and then OnOne (see sidebar for website link) Perfect Effects 8 and Nicol S. Young’s Daydream preset set to 68% layer opacity. The text font is Quicksand. Just a little grunge frame added on top. I love the soft pastel colors of the blooms……Digital Lady Syd
Love the Tryptych in Nik Analog Efex Pro 2!
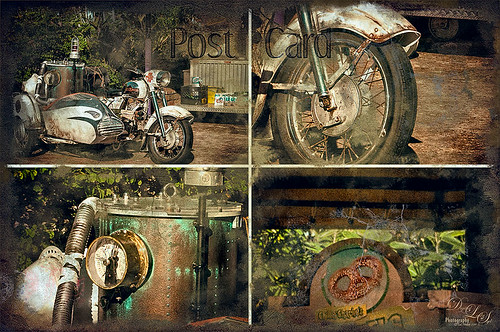
Universal Studios Orlando has so many interesting shooting places – this would have looked great with a person sitting on the bike too. Used the new updated Nik Analog Efex Pro 2 to get this great four image triptych effect. It uses the same image but each section can be manipulated individually. This is a lot of fun to do with an image that has a lot of areas to look at closely. The filters used in this plug-in were the Basic Adjustments with Detail Extraction at 66% and Brightness at -17%; Film Type Bolton 3 at 91% Strength; and Multilens with Variation Strength set to 73% and Variation Type 5. Back in Photoshop Shadowhouse Creations Old Post Set PCB texture (a free download) was added on top. A white layer mask was added and with my Charcoal Brush (Adobe’s Charcoal Brush 60 with an added 19% Angle Jitter in Shape Dynamics section of the Brush Panel to get a different angle with each stroke), the areas I wanted showing were painted back in leaving an interesting border effect. A Curves Adjustment Layer was added to bring back some contrast and a New Layer was used to paint in a little grunge for more vintage feel. On a New Layer, the Sharpen Tool was used to just sharpen up the focal areas in each section. The last step involved added Topaz (see sidebar for website link) ReStyle using the Peat and Rock Preset at 74% opacity. This really popped the image. This was lots of fun to work on!…..Digital Lady Syd
Digital Lady Syd Related Blogs:
How About That Update to Nik Analog Efex Pro 2?
“But we can have lots of good fun that is funny!”
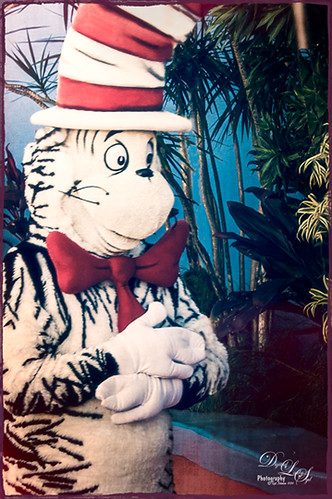
This fun shot is of the Cat in the Hat character in Dr. Seuss Land at Universal Studios Orlando. (Title quote from The Cat in the Hat book.) In Lightroom Seim Effects (see sidebar for website link) Super HDR X and Dave Delnea‘s Backlit Vertical Left presets were applied – these are probably the best sets of Lightroom presets I own! In Photoshop some basic clean up was done before OnOne’s (see sidebar for website link) Perfect Effects 8 plug-in was opened and Jacob Lucas Old Mans Chair preset (supplied by OnOne and one of my favorite Perfect Effects presets) was applied. Back in Photoshop the Sharpen Tool was used on the eyes and hands. Last a basic thin grunge border was applied using a dark purple Color Fill Adjustment Layer clipped to it (ALT+click between the layers to clip). That was it! Such a cute character in this fun part of the theme park……Digital Lady Syd
Where Am I?

OK – the owls in the birdcages should be the big clue if you are a Harry Potter fan! Just another shot taken at the Wizarding World of Harry Potter in Universal Studios Orlando, Florida. Even though this window shot of the owl and school supply store was not the greatest, I really liked it. Some of the reflections in the panes actually show the high tops of the buildings on the other side of the street – so Harry Potterish! Felt this image needed a quick fix with the newly updated Nik Analog Efex Pro 2 since the whole Harry Potter feel is rather dark and vintage. In Lightroom just some basic adjustments and Seim Effects PW4 (see sidebar for website link) Sampler Magic Shade Fixer preset – a free download of some marvelous presets. Since I was going to use the Adaptive Wide Angle Filter in Photoshop, the Lens Profile was turned off. In Photoshop my go-to filter, Topaz (see sidebar for website link) Detail 3 was used and then the Adaptive Wide Angle filter was opened to straighten up all the unsquare window panes – did a pretty good job I think. Next Nik’s Analog Efex Pro 2 was applied using Basic Adjustments, Light Leaks, Lens Vignette, Film Type, Frames, and Levels & Curves which really gave the image the real vintage feel. Back in Photoshop a vignette was created by using a Curves Adjustment Layer to darken the image overall and then paint back with a large soft white brush the lower center focal point to direct the eye. The last step involved using the Sharpen Tool on a New Layer to sharpen up the owls just a little. Done! Love this new update from Nik!…..Digital Lady Syd
Digital Lady Syd Related Blogs:
How to Use the Adaptive Wide Angle Filter
How About That Update to Nik Analog Efex Pro 2?
The Candy Store Staircase

Just had to give a painterly look to this cute pink spiral stairway in a candy store in Harry Potter Land at Universal Studios Orlando. The original was not that great an image – not real sharp and or straight. I really liked the shot though so by adding Alien Skin Snap Art 4 plug-in and the Pastel preset on it, it became a really nice image. To be honest, this image took a long time to get the effect I wanted even with this great filter effect. The Camera Raw Filter’s Radial Filter was added to the light in upper left to make it the focal point and lighten it up a little more. Several Curve, Levels, and Selective Color Adjustments Layers were added. Several clean up and painted layers were added and even my Snow Overlay-slight blur was added at 6% layer opacity to add in a little white canvas feel. The last step was adding a simple painted border that I created in Painter. I have to say that Snap Art really does a pretty good job of painting…..Digital Lady Syd
Digital Lady Syd Related Blogs:
Digital Lady Syd Review Alien Skin Snap Art 4
Digital Lady Syd Reviews Alien Skin Snap Art 3
A Blast from the Past!
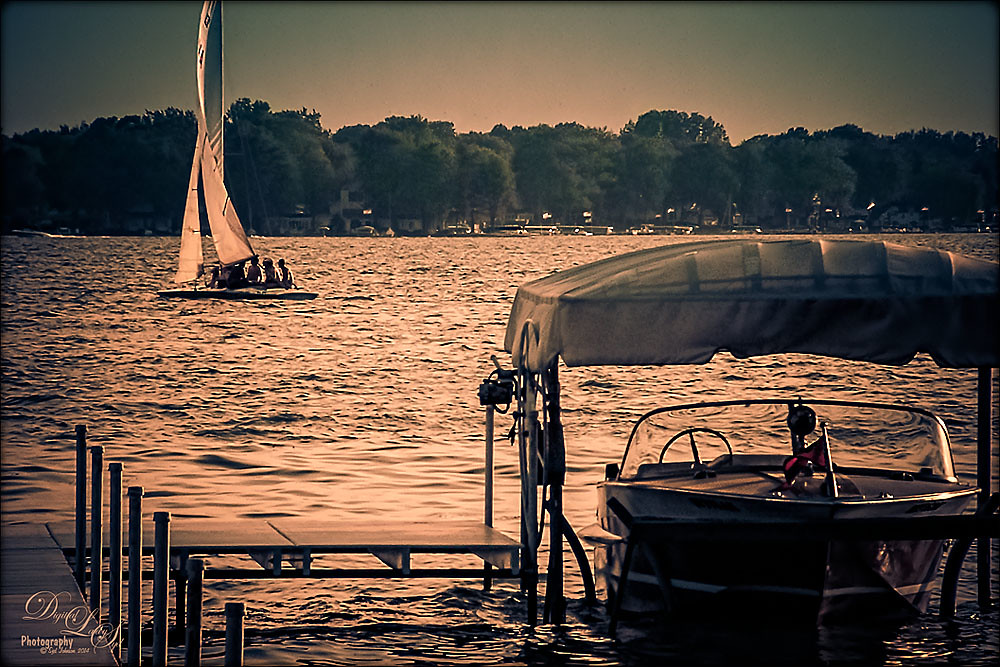
Got an E-mail from an old lake friend yesterday so I thought I would post this shot for him and my old “lake” family of a place I will always remember as “home.” If you are in the vicinity in Indiana, check out Lake Wawasee – a beautiful fresh water lake. This image was taken with my old 2 mg Casio QV-2900 UX Digital Camera – my first digital camera. It actually did a pretty good job. Trey Radcliff’s Friday Night of Regrets Lightroom preset was applied first before opening Photoshop. Topaz (see sidebar for website link) Detail 3’s Feature Enhancement II was applied next. A Selective Color Adjustment was used to add a little more green color into the background trees that look washed out. The mask was filled with black and just the trees painted back with a very low opacity brush. Two New Layers were created and both set to Overlay blend mode. The tree edges were painted in the dark areas with a black brush on one layer and a white brush was used to paint in tree highlights on the other layer using a brushes set to 12% layer opacity. The layer opacities were then lowered. The Sharpen Tool was used on the houses on the shoreline and a Curves Layer Adjustment Layer was added and set to 50% layer opacity. Probably more info than you ever wanted to know, but it is nice to see that some of the newer Photoshop technology and tricks can perk up those older digital photos!…..Digital Lady Syd
Digital Lady Syd Related Blogs:
The Best Dodging and Burning Technique!
Turning the Old into the New
Beware of Snoozing Cat!
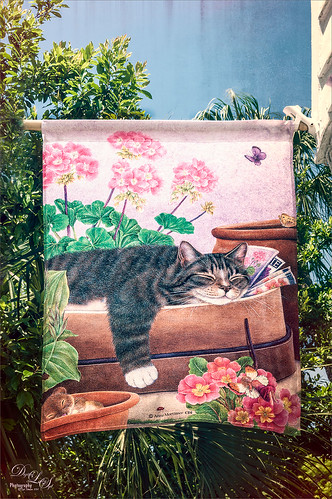
Loved this banner by Anne Mortimer CDI (she does great cat images) outside a darling upstairs cat boutique in St. Augustine, Florida, called City Cat County Cat. (No website so here is their store address: 72B St. George Street, St. Augustine, FL 32084 – definitely worth a stop if you love cats!) If I had a cat, I would buy this! Just basic changes in Lightroom before going into Photoshop. This time I used the Adaptive Lens Filter to straighten up the edges of the banner just a little. On a duplicate layer, OnOne (see sidebar for website link) Perfect Effects was opened and Jason Lucas’ preset Old Man’s Chair (from an OnOne give-away set when you own the suite) was applied and the top Texturizer layer’s opacity was reduced for less Light Leak effect. A Detail Adjustment Layer was added on top in the plug-in and just the cat’s face was sharpened. Back in Photoshop the layer opacity was set to 73%. I created a stamped or composite layer on top (CTRL+ALT+SHIFT+E) and the Sharpen Tool was used just a little bit on the cat’s face and the mouse. That was it – very simple and I really like the preset by Jason – gave a great vintage effect!…..Digital Lady Syd
Digital Lady Syd Related Blogs:
How to Use the Adaptive Wide Angle Lens Filter
My Turtle Friend

Been enjoying my turtle pictures from the Ormond Beach Memorial Art Museum and Garden in Ormond Beach, Florida. This guy was just minding his own business and enjoying the Florida sun when I snapped him. Just basic adjustments were done in Lightroom. In Photoshop I used Nik Viveza 2 to sharpen his turtle lines and to draw focus to his face, and then the Camera Raw filter was applied using the Radial filter for a vignette effect. Really liked how this guy turned – just fun to do!…..Digital Lady Syd
Pretty Hats
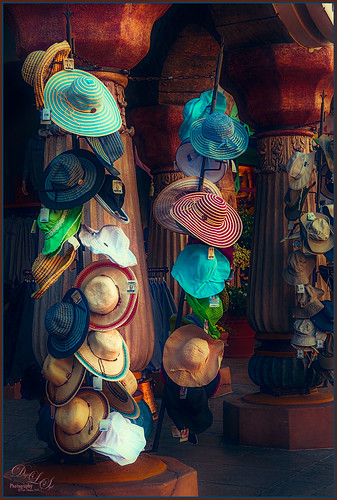
Had to take this image of these really cute hats. Topaz (see sidebar for website link) Detail 3 was applied first in Photoshop to add some general sharpness to the image. Then Topaz Restyle’s Waterloo and Mint preset was added – loved the resulting rich colors that were achieved. The last step was added three Camera Raw Filter Radial Filters to bring the focus of the image on the hats to the left. Add my SJ Thin Double Edge Frame using sampled colors from the image to match. I really enjoyed seeing these hats – so pretty!…..Digital Lady Syd
Soft Pink Calla Lilies!
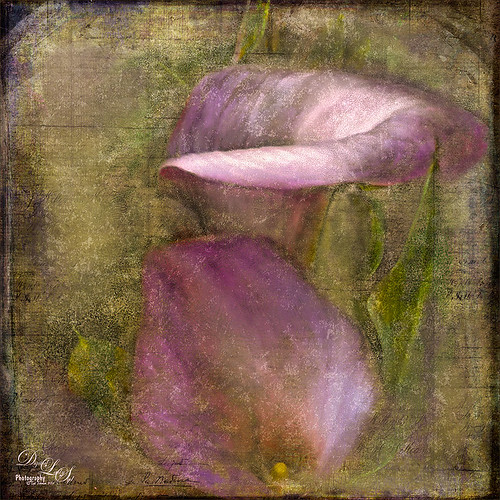
Just wanted to play with this beautiful image of soft pink calla lilies – love their color! Took them with my Android phone in the grocery and loved the result. Did nothing special to them in Lightroom – just the basics, then did a little clean up on the image in Photoshop before adding 2 Lil’ Owls (see sidebar for website link) Carnavale texture. Painted back the flowers in a layers mask attached to the texture and topped it off with Kim Klassen‘s Cloth & Paper Collection’s Magicfilm set to Soft Light blend mode at 45% layer opacity. This completed the vintage feel. The colors just did not look quite right to me and I had a hard time figuring out what to do to get the final look I liked. Then it hit me – go to my favorite plug-in – Nik’s Viveza 2 – and sure enough, with just two control points on the flower petals, I got just the color effect I wanted. Once again, lots of fun to do on boring Monday!…..Digital Lady Syd
Total Eclipse of the Moon!
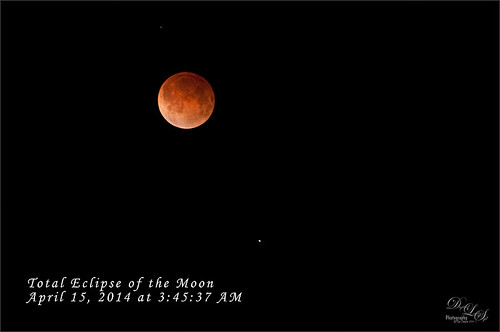
Image of lunar eclipse taken on April 15, 2014 at 03:45:37 AM from northeastern Florida showing what was considered totality according to Astronomy Magazine. Image was shot with my AF-S Nikkor 70-300 mm 1:4.5-5.6 G lens set to aperture priority mode at F/5.6, 300 mm focal length (with crop factor 450 mm), and ISO 1600, with a resulting shutter speed of 2.0 sec. My Nikon D300 was set up on a tripod with a shutter release cord to get the sharpest results. Unfortunately the sky was not all that clear when the photos were being shot and my equipment is not the latest, but all in all, I think it did a fair job of getting a beautiful lunar eclipse shot. No post-processing in Lightroom – just did not help. Took image into Photoshop and used Topaz (see sidebar for website link) DeNoise (Overall 10, Shadows 34), then applied a black layer mask and just painted in a few areas that really needed it – really not too much adjustment here even though my camera does not handle ISO 1600 real well. Topaz Detail 3 was applied (here are the settings: Small Details 0.28, Small Details Boost -0.02, Medium Details 0.55, Medium Details Boost 0.15, Large Details 0.61, and Large Details Boost -0.29 – best plug-in around for this type of detail work) and once again a black layer mask was applied and just a few areas were added back to get more detail in the moon surface. The text font is Monotype Corsive at 38 points. That was it! It was so much fun to go out and shoot at night. Also check out my blog of a lunar eclipse taken on 12/21/10 called Shooting a Lunar Eclipse for more info. Have a great day!…..Digital Lady Syd
Lantern at Stetson
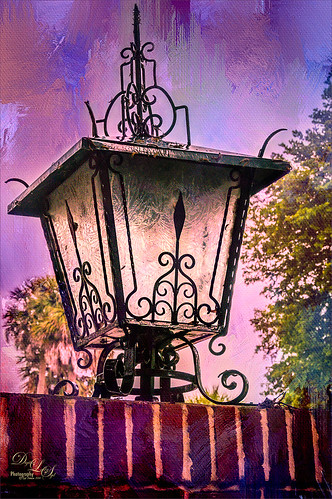
This beautiful large lantern was sitting on top of a large brick wall introducing Stetson University in DeLand, Florida, where my son goes to school. This was an easy image to post-process – just a little detail sharpening using Topaz (see sidebar for website link) Detail 3 so the glass etching could be seen better. Used a black layer mask and just painted back the glass areas. Next I used Mellisa Gallo (one of my favorite texture people) of Painted Textures November Twilight texture set to Linear Light blend mode at 100% layer opacity and April Impasto texture set to Multiply at 52% layer opacity – these were both from great deals she runs on her website each month. The lantern was painted back softly in a layer mask on each texture so the etchings still show up nicely. Now to get the lantern to light up just a little, I tried several different things and it just did not look right. My last attempt was using Nik’s Viveza 2 and setting a Control Point in the lantern. Then the Warmth was set to 44%, Brightness 36%, Contrast -32%, Saturation 52%, and Shadow Adjustments 100% to get the soft glow in the lantern. This filter never lets me down! Anyway, this image is just the way I wanted it!…..Digital Lady Syd


